Waterproofing between sub-floor, wall, and trailer frame

Anything to do with mechanical, construction etc

Waterproofing between sub-floor, wall, and trailer frame

Postby WayneW » Wed Sep 29, 2010 1:41 pm

As a long-time owner of a leaky trailer, I have witnessed first hand the damage water can do to an RV. Now that I am getting ready to build my own trailer, I want to make sure my design is weather resistant. My first concern is having resting water in the cracks between the metal trailer frame and the sub-floor and outside walls. Can any of you give tips on what has worked for you and what didn't work?

I have seen three or four basic designs:
1. The sub floor is slightly narrower than the trailer frame (by about .75" on each side) and the outside wall rests on top of the trailer frame

W
W
W
WSSSSSSSSSSSSSSSSSSSS
FFF
FFF

(sorry, no graphics for this one. W=wall, S=sub-floor, F=frame.)

2. The sub-floor is the same width as the frame and the outside wall hangs over the frame

W
W
W
WSSSSSSSSSSSSSSSSSSSS
WFFF
WFFF

3. The trailer frame has outside framework and the wood parts rest inside the outer edge of the trailer (I have see this with some purchased trailers where you purchase the trailer frame and you provide 2x6 or 2x8 lumber to build the bed of the trailer)

 W
 W
 W
FWSSSSSSSSSSSSSSSSSSSS
FFFF

4. Finally, some people cantilever the sub-floor over the edge of the frame by several inches (around 6" to 12" based on the pics I have seen)

W
W
W
WSSSSSSSSSSSSSSSSSSSS
          FFF
          FFF

With design 1, I worry about water getting trapped between the outside wall and the trailer frame and soaking into the plywood or seeping into the crack between the outside wall and the sub-floor. With design 2 I worry a little about water seeping between the outside wall and the frame, but also about the outside wall falling off as I drive down those washboard roads :-). Design 3 has obvious concerns about basic rain water running down the side of the trailer and seeping between the frame and the wood (I plan to build my own trailer with 2x2 and/or 2x3 tubing, so I this design is not really a concern for me personally). With design 4, I'm less worried about water and more about the strength of the outside edge of the trailer. I don't expect to do any extreme off-road driving, but I will probably hit a lot of washboard roads.

Any advice you can give is most graciously received.
User avatar
WayneW
Teardrop Builder
 
Posts: 27
Joined: Wed Aug 25, 2010 3:17 pm
Location: Lehi, Utah

Postby aggie79 » Wed Sep 29, 2010 4:03 pm

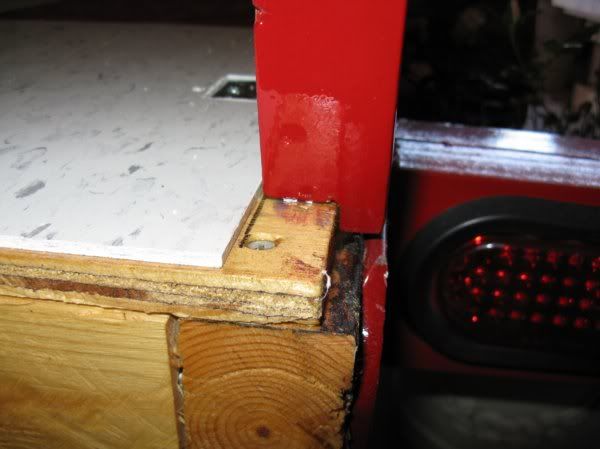
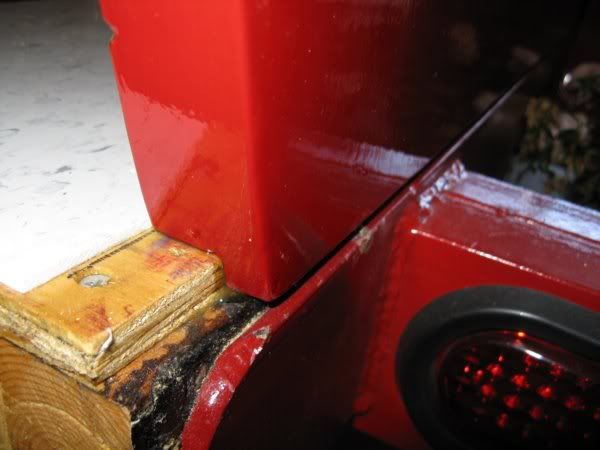
I did a version of #2.

The main difference is there is a 1/4" gap between the portion of the wall that overhangs the frame and the frame. I figured that water could get in there, but it would dry out.

WW
WW
WW
WW
WSSSSSSSSSS
WSSSSSSSSSS
W FFFF
W FFFF
Tom (& Linda)
For build info on our former Silver Beatle teardrop:
Build Thread

93503
User avatar
aggie79
Super Duper Lifetime Member
 
Posts: 5405
Images: 686
Joined: Tue Aug 07, 2007 5:42 pm
Location: Watauga, Texas

Postby planovet » Wed Sep 29, 2010 4:19 pm

Maybe this will help:

Image
ImageMark (& Cindi)
Visit our website: Little Swiss Teardrop

I was wondering why the water balloon was getting bigger... and then it hit me.

ImageImageImageImage
User avatar
planovet
The Cat Man
 
Posts: 5583
Images: 3
Joined: Tue Nov 27, 2007 4:48 pm
Location: Plano, Texas
Top

Postby planovet » Wed Sep 29, 2010 4:45 pm

My wall attachment was a "hybrid" because of the trailer I used. When I attached the walls, there was a small gap running along the entire length of the trailer. I used silicon caulk to fill the gap and then covered it with diamond plate to cover the gap and add a little protection. I hope it won't leak but we will find out someday.

Image

Image

Image

Image
ImageMark (& Cindi)
Visit our website: Little Swiss Teardrop

I was wondering why the water balloon was getting bigger... and then it hit me.

ImageImageImageImage
User avatar
planovet
The Cat Man
 
Posts: 5583
Images: 3
Joined: Tue Nov 27, 2007 4:48 pm
Location: Plano, Texas
Top

Postby madjack » Wed Sep 29, 2010 5:01 pm

...a version of #2 with the body wider by 1/8th per side with a small spacer between wall and frame...walls and floor well sealed with epoxy any water that gets into this area is not trapped and will dry quickly...no problems so far................
madjack 8)

p.s. main thing in my mind, is to keep from doing anything which will create a "water trap".......mj
...I have come to believe that, conflict resolution, through violence, is never acceptable.....................mj
User avatar
madjack
Site Admin
 
Posts: 15128
Images: 177
Joined: Thu Dec 02, 2004 5:27 pm
Location: Central Louisiana
Top

Postby George Taylor » Wed Sep 29, 2010 7:26 pm

I used a style similar to #4. I did however use PT pywood for the flooring.
George Taylor
Teardrop Master
 
Posts: 214
Images: 12
Joined: Sat Mar 13, 2010 9:18 pm
Location: New Boston, NH
Top

Postby WayneW » Wed Sep 29, 2010 9:20 pm

Great ideas and great pics. I plan on using roofing tar on the sub-floor. I figured I would paint it up the side of the sub-floor and possibly a couple of inches up the inside of the side wall where it will butt up against the sub-floor. My hope is that will prevent water from seeping up between the side wall and the sub-floor. However, I have not worked with roofing tar (except to patch the chicken coop roof) and I don't know how hard it gets. It seems to me it would need to be a little malleable for that to work.

Madjack and Tom, how long have you had your trailers? I think I am leaning towards doing an overhang with a small breather gap. Mark's diamond plating also really makes the trailer look nice. I've also thought of doing design one and putting a bead of silicon at the seam. Thoughts?

Another thought I had early on was to put heavy gage visqueen between the sub-floor and trailer frame. My first 1994 fifth wheel had this, but I always worried it would trap and hold moisture (turned out the rubber roof was a much bigger concern). My current 2007 trailer does not have it, but the wood is coated with something (not sure what). I think I have ruled out visqueen. Has anyone tried it?
User avatar
WayneW
Teardrop Builder
 
Posts: 27
Joined: Wed Aug 25, 2010 3:17 pm
Location: Lehi, Utah
Top

Postby WayneW » Wed Sep 29, 2010 10:03 pm

Mark (and Cindi), I visited your website. It was well worth the visit and I have added it to my favorites. Your craftsmanship is amazing. I hope mine looks half as nice as yours when I am done.
User avatar
WayneW
Teardrop Builder
 
Posts: 27
Joined: Wed Aug 25, 2010 3:17 pm
Location: Lehi, Utah
Top

Postby madjack » Wed Sep 29, 2010 10:11 pm

...going on the 4th year (or isit 3) with another couple with the first one, which as far as I know is still going strong...FYI, I don't build a sandwich floor, just a single sheet of ply placed directly on the trailer frame and the walls and floor joined with a cleat made of 1x1x1/16th AL angle...all well sealed with epoxy and a wet layer of epoxy applied while joining all together or in the case of the first one, Gorilla Glue........
madjack 8)

p.s once again, the important part is not to build a water trap into your build........mj
...I have come to believe that, conflict resolution, through violence, is never acceptable.....................mj
User avatar
madjack
Site Admin
 
Posts: 15128
Images: 177
Joined: Thu Dec 02, 2004 5:27 pm
Location: Central Louisiana
Top

Postby aggie79 » Thu Sep 30, 2010 8:42 am

Wayne,

My trailer is still not complete so they jury is still out on whether or not the "gap" method works. It is my opinion - nothing based on fact or personal obeservation - that sidewalls that abut the frame may help water wick up the walls.

I did seal the bottom of my teardrop to excess. (I have a bad case of the first time builders overbuild disease.) The floor and sidewall "skirts" got two coats of CPES, one coat of epoxy, and two coats of rubberized automotive undercoating.

Image

My quess is that sealing the floor is more important than whether or not you leave a gap.

Good luck with your build,
Tom
Tom (& Linda)
For build info on our former Silver Beatle teardrop:
Build Thread

93503
User avatar
aggie79
Super Duper Lifetime Member
 
Posts: 5405
Images: 686
Joined: Tue Aug 07, 2007 5:42 pm
Location: Watauga, Texas
Top

Postby David S » Thu Sep 30, 2010 11:59 am

Mine is like # 1 but it is a woody and will have trim hanging down over the frame.I was concerned about the sides wicking water from the frame so I cut a peice of the tape I use around window seats and mounting flanges to keep water out.It is a thin aluminum with the stickiest butyl tar like stuff you every saw.I cut it to 3/4" wide and stuck it on before I set the walls on the frame.I get mine from Pella but it's available at the big blue box in smaller rolls.
User avatar
David S
Donating Member
 
Posts: 218
Images: 53
Joined: Wed Aug 05, 2009 9:18 pm
Location: Rose Hill Kansas
Top

Postby aggie79 » Thu Sep 30, 2010 1:27 pm

David S wrote:I was concerned about the sides wicking water from the frame so I cut a peice of the tape I use around window seats and mounting flanges to keep water out.It is a thin aluminum with the stickiest butyl tar like stuff you every saw.


I used a similar window seal tape on my frame too, before fastening the teardrop shell.

Image
Tom (& Linda)
For build info on our former Silver Beatle teardrop:
Build Thread

93503
User avatar
aggie79
Super Duper Lifetime Member
 
Posts: 5405
Images: 686
Joined: Tue Aug 07, 2007 5:42 pm
Location: Watauga, Texas
Top

Postby OuttaHand » Sat Oct 23, 2010 8:24 am

I'm going to preface my comments with this statement: My trailer is still being built so I have no proof that my technique works. But . . .

I built my walls like your option #2, with one slight exception that I have not heard mentioned above.

I used a construction adhesive called PL Premium between my subfloor and the frame, and between my exterior wall plywood and the frame.

I glued & screwed 1x4's to the sidewall at the appropriate height to allow the sidewall to hang down over the frame, not quite to the bottom.
When I mounted the wall, Iput PL Premium on the inside of the wall plywood where it would hit the frame. I used enough so that I was sure it would squeeze out the bottom. I then bolted the wall to the frame.

You can see all of this on my build journal:
http://webpages.charter.net/outtahand/littletow/index.htm

If you want to jump directly to the subject at hand, click on Page 6 at the top right of my page.

Once all is done, I plan to go back and caulk the seam where the plywood overhangs the frame at the bottom of the plywood. I'm putting CPES on the bottom edge of the plywood first, then I'll finish it off with caulk to make sure water won't have ANY way to wick up in there.

Living in Wisconsin I know what moisture can do to the undersides of vehicles. I thought my method would be the best to ensure no moisture could wick up in there, while also making the entire trailer just a bit stiffer by "gluing" the plywood to the frame along with the bolts.
Teardrop newbie but camping "oldster"
User avatar
OuttaHand
Teardrop Master
 
Posts: 123
Joined: Thu Jan 01, 2009 6:53 pm
Location: Elkhorn, WI
Top

Postby DrCrash » Sat Oct 23, 2010 8:33 am

#2 and the whole thing frame n all sprayed with Rhino lining.
User avatar
DrCrash
The 300 Club
 
Posts: 489
Images: 51
Joined: Wed Feb 27, 2008 12:36 pm
Location: N.W. Corner Ohio
Top


Return to Teardrop Construction Tips & Techniques

Who is online

Users browsing this forum: No registered users and 3 guests