screwless trim?

Anything to do with mechanical, construction etc

screwless trim?

Postby rmclarke » Sat Jan 29, 2011 2:53 am

Hi all,

I finished up the exterior paint job (except for the trim color and logo) and I'm happy with it (two coats of marine epoxy, then 2 coats of oil based primer, and 2 top coats of Valspar oil base deck and floor paint). So now I'm wanting to put some aluminum trim on it, but I reaallly don't like the idea of putting screw holes in the edges of a nice, completely sealed finish.

Since my hopper is angular, I was planning on using 3/4 alum angle 1/16". Wouldn't some sort of poly ureathane adhesive do the job? I've seen 3M 4200 sold locally but I haven't used it. I searched the forum and read about Sikaflex, but can't find that locally. Are there any other brands of adhesives used for such an application? Maybe even some kind of tape?

Image

Image

Image

Image

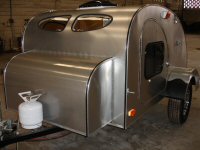
I considered no trim at all, but since my hatch will need aluminum trim (becuz of the way I designed it :duh: ) I thought the rest of the trailer might look kinda funny without it. Sorry I don't have any pics of the hatch yet (it's not fully assembled...you can see it lying inside the trailer in the second picture).

I've really gotta get this thing done so I can camp it in this summer!
:campfire:

Still at it,
Richard
"When a hammer is the only tool you own, every problem begins to look like a nail..."

ImageFrom this: Image to this: Image Finally!!
User avatar
rmclarke
The 300 Club
 
Posts: 384
Images: 231
Joined: Mon Apr 09, 2007 3:22 am
Location: North Jefferson State

Postby madjack » Sat Jan 29, 2011 4:34 am

R, the problem with most adhesives(that will work) is holding them in place until they set up...since you don't need the adhesive/trim to seal the edges, I would look into 3M VHB(very high bond) tape...this is the stuff auto mfgs use to apply trim to autos...good stuff...should be available at an autobody repair/paint supply house...............
madjack 8)
...I have come to believe that, conflict resolution, through violence, is never acceptable.....................mj
User avatar
madjack
Site Admin
 
Posts: 15128
Images: 177
Joined: Thu Dec 02, 2004 5:27 pm
Location: Central Louisiana

Postby Shadow Catcher » Sat Jan 29, 2011 7:21 am

I will go with MadJack on this 3M VHB is one alternative. You can find it on ebay.
User avatar
Shadow Catcher
Donating Member
 
Posts: 6008
Images: 234
Joined: Sat Apr 11, 2009 8:26 pm
Location: Metamora, OH
Top

Postby Rock » Sat Jan 29, 2011 8:48 am

The tape has more of a chance of being reversable as well. If you use the 3M or Sika adhesive you'll almost certainly pull your finish off if you ever have to remove a piece of trim. Plus there's the potential for squeeze out with the adhesive as well.

Eric
Rock
Teardrop Master
 
Posts: 273
Images: 48
Joined: Tue Oct 14, 2008 10:38 am
Location: Fremont, OH
Top

Postby Classic Finn » Sun Jan 30, 2011 6:12 am

I have to agree with Eric dont use the Sika product under the moulding. It is there to stay once applied. Im a Sika product fan and Ive tried this. Works well on mouldings and other things but separating it if needed will ruin your work for sure. ;)
Royal Teardrop Society Scandinavian Bureau Chief of Staff

Image
User avatar
Classic Finn
Midnight Sun Voyager
 
Posts: 17488
Images: 146
Joined: Fri Apr 29, 2005 4:29 am
Location: Country of Finland
Top

Postby Shadow Catcher » Sun Jan 30, 2011 7:10 am

There is a removal procedure for the 3M VHB and it will come off with orange base cleaners.
User avatar
Shadow Catcher
Donating Member
 
Posts: 6008
Images: 234
Joined: Sat Apr 11, 2009 8:26 pm
Location: Metamora, OH
Top

Postby S. Heisley » Sun Jan 30, 2011 10:44 am

You've done a beautiful job on the paint and the cabin and it already looks really good.

:thinking: Instead of putting trim on the cabin edges, you could just trim the doors to match the hatch. It would be easier and probably less hassle and risk than trimming the whole cabin and would still tie things together. You could even use a smaller trim angle on the doors and it would still look good and blend everything in. If you wanted to have something silver toned on each side, a nice aluminum, brushed nickel, or stainless steel decoration on the middle of front or one on each of the front corners (or…?) Maybe take a look at handle bases or the silver decorations that come on mud flaps - not the naked ladies! - :lol: ...or such to get ideas?

Oh, and the metal trim on the doors wouldn't have to break up the paint trim if you only trim the windows or just the top half of the doors or something like that.

Just a thought….
User avatar
S. Heisley
Super Lifetime Member
 
Posts: 8871
Images: 495
Joined: Mon Sep 17, 2007 10:02 am
Location: No. California
Top

Postby angib » Sun Jan 30, 2011 2:37 pm

3M VHB is strong stuff.

I've been trying to think how you can use it on angle as you can't slide it into place. I think you can stick the tape to both faces of the body, push the angle into position and then pull out the release tapes to make the final bond.
User avatar
angib
5000 Club
5000 Club
 
Posts: 5783
Images: 231
Joined: Fri Apr 30, 2004 2:04 pm
Location: (Olde) England
Top

Postby rmclarke » Mon Jan 31, 2011 3:01 am

Thank you everyone for the input on this.....I've been checking around online for the VBS tape...ebay, etc....the stuff seems kind of expensive from what I've seen so far probably would cost more than my aluminum trim...also, what Andrew said got me to thinking.....the stuff might be a real pain in the 'arse' to get positioned properly!

And finally, maybe I'm just being to anal about this...I mean, after all, lots of trailers out there with trim attached with screws.....shoot some sealant in the holes and under the trim, right? Maybe just use less screws.

Anyway, thanks again all......will keep at it and keep you posted. :thumbsup:

Richard
"When a hammer is the only tool you own, every problem begins to look like a nail..."

ImageFrom this: Image to this: Image Finally!!
User avatar
rmclarke
The 300 Club
 
Posts: 384
Images: 231
Joined: Mon Apr 09, 2007 3:22 am
Location: North Jefferson State
Top

Postby aggie79 » Mon Jan 31, 2011 9:13 am

Richard,

You've built yourself a fine-looking teardrop. The trim will really finish it nicely.

I have yet to rain test my teardrop, but feel pretty confident that I've minimized leaks at screw holes by using an epoxy syringe to squirt in some sealant before final fastening. (After pre-drilling, I installed screws so the threads were cut in the plywood, then backed them all out, added sealant, and replaced the screws.)

Image

Take care, Tom
Tom (& Linda)
For build info on our former Silver Beatle teardrop:
Build Thread

93503
User avatar
aggie79
Super Duper Lifetime Member
 
Posts: 5405
Images: 686
Joined: Tue Aug 07, 2007 5:42 pm
Location: Watauga, Texas
Top

Postby Rock » Mon Jan 31, 2011 9:28 am

I'm very serious about my water intrusion. I'm confident that my teardrop would float indefinitely with no damage.

Having said that - McMaster-Carr is your friend. http://www.mcmaster.com/#catalog/117/3226/=atvhc0

I used the stainless steel "Metal Bonded Sealing Washers" to hold "large" trim pieces on like windows, hinges, vents, etc. Seals to both the surface of the trim as well as the shank of the screw. That and some type of sealant in the hole for double protection.

Having said all that - my aluminum corner trim is held on with #4 brass wood screws countersunk with no washers - with sealant in the holes. My camper is garaged so should last several lifetimes anyway.

Eric
Rock
Teardrop Master
 
Posts: 273
Images: 48
Joined: Tue Oct 14, 2008 10:38 am
Location: Fremont, OH
Top


Return to Teardrop Construction Tips & Techniques

Who is online

Users browsing this forum: No registered users and 2 guests