Newbie - Wall Attachment Question

Anything to do with mechanical, construction etc

Newbie - Wall Attachment Question

Postby PSBreen » Thu Jul 14, 2011 11:57 am

It appears the most popular methods of attaching walls to the frame are:

A) Place the walls on top on the floor. This gives a few more inches to the cabin height but will narrow the distance between the walls.

B) Make the floor slightly wider than the frame and notch the walls to slip over the floor edge and cover the frame. Can give you the full width of the frame but will lose a few inches in cabin height. May interfere with fenders and tires.

Does anyone have any other pro / cons to these methods? Thanks.
Steve & Cynthia
User avatar
PSBreen
Donating Member
 
Posts: 185
Images: 93
Joined: Tue May 24, 2011 12:36 pm
Location: Layton, UT

Re: Newbie - Wall Attachment Question

Postby terryjones1 » Thu Jul 14, 2011 1:02 pm

PSBreen wrote:It appears the most popular methods of attaching walls to the frame are:

A) Place the walls on top on the floor. This gives a few more inches to the cabin height but will narrow the distance between the walls.

B) Make the floor slightly wider than the frame and notch the walls to slip over the floor edge and cover the frame. Can give you the full width of the frame but will lose a few inches in cabin height. May interfere with fenders and tires.

Does anyone have any other pro / cons to these methods? Thanks.


http://tnttt.com/viewtopic.php?t=19442

The above thread covers wall attachments.
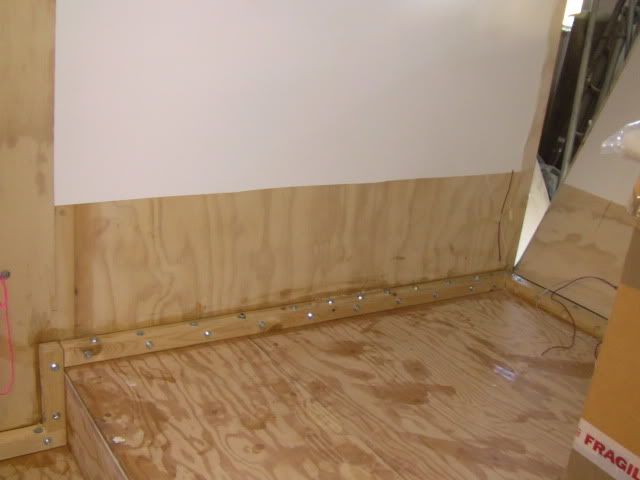
I used a combination of Simple Cleat & Rabbet Joint.

http://tnttt.com/viewto ... &start=105

See above thread for my wall attachment.
Using the Rabbet Joint allow for covering steel frame.
Using the Simple Cleat allows for installing a "sandwitch" type wall that has been previously constructed.
My TTT Garageable Standy Build Journal: viewtopic.php?f=50&t=40591
User avatar
terryjones1
Gold Donating Member
 
Posts: 266
Images: 1
Joined: Wed Aug 25, 2010 2:09 pm
Location: Lincoln, Ca

Postby dh » Fri Jul 15, 2011 12:28 am

Just my personel preference, but I think wall over frame gives a more finished look.

Also, the frame can be bolted directly to the frame, no cleats needed.
Ignorant doesn't know any better, Stupid knows better but does it anyway.

My build page: http://www.tdbuildlog.blogspot.com/
User avatar
dh
Gold Donating Member
 
Posts: 1647
Joined: Fri Aug 14, 2009 7:08 pm
Location: North East Arkansas
Top

Postby terryjones1 » Fri Jul 15, 2011 9:29 am

dh wrote:Just my personel preference, but I think wall over frame gives a more finished look.

Also, the frame can be bolted directly to the frame, no cleats needed.


My outside wall skin is 1/4" plywood.
The Rabbet Joint is only 1/4" thick.
That is not enough to connect walls to frame.
Thus, I needed cleats.
My TTT Garageable Standy Build Journal: viewtopic.php?f=50&t=40591
User avatar
terryjones1
Gold Donating Member
 
Posts: 266
Images: 1
Joined: Wed Aug 25, 2010 2:09 pm
Location: Lincoln, Ca
Top

Postby PSBreen » Sun Jul 24, 2011 3:22 pm

Sorry for the delay in getting back to this thread. I think I'm going to be in the same boat as Terry. I'm planning to use framed walls with either 1/8" or 1/4" outside skins, so the walls will only be 1" to 1 1/8" thick. I was considering using a kreg jig to drill my wall mounting holes, so sitting the walls on top of the floor looks like a better way to go for me. I had thought about letting the outside wall hang over the frame, but have some concerns. While it would look better, in this case it could also cause problems. That lower section would only be attached to the frame with glue. One big fear is that any flex in the wall to floor joint may cause the lower portion of the outer wall to separate from the framework of the wall. Those skins give the wall a lot of it's strength. Just my thoughts.
Steve & Cynthia
User avatar
PSBreen
Donating Member
 
Posts: 185
Images: 93
Joined: Tue May 24, 2011 12:36 pm
Location: Layton, UT
Top

Postby terryjones1 » Sun Jul 24, 2011 6:49 pm

PSBreen wrote:Sorry for the delay in getting back to this thread. I think I'm going to be in the same boat as Terry. I'm planning to use framed walls with either 1/8" or 1/4" outside skins, so the walls will only be 1" to 1 1/8" thick. I was considering using a kreg jig to drill my wall mounting holes, so sitting the walls on top of the floor looks like a better way to go for me. I had thought about letting the outside wall hang over the frame, but have some concerns. While it would look better, in this case it could also cause problems. That lower section would only be attached to the frame with glue. One big fear is that any flex in the wall to floor joint may cause the lower portion of the outer wall to separate from the framework of the wall. Those skins give the wall a lot of it's strength. Just my thoughts.


My side walls are 1-1/4" thick (1/4" Plywood, 3/4" thick framing, 1/4" plywood).
The outer 1/4" plywood skin covers the steel frame.
I epoxied & bolted 1-1/2" x 1-1/2" framing to the 1/2" plywood floor.
I placed this framing 1" from edge of the 1/2" plywood floor.
I then epoxied & screwed the 1-1/2" x 1-1/2" framing to the interior walls.
I used 3M 5200 at the bottom of the wall & the 1" floor edge.
I did not bolt screw or epoxy the 1/4" plywood to the steel frame, except for the drop floor area at the entrance door.
I used 3M 5200 to attach the 1/4" plywood skin to the frame at this area.

See photo shown below.


Image
My TTT Garageable Standy Build Journal: viewtopic.php?f=50&t=40591
User avatar
terryjones1
Gold Donating Member
 
Posts: 266
Images: 1
Joined: Wed Aug 25, 2010 2:09 pm
Location: Lincoln, Ca
Top

Postby Breezy13 » Mon Jul 25, 2011 8:35 am

Has anyone attached their walls using the Kreg system? I've got the 2 1/2 inch deck screws, and think I might try it!

Breezy
User avatar
Breezy13
Teardrop Builder
 
Posts: 47
Images: 11
Joined: Mon May 23, 2011 9:20 am
Location: Estes Park, CO
Top

Postby PSBreen » Tue Aug 02, 2011 10:51 pm

Breezy,

Did you give kreg system a try on your walls? I'm curious to hear how it works.
Steve & Cynthia
User avatar
PSBreen
Donating Member
 
Posts: 185
Images: 93
Joined: Tue May 24, 2011 12:36 pm
Location: Layton, UT
Top

Postby Breezy13 » Wed Aug 03, 2011 8:12 am

I haven't had a chance to attach my walls yet, lots of epoxy, priming a painting left to do. Should have thought a bit more before posting, my entire wall design is based on attaching the walls to the side of the frame, changing that now would require a lot of rework(wheel wells mostly). But I did use the Kreg tool for my foot well. I really need to take some pictures and get a build journal going.....
User avatar
Breezy13
Teardrop Builder
 
Posts: 47
Images: 11
Joined: Mon May 23, 2011 9:20 am
Location: Estes Park, CO
Top


Return to Teardrop Construction Tips & Techniques

Who is online

Users browsing this forum: No registered users and 5 guests