Template finished, any suggestions?

Anything to do with mechanical, construction etc

Template finished, any suggestions?

Postby George Kraus » Tue Jul 03, 2007 4:04 pm

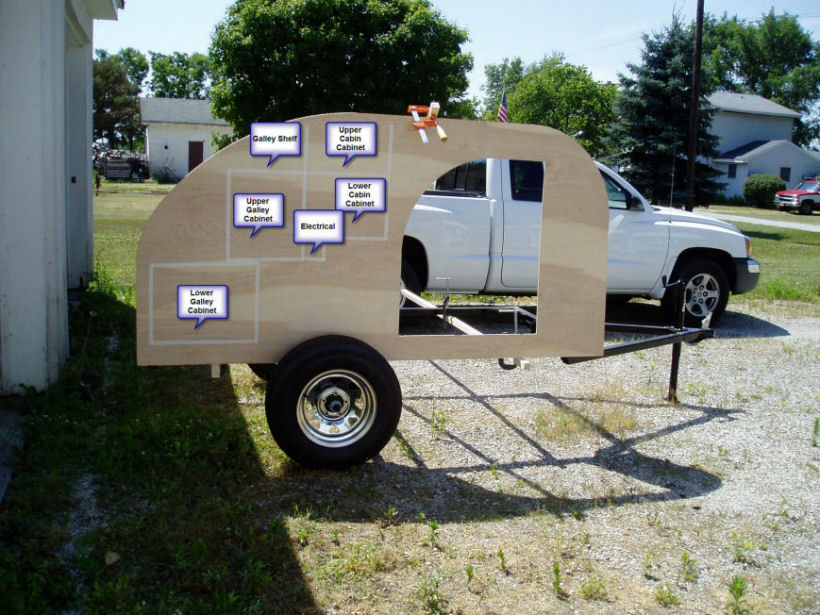
Finally got around to cutting out my template and in the process realized how much I have learned since joining the forum, thanks to all you craftsmen and women for sharing your knowledge. I have a picture of my template sitting on the trailer chassis, please give suggestions.
Image

George
Started on the long road to happiness
User avatar
George Kraus
Donating Member
 
Posts: 162
Images: 16
Joined: Thu Apr 14, 2005 8:17 am
Location: OH Tiffin

Postby neal b » Tue Jul 03, 2007 5:08 pm

Hi George that looks great :thumbsup: :thumbsup: now get some more sawdust flyn keep up the good work that is the style iam going to build for number 2 starting this fall cant wait to get started already have a few parts

neal b :D
neal b
The 300 Club
 
Posts: 456
Joined: Thu Sep 08, 2005 8:25 pm
Location: missouri rosebud

Postby Roly Nelson » Tue Jul 03, 2007 5:34 pm

Well George, by suggestions, I guess you mean what is the next step you should take. When I was as far as you are, I cut matching left and right plywood panels for each wall, using the template to make them exactly the same. Then I glued and screwed curved 1x2 members, bandsawed to match the outside curves of the side profile and attached them to the inside, and attaching the sides to the floor followed. This stiffened my fairly flimsy 3/16" lauan walls and made attaching the roof struts to the sidewalls, an easy matter. It also provided a good solid attachment for the roof plywood and the edges.

Some builds are different than this, but it worked for me. Keep scrolling down, I am sure more definate ideas will be posted, especially if insulation, interior paneling and wall electrical provisions are involved. Good luck on your effort, take lots of pics and post em.

Roly, hoping for rain, (hurry back Gage) :worship: and cursing the 103 degree temps in So Cal :cry:
See the little 1/2 Nelson Woody constructions pics at: http://gages-56.com/roly.html
User avatar
Roly Nelson
L'il Ol' Woody Builder
 
Posts: 2971
Images: 13
Joined: Sun Jan 30, 2005 12:45 pm
Location: Wildomar, Calif
Top

Postby martha24 » Tue Jul 03, 2007 6:03 pm

George,
The profile & door location look good to me. :thumbsup:
With the cabinet locations, I would suggest to do some mock ups once you get to the point of having the floor & walls up.
For the inside cabinets I literally sat inside & put paper across where I thought the upper cabinets should be. They just seemed too close to me & made me feel a little claustrophobic or something. When I backed them up a couple of inches it seemed much better to me. We haven't got to the point of having doors on the cabinets yet, but the location I choose with paper worked well for me having now slept in the tear a couple of times. Going by your door, mine started about where you show yours.
I'm a great believer in mock ups of some sort whenever you can.
Now let's see some sawdust. :lol:
Martha ;)
Martha ;)

Image
User avatar
martha24
1000 Club
1000 Club
 
Posts: 1353
Images: 237
Joined: Thu Aug 03, 2006 4:32 am
Location: Calif., Goleta
Top

Postby peggyearlchris » Tue Jul 03, 2007 7:30 pm

:thumbsup: George ,It looks super now the fun begins. :applause: :applause: Peg
User avatar
peggyearlchris
500 Club
 
Posts: 984
Images: 56
Joined: Mon May 29, 2006 8:49 pm
Location: corpus christi,texas
Top

Postby Steve Frederick » Tue Jul 03, 2007 7:49 pm

By george, George :lol: , I think you've got it!! :thumbsup:
Stack up the exterior sheets, good sides in, and start makin' dust!! :thumbsup:
Blessings, Steve
Adirondacks, Upstate New York
Building Journals
The Shop Manual's 8-years old!! Thank's everyone!
New! 'Rondack Lodge Plans!Order Here!
Image
User avatar
Steve Frederick
Custom Teardrop Builder
 
Posts: 1984
Images: 29
Joined: Thu Apr 15, 2004 5:02 pm
Location: Upstate New York, Adirondacks (Great Sacandaga Lake)
Top

Postby Juneaudave » Tue Jul 03, 2007 8:50 pm

Boy( simulated wolf whistle ) that ply sure has nice grain...who was it that just finished his with the nice ply with similar designs?? George...have you given any thoughts to the "look" you want?

:thinking: :thinking: :thinking:
User avatar
Juneaudave
Super Duper Lifetime Member
 
Posts: 3237
Images: 380
Joined: Sun Jul 03, 2005 12:11 pm
Location: Juneau, Alaska
Top

Postby doug hodder » Tue Jul 03, 2007 9:04 pm

George...looks like you have formulated a well thought out plan of attack...what's the sleeping compartment length? Time to start cutting some more ply!!! :applause: Doug
doug hodder
*Snoop Dougie Doug
 
Posts: 12625
Images: 562
Joined: Tue Dec 14, 2004 11:20 pm
Top

Postby Micro469 » Tue Jul 03, 2007 9:56 pm

Those wheels just don't look good with that profile....... Send them to me and go out and buy a new set........ :R
John
Image
User avatar
Micro469
Super Lifetime Member
 
Posts: 3185
Images: 382
Joined: Mon Nov 07, 2005 10:46 pm
Location: Brampton,Ontario,Canada
Top

Postby George Kraus » Tue Jul 03, 2007 10:16 pm

Neal B - Thanks and good luck on #2

Roly - Thanks for a lot of good suggestions

Martha - I wondered the same thing, I will definitely try your mock up idea

Peggy - Thanks

Steve - Thanks

Juneau Dave - $10 a sheet luan project panel, it is pretty, the grain looks like maple, got me to thinking now.

Doug - 6' sleeping compartment, I am 5' 7", the wife is 5" 2", do you think the 6' would affect a future sale when I build #2? Darn you guys, now you have me talking like you.

Micro - It was $20 or $25 per wheel extra to get chrome, even though they don't look right I'll keep them LOL.
Started on the long road to happiness
User avatar
George Kraus
Donating Member
 
Posts: 162
Images: 16
Joined: Thu Apr 14, 2005 8:17 am
Location: OH Tiffin
Top

Postby Ira » Tue Jul 03, 2007 10:51 pm

martha24 wrote:t paper across where I thought the upper cabinets should be. They just seemed too close to me & made me feel a little claustrophobic or something.


Much better said than I could have said:

It is really, really tight in there. And you basically don't HAVE much functional cabinet space in the cabin of a 4 by 8. (If you're doing longer than 4 by 8, ignore my ramblings here.)

So in a 4 by 8, you want those bulkhead walls pushed as far to the rear as possible to give you maximum cabin space, and a workable galley space.

In a 4 by 8, your bottom bulkhead wall "has" to be 2' from the rear edge of the trailer, giving you 6' of sleeping length. Yeah, you can be radical or conservative, but you're not gonna vary from this much and be happy.

After that bottom wall is set, the middle and upper can be placed almost anywhere you want--but you may decide it's better to lose depth on those galley cabinets so you can have MORE in the cabin cabinets, if you really want that space there.

But anyway you cut it, it ain't a lot of space, so don't get your hopes up.
Here we go again!
User avatar
Ira
Forum Storyteller
 
Posts: 5652
Images: 118
Joined: Tue Nov 29, 2005 2:16 pm
Location: South Florida
Top

Postby doug hodder » Tue Jul 03, 2007 11:02 pm

George Kraus wrote:Doug - 6' sleeping compartment, I am 5' 7", the wife is 5" 2", do you think the 6' would affect a future sale when I build #2? Darn you guys, now you have me talking like you.


Geo...just something to think about...I had a 6' in 1980 a 49 Kit....Just didn't work for me, even sleeping on a diagonal. A few inches might make it more marketable in the long run, you can get a lot more creative in jamming pots and pans in than you can a body...just an idea... :thinking: doug
doug hodder
*Snoop Dougie Doug
 
Posts: 12625
Images: 562
Joined: Tue Dec 14, 2004 11:20 pm
Top

Postby bledsoe3 » Tue Jul 03, 2007 11:19 pm

That looks good George. One question about upper and lower cabin cabinets, why? Maybe cabinet door making is no problem for you, but for me it just means extra doors to make. I made tall cabinets and if I decide I need it, I'll add a shelf in there. YMMV
If you do what you've always done, you'll get what you've always got.
User avatar
bledsoe3
3000 Club
3000 Club
 
Posts: 3694
Images: 112
Joined: Tue Jun 07, 2005 5:55 am
Location: Oregon, Portland
Top

Postby martha24 » Tue Jul 03, 2007 11:22 pm

George,
Our teardrop is 4' wide & has a 6' sleeping compartment. I'm 5'5" & my husband is 5'3" and we have enough room. Amazingly the first time we slept in it, we both thought it was more roomy than we expected. But I do like where we started the upper interior cabinets, they're not real deep but still very useful.
Martha ;)
Martha ;)

Image
User avatar
martha24
1000 Club
1000 Club
 
Posts: 1353
Images: 237
Joined: Thu Aug 03, 2006 4:32 am
Location: Calif., Goleta
Top

Postby Micro469 » Tue Jul 03, 2007 11:30 pm

My mattress area is 57" by 75".... I think it still might be too small. I'm 5.11"..... = 71" ..... :roll:
John
Image
User avatar
Micro469
Super Lifetime Member
 
Posts: 3185
Images: 382
Joined: Mon Nov 07, 2005 10:46 pm
Location: Brampton,Ontario,Canada
Top

Next

Return to Teardrop Construction Tips & Techniques

Who is online

Users browsing this forum: No registered users and 7 guests