Heikki and Miriam.
You know how some projects just look so easy, and you figure you can get them done in short order (kind of like teardrops...) well, this is one of them...
The rack is pretty large as roof racks go, 58" wide x 35" tall or deep, and 5" high.
The copper is 1/2" od. rigid water line, and sweat fittings.
Sweat means solder together.
It is fairly light, about 10 pounds or so, and is strong enough to do the job, but not overbuilt.
I started by building the end frames.
They are the long somewhat cuved rectangles that the crossbars fit into.
<img src="http://img.photobucket.com/albums/v284/1948rob/Cabin%20car%20project/roofrack3.jpg?t=1186352464">
The end frame is closest to you in the picture.
It starts at the bottom and goes to the right.
Also at the bottom of the picture, you can see the brass/bronze "foot".
It is an elbow designed to be used to fasten the plumbing to the wall, but also works well to fasten to a roof.
There are 4 of these feet.
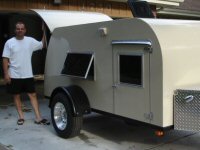
The rack is nothing but a bunch of short lengths of pipe and a lot of fittings.
Here it is in the back of my truck.
<img src="http://img.photobucket.com/albums/v284/1948rob/Cabin%20car%20project/parts6.jpg?t=1186353531">
Copper pipe is not terribly strong when spanning more than a few inches, and I need to be able to tie down the luggage, so some bracing was called for.
You can see it in this, and the previous shot.
<img src="http://img.photobucket.com/albums/v284/1948rob/Cabin%20car%20project/parts5.jpg?t=1186353654">
The span from side to side needed bracing in the center to keep the rope or cords from pulling the pipe out of shape.
The two center bars were joined, and then braces run from the "floor" to the top bars on front and back.
Some "crosses" would have made the job less labor intensive than "tees" but that was all I could find locally...not even sure if a cross is available (I'm not a plumber...

)
Some of the pipe is slightly bent to follow the curve of the roof.
The back has two pieces that stick up a little higher than the rest, they are for looks, and to have a place to tie the hold downs to.
<img src="http://img.photobucket.com/albums/v284/1948rob/Cabin%20car%20project/parts1.jpg?t=1186353979">
Pretty easy to build, but a time consuming project.
There are a whole lot of pieces to clean and prep for soldering, and lots of dry fitting too.
Once everything was soldered together and cooled off, I went over it all with acetone and then steel wool.
It makes it shiny, but since the surface is freshly exposed to air, it begins to oxidize pretty fast.
A nice medium to dark brown aged look is what I'm after
I have a good 12 hours in the job, not counting shopping.
Could have probably bought one cheaper, but chrome wouldn't have looked right, and the feet had to land correctly on the roof framing for attachment.
Rob
Waiting for "someday" will leave you on your deathbed wondering why you didn't just rearrange your priorities and enjoy the time you had, instead of waiting for a "better" time to come along...


 You pack better than me.
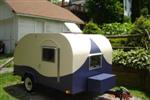


 please and thank you!
 ......... Rob, I think the copper pipe will patina and blend into the dark trim but I would NOT like to see a plastic tub strapped to the top of your wooden beauty. The suitcase and chair look in place but I think you could place all the cords and placemats in a 'Christmas wrapping paper' tub made by Rubbermaid. Stack them on the floor when traveling and put'em under the trailer while sleeping.


 Hmmm
Hmmm 


 Great job on the rack.I really like it too.