My version of back hatch supports

Anything to do with mechanical, construction etc

My version of back hatch supports

Postby BillZ » Sun Aug 21, 2011 10:29 pm

For those of you who don't know, I purchased my Tear from forum member B. Bodemer early this spring. My wife and I have thoroughly enjoyed taking it camping.

After spending some time in the tear, we decided on a few changes and additions to this wonderful teardrop to customize it for ourselves.

One thing I want to do is build wooden drawers and bottom cupboards in the galley. But before I did, I needed to change the hatch supports so they wouldn't be in the way. After consulting this forum many times, I came up with a fairly simple design that I think will work for us.

This tear is very well made and designed so I took as much care as my meager talents could muster and tried to make something that followed the look of the tear and also could be removed without too much trouble in case it turned out that we didn't like it.

Original broomstick supports:
Image

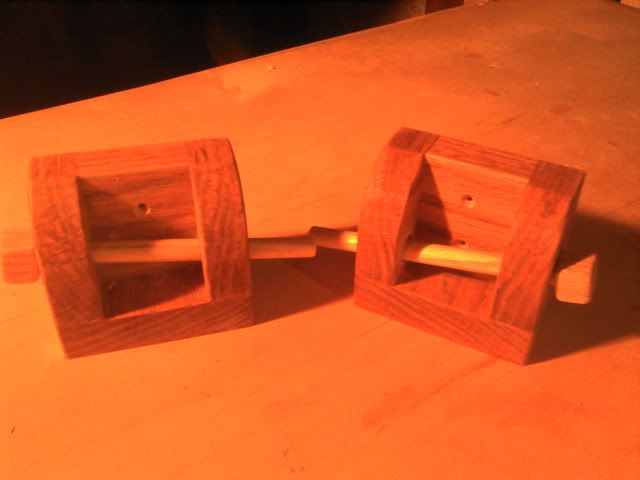
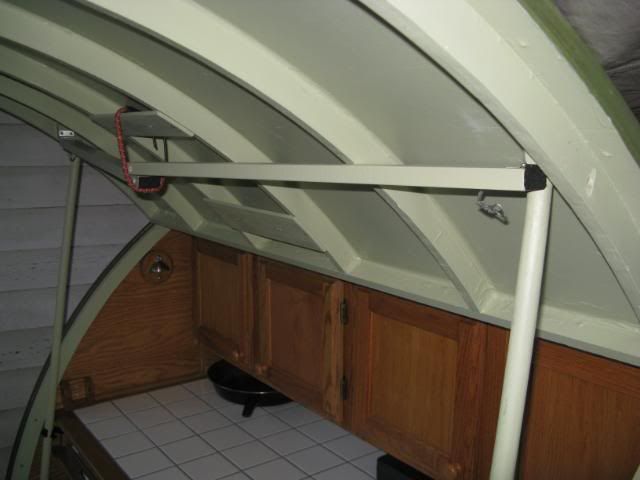
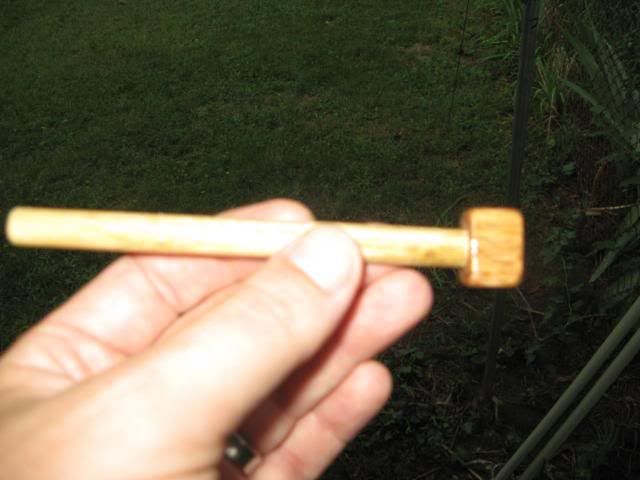
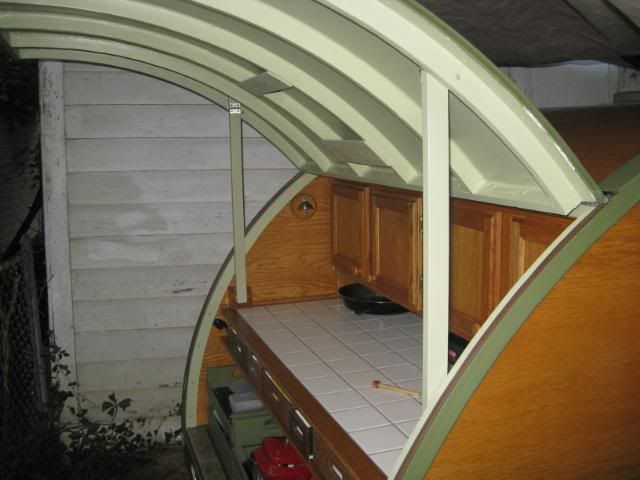
My wife is not blessed with upper body strength and she had some trouble with holding the hatch open and installing the broom handles by herself so I decided to go with a hinged design that hinges at the top. When the hatch is opened, the supports can swing down and fall pretty much in place. Out of a scrap piece of red oak 1X I made "receivers" with a pin to hold the uprights in place.
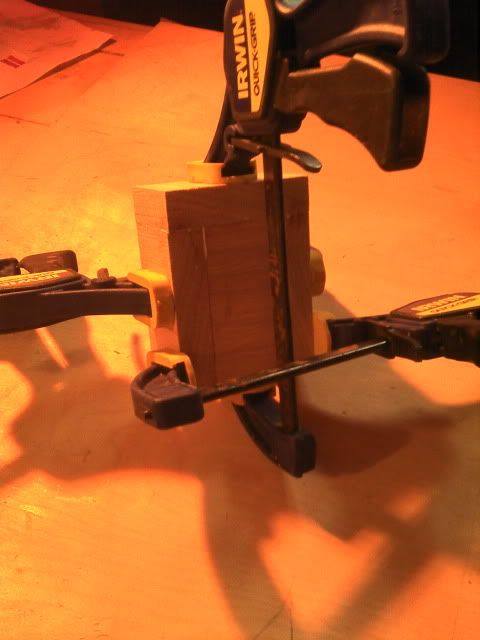
Image

Image

Image

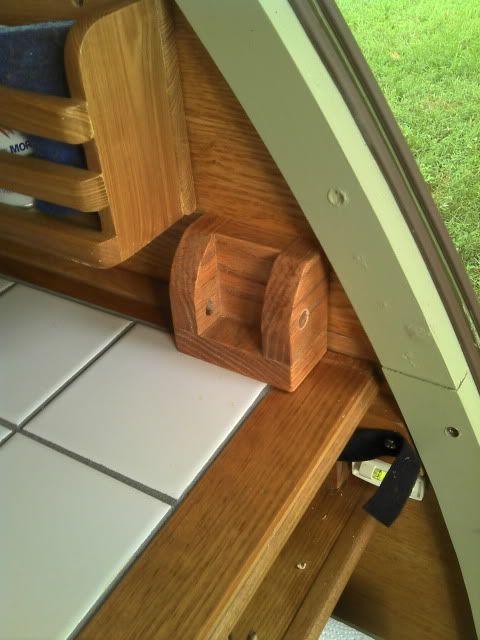
The receivers sit on the counter and 2 #6 screws attach it to the wall. This pic shows the receiver in place before being screwed to the wall.
Image

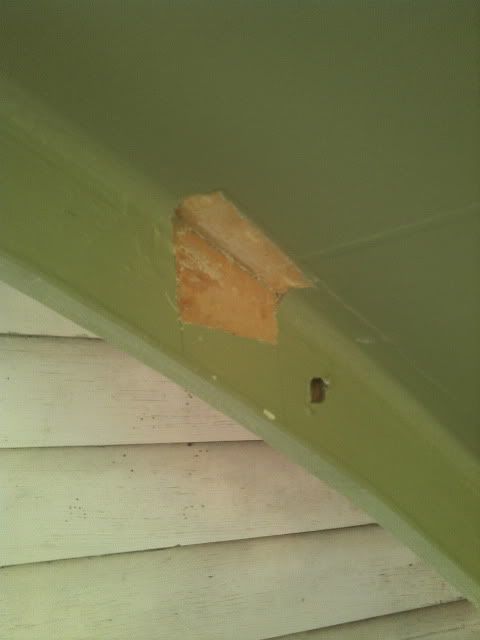
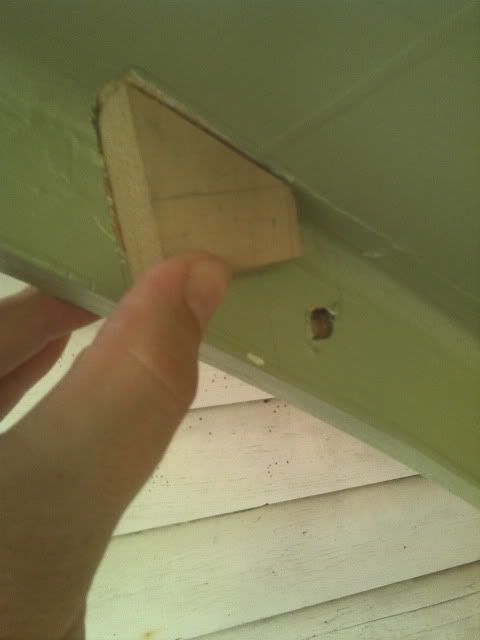
I then used a scrap piece of solid maple 1x2 for the uprights. I cut the angle at the top end to match the curve of the hatch, cut to the length that I wanted, then took a small portion off the top to attach to the hatch. This small piece is the only permanent addition to make this design work and it would be hardly noticeable if we decided to not use it in the future. I removed the paint and primer at the point of contact and glued it to the spar so all the pressure of contact would not be on the 1/4" hatch skin.
Image

Image


Then I painted the uprights and finished the receivers and pins to match the rest of the galley and attached the uprights to the top support with a simple hinge.

Image

Image


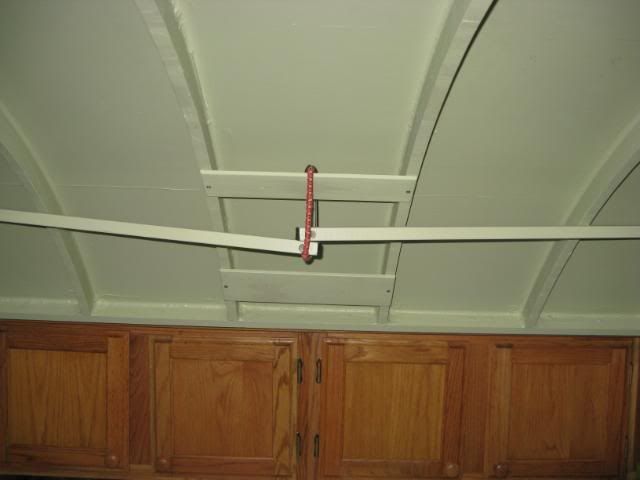
I haven't yet worked out a permanent way to hold the supports when the hatch is down. right now, they are just held up with a bungee on the crosspiece you can see in the center of the hatch. Oh, and I plan to leash the pins with some type of string or wire so they stay near the receivers.
User avatar
BillZ
The 300 Club
 
Posts: 308
Images: 0
Joined: Tue Feb 16, 2010 7:39 pm
Location: College Park, Maryland

Postby Deryk the Pirate » Mon Aug 22, 2011 5:20 am

Looks Great!
Build Thread lil vardo 1: http://tinyurl.com/baqe6py
Build Thread lil vardo 2: http://tinyurl.com/b3rwffm
User avatar
Deryk the Pirate
500 Club
 
Posts: 809
Images: 158
Joined: Tue Aug 18, 2009 11:03 am
Location: Parlin NJ

Postby gregp136 » Mon Aug 22, 2011 6:43 am

Excellent!!
Image
User avatar
gregp136
The 300 Club
 
Posts: 329
Images: 100
Joined: Sun Jan 03, 2010 8:11 am
Location: West Allis, Wisconsin
Top

Postby starleen2 » Mon Aug 22, 2011 7:06 am

cool re - fit of the galley struts :thumbsup:
User avatar
starleen2
5th Teardrop Club
 
Posts: 16272
Images: 224
Joined: Sat May 12, 2007 8:26 pm
Location: Pea Ridge ,AR
Top

Postby absolutsnwbrdr » Mon Aug 22, 2011 7:26 am

Nice work! They fit in perfectly! How do you keep them folded up for travel?
Zach
Coming Soon...
Image Image
User avatar
absolutsnwbrdr
Donating Member
 
Posts: 2657
Images: 412
Joined: Mon Jan 25, 2010 6:10 pm
Location: Hanover, PA
Top

Re: My version of back hatch supports

Postby chartle » Mon Aug 22, 2011 10:29 am

BillZ wrote:
Image


I haven't yet worked out a permanent way to hold the supports when the hatch is down. right now, they are just held up with a bungee on the crosspiece you can see in the center of the hatch. Oh, and I plan to leash the pins with some type of string or wire so they stay near the receivers.


Just found these forums a few days ago and didn't think my first post was answering a question but here goes.

How close are the two supports when folded? If they are close you could use a singe wooden turnbuckle attached the crosspiece that is already on the hatch to hold them both up.

The issue I see though is that you would need twp people to fold them up, one to hold the hatch and one to fold them both up at the same time.

So I would use two turnbuckles one for each leg. It also looks like you would have to add an angled piece to wood so these turnbuckles would be at the right angle to match up with the legs.

One quick question. Why did you angle the pins? To maybe make it easier to get you fingers around them?
chartle
Teardrop Master
 
Posts: 159
Images: 3
Joined: Thu Aug 18, 2011 8:30 pm
Location: Pgh
Top

Postby aggie79 » Mon Aug 22, 2011 11:05 am

Nice retrofit! I like the simplicity and effectiveness of your design.

As far as how to hold the supports when they are in travel position, perhaps cabinet door latches, either magnetic or physical, could be used for this purpose.
Tom (& Linda)
For build info on our former Silver Beatle teardrop:
Build Thread

93503
User avatar
aggie79
Super Duper Lifetime Member
 
Posts: 5405
Images: 686
Joined: Tue Aug 07, 2007 5:42 pm
Location: Watauga, Texas
Top

Postby chartle » Mon Aug 22, 2011 11:22 am

aggie79 wrote:As far as how to hold the supports when they are in travel position, perhaps cabinet door latches, either magnetic or physical, could be used for this purpose.


I was thinking that also maybe a roller catch
chartle
Teardrop Master
 
Posts: 159
Images: 3
Joined: Thu Aug 18, 2011 8:30 pm
Location: Pgh
Top

Re: My version of back hatch supports

Postby BillZ » Mon Aug 22, 2011 6:02 pm

chartle wrote:
Just found these forums a few days ago and didn't think my first post was answering a question but here goes.

How close are the two supports when folded? If they are close you could use a singe wooden turnbuckle attached the crosspiece that is already on the hatch to hold them both up.

Welcome to the forum chartle! The supports when folded in actually overlap each other by about 2 or 3".

The issue I see though is that you would need twp people to fold them up, one to hold the hatch and one to fold them both up at the same time.

I hope to come up with a solution that enables one to fold the uprights one at a time so you only have to hold the hatch when folding the second one.

So I would use two turnbuckles one for each leg. It also looks like you would have to add an angled piece to wood so these turnbuckles would be at the right angle to match up with the legs.

I have considered something similar. The main concern is I don't want anything sticking down that I would hit my head on while standing under the open hatch.

One quick question. Why did you angle the pins? To maybe make it easier to get you fingers around them?

I angled the pins downward so that they stay in place.


aggie79 wrote:As far as how to hold the supports when they are in travel position, perhaps cabinet door latches, either magnetic or physical, could be used for this purpose.


aggie,
I think a magnetic catch sounds promising and would be great for ease of use. Placement may be a bit difficult because the uprights don't come against the center spars at a true perpendicular angle. Since the hinge is not at the edge of the spar, they stick out towards you when folded in. It's a bit hard to explain so I'll try to get a pic this evening.


Here are 2 pics of the uprights folded in with a temporary bungee holding them:

Image

Image
User avatar
BillZ
The 300 Club
 
Posts: 308
Images: 0
Joined: Tue Feb 16, 2010 7:39 pm
Location: College Park, Maryland
Top

Re: My version of back hatch supports

Postby chartle » Mon Aug 22, 2011 6:58 pm

To me it seems what is making this difficult is the supports over lapping. If they lay flat and don't overlap it would make it easier to add latches and or magnets

Options so far

* shorten the supports. Of course that lowers the hatch.

* Shorten, advantages above, and move up the brackets.

* Shorten and move them closer to the front of the trailer but that would add stress to the hinge.

* kind half lap them so the lay flat.

* change the design so that hinged part at the top is angled just a little bit in opposite directions, this way the supports will miss each other and allow them to lay flatter so you can you a separate catch for each one.

* get shorter so the hatch can be lower and use suggestion one. :D
Last edited by chartle on Mon Aug 22, 2011 7:26 pm, edited 1 time in total.
chartle
Teardrop Master
 
Posts: 159
Images: 3
Joined: Thu Aug 18, 2011 8:30 pm
Location: Pgh
Top

Postby CliffinGA » Mon Aug 22, 2011 7:25 pm

chartle said
To me it seems what is making this difficult is the supports over lapping.

Options so far

* shorten the supports so they lay flatter and don't overlap which would make it easier to add latches and or magnets. Of course that lowers the hatch.

* Shorten, advantages above, and move up the brackets.

* Shorten and move them closer to the front of the trailer but that would add stress to the hinge.

* kind half lap them so the lay flat.

* get shorter so the hatch can be lower and use suggestion one.


Or you can put the catches/magnets on the 2 second spars in where the pieces nearly touch the supports.

Cliff
In God we trust, shoot the rest and he will sort out!

My Build:

viewtopic.php?f=50&t=42628
User avatar
CliffinGA
1000 Club
1000 Club
 
Posts: 1499
Images: 207
Joined: Sat Nov 14, 2009 1:29 pm
Location: Jefferson, GA
Top

Postby Woodbutcher » Mon Aug 22, 2011 7:41 pm

I have a similar setup, but I used 1" Dowel rods as my props. Then to hold them to the hatch I used metal broom holders for the handles to snap into. Easy to do with 1 person.

If you look close you can see the silver broom holders on the hatch. You may be able to just notch out a section of your supports to allow the holder to clip onto the support. I would not use a magnetic catch to much bouncing around back there . You need something firm.

Image


Great job at the reto fit!
User avatar
Woodbutcher
Platinum Donating Member
 
Posts: 4191
Images: 45
Joined: Fri Mar 10, 2006 10:01 pm
Location: Chicago Suburbs
Top

Postby Sam I am » Mon Aug 22, 2011 9:04 pm

I like the magnet idea. I used magnetic cabinet latches to hold the folding leg on my side table up, and to hold two small folding beverage/snack tables on the inside. They work well, and alignment is not critical.
User avatar
Sam I am
500 Club
 
Posts: 770
Images: 106
Joined: Sun Jul 02, 2006 9:19 pm
Location: Central PA
Top

Postby chartle » Tue Aug 23, 2011 9:56 am

CliffinGA wrote:
Or you can put the catches/magnets on the 2 second spars in where the pieces nearly touch the supports.

Cliff[/b]


Yea but that wouldn't make for slick finish.

and hey another Cliff, you are the fifth I have ever "met". The first was my father but are you a "ton" or a "ford". I'm a "ford"
chartle
Teardrop Master
 
Posts: 159
Images: 3
Joined: Thu Aug 18, 2011 8:30 pm
Location: Pgh
Top

Postby Nobody » Tue Aug 23, 2011 2:32 pm

Nice retro-fit Bill! :thumbsup: I wuz thinkin' of something similar during my initial build but never figured out the 'hold-up' mechanism so I just went in the opposite direction & hinged my props at the counter & let 'em lie flat on the counter during travel. I devised a latch/receptacle on the hatch made of aluminum & use a 'Linch Pin' as a 'keeper' to hold the props up & prevent a strong wind from lifting the hatch off 'em. Instead of trying to 'tether' the pins I just drilled a 'slanted' hole at each end of the counter to hold pins when not being used. My hinge pins have enough slack that the props are able to lie flat adjacent to each other when the hatch is down & they've never scratched or damaged the counter finish. My hatch is fairly heavy but my tiny wife is able to lift it (with both hands) & hold it up with one hand while raising the prop to its receptacle, then raise the other prop. Only problem she has is sometimes if the TD is parked on a downward slope to the rear, she ain't tall enough to hold the hatch high enough for the props to fit :o

We've since changed the galley decor -
Image

Image
Image
Image
Image
Image
Harvey -

- - - - - - - - - - - - - - - -

Doing the right thing ain't always easy but, . . . it's always right!
User avatar
Nobody
1000 Club
1000 Club
 
Posts: 1196
Images: 342
Joined: Wed Jan 25, 2006 1:09 pm
Location: Benton, Arkansas
Top

Next

Return to Teardrop Construction Tips & Techniques

Who is online

Users browsing this forum: No registered users and 7 guests