Fenders On :)

Anything to do with mechanical, construction etc

Postby Joanne » Fri Apr 13, 2007 5:22 pm

Keith, I believe I mis-spoke on this.

After sanding the final coat of primer and before the first coat of paint, I wiped the entire trailer down with lacquer thinner NOT acetone. The rag was damp (not soaked) in the lacquer thinner, but it didn't take off the primer.

Joanne


Keith B wrote:After your very last coat of paint was on you did this? I'd think the acetone would eat right through the paint.
New! My Camp Cooking Forum

Project Desert Dawg website


Universal Health Care
Health care with the efficiency of the Department of Motor Vehicles
and the compassion of the Internal Revenue Service.
User avatar
Joanne
Queen of Cast Iron
 
Posts: 2111
Joined: Thu Jul 01, 2004 9:43 pm
Location: Las Vegas, NV

Postby Keith B » Fri Apr 13, 2007 5:53 pm

Ahhh gotcha... did you do any kind of "buff" "sanding" after the very last coat of paint was on and dry, to remove any "bugs" "dust" etc... that's what I was kinda wondering about?
************
Keith
"Work and work and do your best! Paint and putty will do the rest!"
User avatar
Keith B
Silver Donating Member
 
Posts: 550
Images: 148
Joined: Mon Jan 29, 2007 3:54 pm
Location: Wichita, KS

Postby Joanne » Fri Apr 13, 2007 6:02 pm

Nope! I guess you could color sand and polish, but I just don't see the value. My prep work wasn't good enough to warrent that kind of additional effort. :o

Joanne


Keith B wrote:Ahhh gotch... did you do any kind of "buff" "sanding" after the very last coat of paint was on and dry, to remove any "bugs" "dust" etc... that's what I was kinda wondering about?
New! My Camp Cooking Forum

Project Desert Dawg website


Universal Health Care
Health care with the efficiency of the Department of Motor Vehicles
and the compassion of the Internal Revenue Service.
User avatar
Joanne
Queen of Cast Iron
 
Posts: 2111
Joined: Thu Jul 01, 2004 9:43 pm
Location: Las Vegas, NV
Top

Postby Keith B » Sun Apr 15, 2007 3:13 pm

WOW... That Interlux Brightside is NICE paint.. I've NEVER seen paint go on this smooth. Given my "spray" ability, I don't think I would have gotten a better job by spraying it.

No, it's not an automotive quality finish, but I have to say, I'm very pleased with this paint... two coats are on and will put the 3rd and final on tomorrow. They say two is the minimum... well, I don't like to do just the minimum.... plus I have the paint so why not....

For those who "haven't" used it before, let me offer just a few tips.
1.) Get your surface clean. I wiped mine down 3x with solvent and followed directly with a clean dry rag, then I tact clothed it just min. before I actually painted.
2.) Put it on thin, DO NOT try to cover in one coat.
3.) Buy a good brush. Mine was $30 and I think it did a great job.
4.) Roll it on and back roll it in 2-3 directions to make sure its covered, and even... and only do like a 2'x2' area at a time, the "joints" blend togther, you can't tell where I stopped and started.
5.) Tip it off ONCE and leave it alone... you're going to look at it and be like... YIKES, that looks terrible... wait about 30 min and it simply just levels itself out. I can actually see myself in the finish.
6.) DO NOT RUSH IT... put it on and wait a day before you do anything, do not paint w/ fans, open doors, etc. as to keep the dust down that will get into the paint.

I've VERY satisfied with my results.. I hope it holds up as good as it looks. When it's dry is has a very "plasticy" feel to it.. seems to be quite smooth and hard. I will post pictures later as I don't want to open the door or stir up any dust right now.

OH and FYI: I took all my quarts and put them into one gallon can and mixed them all together.. don't know if that's necessary, but I'm certain I'll get a more true color then going from one quart to the next.
:D

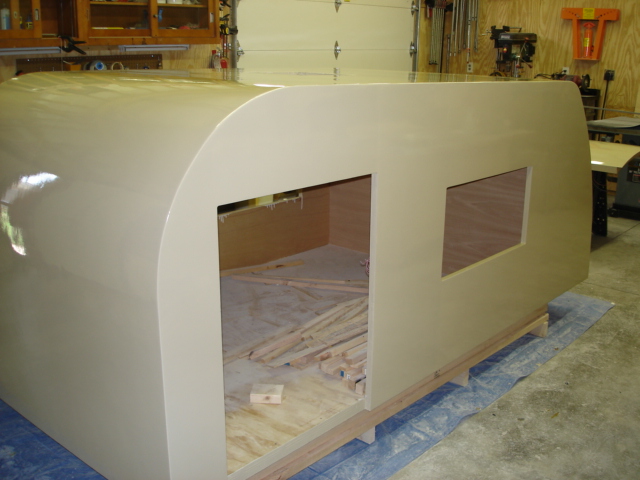
This is after the 1st coat...the 2nd looks SO much better:
Image
************
Keith
"Work and work and do your best! Paint and putty will do the rest!"
User avatar
Keith B
Silver Donating Member
 
Posts: 550
Images: 148
Joined: Mon Jan 29, 2007 3:54 pm
Location: Wichita, KS
Top

Postby Juneaudave » Sun Apr 15, 2007 3:22 pm

You jerk!!! :lol: :lol: :lol:

Where the heck is the Pics!!!! Pretty amazing how that stuff lays down on a prepped surface!!!
User avatar
Juneaudave
Super Duper Lifetime Member
 
Posts: 3237
Images: 380
Joined: Sun Jul 03, 2005 12:11 pm
Location: Juneau, Alaska
Top

Postby Miriam C. » Sun Apr 15, 2007 3:47 pm

:o :applause: :applause: :thumbsup:
Boy Keith, between you an Elmer I am tempted to paint after all. Very nice surface.
“Forgiveness means giving up all hope for a better past.â€
User avatar
Miriam C.
our Aunti M
 
Posts: 19675
Images: 148
Joined: Wed Feb 15, 2006 3:14 pm
Location: Southwest MO
Top

Postby doug hodder » Sun Apr 15, 2007 4:15 pm

Miriam...remember that Keith had several coats of epoxy and sanding under it, to give him that nice smooth finish prior to laying the paint down, it's not just paint on wood. Doug
doug hodder
*Snoop Dougie Doug
 
Posts: 12625
Images: 562
Joined: Tue Dec 14, 2004 11:20 pm
Top

Postby Miriam C. » Sun Apr 15, 2007 4:23 pm

doug hodder wrote:Miriam...remember that Keith had several coats of epoxy and sanding under it, to give him that nice smooth finish prior to laying the paint down, it's not just paint on wood. Doug

:R :lol: Right! Ok you talked me out of it.
“Forgiveness means giving up all hope for a better past.â€
User avatar
Miriam C.
our Aunti M
 
Posts: 19675
Images: 148
Joined: Wed Feb 15, 2006 3:14 pm
Location: Southwest MO
Top

Postby Keith B » Sun Apr 15, 2007 8:25 pm

Yup..thanks to Doug I did LOTS of epoxy work. It was my first time using Epoxy and I still have a lot to learn.. AND...it' my first time really doing "body" work, so you can see some waves, etc.... it's not perfect, but given what I've done and what I've learned, well, DAD-GUM I'm satisified, really. It really turned out better than I deserve, but as Doug mentioned, there's almost 5 full coats of epoxy under there and lots of filling.. and LOTS of sanding and that is a complete understatement.. when I say LOTS I mean LOTS AND LOTS AND LOTS..... I used cheap ole BC plywood, because I was going to do aluminum, but in KS we have hail, some big, some small and well, why chance it..... I can "ruff" this up and always fix stuff...dented aluminum cannot easily be fixed.. right or wrong, this is what I did and I have everyone on this forum to thank... I couldn't have done it without you all. Like I said, it's not perfect, but I'm still pretty pround.. I'm a builder, not an auto body guy... but I'm learning and that's most of the fun... learning a new trick and what not. Thank you all so much for your helps, tips and advise, I can't wait to keep doing more of the finishing touches... and as alwasy, I'll keep you posted. It might not be the best finish in the gathering, but I'm still proud of what I wanted, tried and did do... and isn't that 1/2 the battle?....the other 1/2 is enjoing it and learning and getting better.. and that's the 1/2 I'm concentrating on.

Juneaudave... amazing is a good word for it.. I couldn't believe what this paint did on "it's own"..... after 20-30 min is just went flat, no air bubbles, NOTHING.... It might be expensive, but I can see myself using this stuff on other projects until I "perfect" the automotive paint spray technique.. yes it's rolled on, but it's by far the BEST "roll" application I've ever seen.
************
Keith
"Work and work and do your best! Paint and putty will do the rest!"
User avatar
Keith B
Silver Donating Member
 
Posts: 550
Images: 148
Joined: Mon Jan 29, 2007 3:54 pm
Location: Wichita, KS
Top

Postby Joanne » Sun Apr 15, 2007 9:22 pm

Congratulations on the results of your painting effort! :thumbsup: Like you, I was very surprised how well it turned out. If I would have done a lot of surface prep before hand, it would have turned out that much better. Before I started I was really worried it would look like someone painted it with old housepaint and a broom. It ended up looking pretty good.

Joanne

Keith B wrote:Yup..thanks to Doug I did LOTS of epoxy work. It was my first time using Epoxy and I still have a lot to learn.. AND...it' my first time really doing "body" work, so you can see some waves, etc.... it's not perfect, but given what I've done and what I've learned, well, DAD-GUM I'm satisified, really. It really turned out better than I deserve, but as Doug mentioned, there's almost 5 full coats of epoxy under there and lots of filling.. and LOTS of sanding and that is a complete understatement.. when I say LOTS I mean LOTS AND LOTS AND LOTS..... I used cheap ole BC plywood, because I was going to do aluminum, but in KS we have hail, some big, some small and well, why chance it..... I can "ruff" this up and always fix stuff...dented aluminum cannot easily be fixed.. right or wrong, this is what I did and I have everyone on this forum to thank... I couldn't have done it without you all. Like I said, it's not perfect, but I'm still pretty pround.. I'm a builder, not an auto body guy... but I'm learning and that's most of the fun... learning a new trick and what not. Thank you all so much for your helps, tips and advise, I can't wait to keep doing more of the finishing touches... and as alwasy, I'll keep you posted. It might not be the best finish in the gathering, but I'm still proud of what I wanted, tried and did do... and isn't that 1/2 the battle?....the other 1/2 is enjoing it and learning and getting better.. and that's the 1/2 I'm concentrating on.

Juneaudave... amazing is a good word for it.. I couldn't believe what this paint did on "it's own"..... after 20-30 min is just went flat, no air bubbles, NOTHING.... It might be expensive, but I can see myself using this stuff on other projects until I "perfect" the automotive paint spray technique.. yes it's rolled on, but it's by far the BEST "roll" application I've ever seen.
New! My Camp Cooking Forum

Project Desert Dawg website


Universal Health Care
Health care with the efficiency of the Department of Motor Vehicles
and the compassion of the Internal Revenue Service.
User avatar
Joanne
Queen of Cast Iron
 
Posts: 2111
Joined: Thu Jul 01, 2004 9:43 pm
Location: Las Vegas, NV
Top

Postby Keith B » Sun Apr 15, 2007 10:03 pm

Joanne... I totally hear you on that.... thanks again for all your experiences and help on Interlux... it sure helped... are you going to Minden? would like to see you there.
************
Keith
"Work and work and do your best! Paint and putty will do the rest!"
User avatar
Keith B
Silver Donating Member
 
Posts: 550
Images: 148
Joined: Mon Jan 29, 2007 3:54 pm
Location: Wichita, KS
Top

Postby Geron » Mon Apr 16, 2007 5:06 am

Keith B wrote: so you can see some waves, etc....


I'm sure mine will make you sea sick when you walk by :lol: :lol:

Question:

Why use a roller if you "tip" is afterwards? Why not just brush it on? Is there some value to using the roller first?

I"m still "epoxying"

g
If it's not broken, you're not trying hard enough.
User avatar
Geron
1000 Club
1000 Club
 
Posts: 1522
Images: 173
Joined: Tue Jan 18, 2005 6:23 am
Location: Georgia, Cherrylog
Top

Postby toypusher » Mon Apr 16, 2007 5:28 am

Keith,

Thnat looks great! Nice job!
User avatar
toypusher
Site Admin
 
Posts: 43040
Images: 324
Joined: Fri Jan 28, 2005 12:21 pm
Location: York, PA Area
Top

Postby glassice » Mon Apr 16, 2007 6:35 am

WOW! look great thank for the info
It is not the return ON my investment that I am concerned about; it is the return OF my investment
User avatar
glassice
Silver Donating Member
 
Posts: 588
Joined: Fri Sep 22, 2006 1:23 am
Location: E nev
Top

Postby Keith B » Mon Apr 16, 2007 8:31 am

Geron... you need to use a roller to put the paint on so you can get better coverage, use less paint and to keep it flat and smooth. A brush is going to have heavy and light spots and you're going to tend to overwork it if you do that..you can use the brush in the "tight" spots...I used a full 9" foam roller; You want to put it on nice and thin. When you roll in on just go horizonally, diag and vertically to make sure you spread it out nice and even..as you do this is creates and even surface and the roller will put THOUSANDS of little airbubbles, etc. in the paint...then you just take a really good brush, like a 100% china bristle brush, and just very lightly "tip" the surface. This pops all those little bubble and flattens the paint even more - you're going to see all the brush marks, etc..but ONLY TIP IT ONCE AND LEAVE IT ALONE...in about 20 min they just kind of "go away". The key is to tip lightly, have a wet edge on your brush and to hold the brush at about a 45 degree angle...you're not "dragging" paint, just tipping it off. You cannot use just any 'ole roller either. You need to use a solvent resistant, short foam roller, otherwise your paints going to be to thick and other rollers will leave "fuzz" in the paint... I have ZERO runs that I can see, but I'm putting on 3 very nice thin coats, sanding w/ 220 and 320 between each.
These are the rollers I used: jamestown distributors
This is the brush I used: http://www.purdycorp.com/catalog/brushes/display/60/all/11
The first coat of paint took a little over a quart. The 2nd coat used maybe 3/4 of a quart and I'm sure the 3rd will take about 3/4 as well...but I still have the underside of the hatch and the doors to do yet... I bought 5 quarts, hopeing to have one left over for "touch-ups" down the road.
I also have 2 coats of Epoxy PrimeKote Primer (by Interlux), under the paint, and I sanded those coats as well.
Last edited by Keith B on Mon Apr 16, 2007 8:41 am, edited 2 times in total.
************
Keith
"Work and work and do your best! Paint and putty will do the rest!"
User avatar
Keith B
Silver Donating Member
 
Posts: 550
Images: 148
Joined: Mon Jan 29, 2007 3:54 pm
Location: Wichita, KS
Top

PreviousNext

Return to Teardrop Construction Tips & Techniques

Who is online

Users browsing this forum: No registered users and 6 guests