Sides and Doors Cut Out!!!

Anything to do with mechanical, construction etc

Postby Ira » Wed May 02, 2007 7:53 am

HOLY CRAP!!!
Here we go again!
User avatar
Ira
Forum Storyteller
 
Posts: 5652
Images: 118
Joined: Tue Nov 29, 2005 2:16 pm
Location: South Florida

Postby elmo » Wed May 02, 2007 9:00 am

Wow...what everyone else said pretty much sums it up! Beautiful. I can't wait for the rest. :thumbsup:
It's scary when you start making the same noises as your coffee maker.
User avatar
elmo
Donating Member
 
Posts: 4484
Images: 216
Joined: Tue Feb 28, 2006 3:11 pm
Location: Island of Misfit Toys

Postby Keith B » Wed May 02, 2007 10:35 am

:bowdown:
************
Keith
"Work and work and do your best! Paint and putty will do the rest!"
User avatar
Keith B
Silver Donating Member
 
Posts: 550
Images: 148
Joined: Mon Jan 29, 2007 3:54 pm
Location: Wichita, KS
Top

Postby AmyH » Wed May 02, 2007 10:41 am

Thanks everyone! It seems like forever just getting it to this point, and it felt incredible propping that side up to see how it looked. I was terrified of messing up the sides when I routed them out!

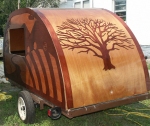
For everyone asking about the decorative strip, I can't take full credit for that design. I got the idea from a great guy who offers plans for rowing shells (Aeneas Originals). Hopefully my photo log gives a pretty good idea about how it went together, but if not feel free to ask questions. It really wasn't as hard as it looks, although the hard maple was a b*%#@ to cut. :lol:

I had a hard time falling asleep last night, since my mind is racing on to what I need to do next. I am having a heck of a time trying to find 5' wide aluminum sheets that aren't too thick to make the bends on the roof. I am starting to think about going all-woody, but I really liked the idea of having the roof skinned in aluminum. I have to decide if I can wrangle .050 thick aluminum around the curves or give up and go with a wood roof. Hmmm.....choices choices choices....
Amy
"...follow humbly whereever and to whatever abyss Nature leads, or else you shall learn nothing." T.H. Huxley

Photo Log
Camping Trips with the Tear
User avatar
AmyH
*The 300 Club
 
Posts: 624
Images: 4
Joined: Sat May 15, 2004 8:35 pm
Location: Shoreline, WA
Top

Postby Keith B » Wed May 02, 2007 10:49 am

5' wide at 4thousands should be pretty standard, but only to 10' long; it should be between $75-$100 per sheet pending your supplier.
************
Keith
"Work and work and do your best! Paint and putty will do the rest!"
User avatar
Keith B
Silver Donating Member
 
Posts: 550
Images: 148
Joined: Mon Jan 29, 2007 3:54 pm
Location: Wichita, KS
Top

Postby b.bodemer » Wed May 02, 2007 11:21 am

Amy,

That is beautiful work you are doing...................

:thumbsup: :thumbsup: :thumbsup:

Barb
User avatar
b.bodemer
1000 Club
1000 Club
 
Posts: 1608
Images: 328
Joined: Mon May 08, 2006 5:43 pm
Location: Lakewood OH
Top

Postby critter » Wed May 02, 2007 2:11 pm

sandbaggin pro huh? :D
critter

salad anit food... its what food eats!


critter
User avatar
critter
500 Club
 
Posts: 565
Images: 54
Joined: Fri Nov 04, 2005 2:39 pm
Location: greensboro nc
Top

Postby jmtk » Wed May 02, 2007 2:27 pm

Wow, Amy! That is beautiful woodwork. I can hardly wait to see what else you have planned! :thumbsup:

Jeanette
User avatar
jmtk
Donating Member
 
Posts: 324
Images: 98
Joined: Wed Nov 09, 2005 10:44 am
Location: Utah
Top

Postby peggyearlchris » Wed May 02, 2007 8:08 pm

:thumbsup: :thumbsup: Oh Amy, It looks awesome. You go girl!! :applause: :applause: :applause: Peg
User avatar
peggyearlchris
500 Club
 
Posts: 984
Images: 56
Joined: Mon May 29, 2006 8:49 pm
Location: corpus christi,texas
Top

Postby toolferone » Mon May 07, 2007 4:57 pm

Amy, Very nice work there. What weight glass cloth did you use?
Tom F.
Freud Tools
S.E.Woodworking Specialist
User avatar
toolferone
Donating Member
 
Posts: 37
Joined: Tue Mar 13, 2007 8:46 pm
Location: Raleigh
Top

Postby lmh222 » Mon May 07, 2007 5:23 pm

WOW - I am absolutely amazed. I've never tried inlay before but that was absolutely enough to make me want to start experimenting. That is awesome!
The difference between being involved and being commited is like eggs and bacon - the chicken was involved but the pig was commited.

http://www.teardrop.myphotoalbum.com
User avatar
lmh222
Teardrop Advisor
 
Posts: 67
Images: 8
Joined: Wed Apr 06, 2005 1:25 pm
Location: Vermont
Top

Postby mikeschn » Mon May 07, 2007 6:39 pm

Amy,

That is awsome. Glad to see the pace picking up again!

Mike...
The quality is remembered long after the price is forgotten, so build your teardrop with the best materials...
User avatar
mikeschn
Site Admin
 
Posts: 19202
Images: 475
Joined: Tue Apr 13, 2004 11:01 am
Location: MI
Top

Postby AmyH » Mon May 07, 2007 9:06 pm

Thanks everyone! Mike, I sure am glad to be picking up the pace on the build as well! :lol: I want to get camping in this tear before Summer has come and gone, again.

Toolferone, I used 6 oz fiberglass cloth, which may have been overkill, but it worked out nicely. The sides weren't as heavy as I thought they would be.

lmh222, I absolutely love the tree silhouette on your tear, that is some beautiful work there!
Amy
"...follow humbly whereever and to whatever abyss Nature leads, or else you shall learn nothing." T.H. Huxley

Photo Log
Camping Trips with the Tear
User avatar
AmyH
*The 300 Club
 
Posts: 624
Images: 4
Joined: Sat May 15, 2004 8:35 pm
Location: Shoreline, WA
Top

Postby forestfrog » Mon May 07, 2007 9:55 pm

Absolutely beautiful!!!! :thumbsup: :applause: :thumbsup:
I'm looking forward to following the rest of your build...you'll be camping in no time! :campfire:
Kristi
Image
~*~Stand still and be awed by Nature...~*~
User avatar
forestfrog
Teardrop Master
 
Posts: 272
Images: 83
Joined: Mon Aug 21, 2006 11:50 pm
Location: Louisiana - the middle part
Top

Postby lmh222 » Mon May 07, 2007 11:59 pm

Thank you - the only trouble is that it is an overlay (I think that is what it is called) on a curved surface. The bottom and a few of the branches like to come un-stuck periodically... it makes me admire your inlay work that much more.

My tear is about 2 years old now. It is due for some major cleaning up and refinishing this summer. No major problems with the body (a little bit of water damage :cry: ) but the trim pieces definitely need some TLC. So, I'm back here on the boards looking at all of the inspirational ideas and getting myself back into "building-mode".

~Lindsey

P.S. - I don't know if I'm imagining this but it seems like there are WAY more women here than there were 2 years ago. I could swear there were only 2 or maybe 3 women on the boards back then. Now, it seems like there are quite a few. :thumbsup:
The difference between being involved and being commited is like eggs and bacon - the chicken was involved but the pig was commited.

http://www.teardrop.myphotoalbum.com
User avatar
lmh222
Teardrop Advisor
 
Posts: 67
Images: 8
Joined: Wed Apr 06, 2005 1:25 pm
Location: Vermont
Top

PreviousNext

Return to Teardrop Construction Tips & Techniques

Who is online

Users browsing this forum: No registered users and 6 guests