Page 2 of 4

PostPosted: Tue Jul 08, 2008 1:48 pm
by aggie79
I too had thought about the 2-pin approach on the router, but after sketching it out, I found out it won't work except on constant radius curves or straight pieces.

PostPosted: Tue Jul 08, 2008 6:33 pm
by 48Rob
Using a router is certainly the easiest method! No arguments there!

Trouble is, unless either the side profile is "perfect"...and exactly the same, either side, then you have to create a template, and again, if both sides aren't exactly the same, you'll need two templates.

If a person was going to do a number of trailers, and cut the side profiles with a template that could also be used to cut the trim, it would be much better/faster to use a router.
If the sides are different, then using the existing profile to get a matching trim/border is really the only practical method.

Rob

PostPosted: Tue Jul 08, 2008 9:22 pm
by WarPony
48Rob wrote:Trouble is, unless either the side profile is "perfect"...and exactly the same, either side, then you have to create a template, and again, if both sides aren't exactly the same, you'll need two templates....


Huhhhh........ this is really disheartening to read. My profiles are already cut and have the inner frames/spars glued to the outside skins but aren't stood up or glued to anything. There's no way I can eyeball a "perfect" profile from what I have now. I have a router but am not really comforable using it like I can a belt sander and even then, I can get a little wild with it and gouge out a dip I'll have to deal with some other way.

I guess we'll see........ I'm still sticking to my original game plan to make our Widget look as good as possible with my skills. You guys are the best!!!

Jeff and Anna

PostPosted: Tue Jul 08, 2008 10:23 pm
by Juneaudave
Well...still another way....this may be hard to explain...

First...I fit the boards around the perimeter and tacked them in place with brads. I tried to cut the joints so they were square to the curve. No glue at this point.

Second....with the boards just tacked on...I routed the outside curve with a 1/4 spiral bearing bit to match the outside profile. A light sanding on the outside curve smoothes any irregularities...

Third...for the inside curve...I used a guide on the router with the outside edge of the panel on the guide. Couple passes, not completely through but almost and the inside curve is cut.

Fourth...mark and remove the individual pieces held in place with brads...finish the cut with a utility knife, lightly sand and you are ready to glue in place.

...Here's the router with the guide...

Image

Worked for me. You just need to be carefull. If you leave a little space between the guide plates...the router will keep itself square to the curve... :thinking: :thinking:

PostPosted: Wed Jul 09, 2008 12:06 am
by cuyeda
Juneadave looks like he has a process that seems doable. On the other hand, I fear making a mistake with the router slipping or dragging causing a mistake. I have little experience with the router, practice would probably be key before actually working on the TD.

Just thinking out loud. The outside edge could be done with a template bearing bit. Why not just use a marking guide to draw the inside line width, remove the trim pieces, bandsaw/jigsaw very close to the line, then drum sand to the line. It may take longer, but mistakes could be minimized. If you don't have a drum sander, mount your belt sander upside down to the workbench.

PostPosted: Thu Jul 10, 2008 6:46 pm
by Senior Ninja
I used thin strips of pine. I bent them into a "J" shape in the back of the shower. It worked just fine.
Steve

PostPosted: Thu Jul 10, 2008 7:24 pm
by Juneaudave
cuyeda wrote:Juneadave looks like he has a process that seems doable. On the other hand, I fear making a mistake with the router slipping or dragging causing a mistake. I have little experience with the router, practice would probably be key before actually working on the TD.

Just thinking out loud. The outside edge could be done with a template bearing bit. Why not just use a marking guide to draw the inside line width, remove the trim pieces, bandsaw/jigsaw very close to the line, then drum sand to the line. It may take longer, but mistakes could be minimized. If you don't have a drum sander, mount your belt sander upside down to the workbench.


Well...in fact I did slip on two occasions thoughout the build and ruined a couple short lengths of trim. But seeings how the trim was just temporaily held in place with brads while routing... I was able to just remove the goofed up length, cut another piece, tack it in place, and move on!!!! It is pretty easy to slip with a router.

;)

PostPosted: Fri Jul 11, 2008 12:12 am
by 2bits
I have been thinking about this too, and someone tell me what issues they see with this. The germ of the idea is to take a piece of 4'x8' 1/8", or 1/4" plywood and clamp to the side of the tear covering the entire profile top to bottom. You could scribe the exact profile then scribe the depth as you like and cut out one long continuous strip. With my 10 foot tear this will cover everything right up to the hatch opening where there will need to be a joint anyway, and the wheel well will hide any joint at the bottom.

I just like the idea of one continuous strip and the simplicity of it. The drawback is of course the plywood material... Call me a redneck but I rounded over some plywood for the back of my magazine shelf and the lines look pretty cool to me. Is this a crackhead idea or feasible? Will it look terrible there?

PostPosted: Wed Dec 24, 2008 12:57 am
by cdfnchico
48Rob wrote:The last important bit is to be sure to seal ALL sides of the trim.
Water WILL get behind the trim, no matter how well you think you have the edges caulked, and ruin the finish.

The side profile should be varnished/sealed with several coats.
The trim piece should be varnished/sealed with several coats, except for the face where it will be screwed on.


Rob, we're getting ready to trim our tear...can you clarify what you mean by this...it seems to be contradictory...we think we're going to CPES all sides of the trim and than varnish everything once installed...?

PostPosted: Wed Dec 24, 2008 7:39 am
by 48Rob
Hi Cathy,

Perhaps it could have been more clearly written...sorry.

The side profile should be varnished/sealed with several coats.

The trim piece should be varnished/sealed with several coats, except for the face where it will be screwed on.
(this is so the screw hole plug and the face of the trim can be sanded smooth after the plug is installed).

Screw the pices on, then remove the pieces one at a time.
Apply a dab of sealant/caulk around the backside of the screw hole, and inject a little in the screw hole itself, then re screw the piece to the body.

Once all is dry, you can plug the screw holes, or leave them as is.
Then apply stain and varnish to the face of the trim pieces.

A bit more work than just screwing the pieces on and giving the exposed parts a coat of varnish, but it will prevent moisture from getting behind/under the varnish and lifting it/turning the wood black.

I'm not familiar enough with CPES, experience wise, to offer an opinion, but if it does indeed "encapsulate" the wood, then the same purpose has been served.

My general caution was that it simply is not wise to attach two pieces of wood together, and then seal only that which is visible, as moisture will find a way between them.

Rob

PostPosted: Wed Dec 24, 2008 2:27 pm
by t-vicky
Jeff, Go to my album page 5 3 rd pic over top row. Those are 1" dowel rods cut about 1" long, drilled about 3/16 in the middle & sanded flat on one side to keep the clamp from sliding off. Draw a line where you want the inside of the trim to be & screw these to the edge of your line with 1-1/2 deck screws. Now look at the second row of pics, last one on the right. These are 1/4 thick strips of my hardwood. Hope you have lots of clamps.
Feel free to ask any questions. Roger

PostPosted: Tue Dec 30, 2008 10:13 pm
by Todah Tear
I laid a piece of insualtion sheet againts the profile of my galley and traced the curve onto the insulation sheet. I then drew a curve parallel to the first curve onto the insulation. The 2nd curve was 3" from the 1st curve because i wanted the trim to be 3" wide. I cut it out and trimmed the insulation template as needed. I then took the cut out and laid it on my wood and traced the pattern onto the wood. If you are lucky, the template will fit on one piece of wood. If the insulation template is longer than one sheet of wood, place 2 pieces of wood together. That way everything matches up.

Image


Image

The part(split) at the top is where the hatch is hinged to the roof.

Todah

PostPosted: Thu Jan 01, 2009 10:57 pm
by wannabefree
Steam bending and bent laminations are a couple approaches that come to mind.

There are good descriptions of both processes on this site (somewhere) and other woodworking sites. In either case you can use the trailer as a form. Steam bending will use less material, but you have to work fast. Laminations require a good tablesaw. A planer is optional.

I'm undecided as to which I will use, but the decision is coming up soon.

PostPosted: Tue Feb 03, 2009 10:52 pm
by WarPony
Juneaudave wrote:Image


I'm going to use this guide (or something close to it) and do the best I can. The weather was REALLY nice a couple of weeks ago so I got one side of the trim put on and tonight I cut it and it looks kinda alright for now. It's screwed on but not glued together so if my router gets out of hand and ruins the trim I can start over.

I'll post some pics later on......... I'm still worn out from Superbowl Sunday....... what a puss.

Jeff

PostPosted: Sun Feb 15, 2009 1:48 pm
by wannabefree
I ended up doing steam bent laminations. Use the trailer for the form. Attach a thin, wide strip to the top with screws, overhanging the edge by the thickness of the side wall trim. Don't glue it to the trailer yet.

Image

Next, build a steamer. Mine is a piece of rain gutter downspout, a pressure cooker, and the camp stove. A hotter stove would produce more steam, which would be good. Wires run side to side in the steambox hold the strip off the bottom of the steambox.

Image

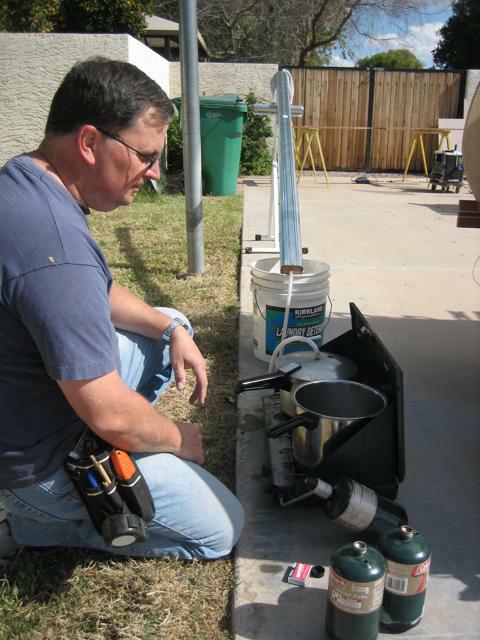
While the water boils, rip some thin strips that you will laminate together to form the sides. Mine are 1/2 x 5/16. You want them thin enough you can bend without breaking and wide enough they don't twist when you bend them. When the steam is up put one in the steamer and plug the open end with a rag. Don't put them all in; you can oversteam as easily as understeam.

Allow it to steam 15 minutes for each 1/4 inch of thickness. One thing -- this works best with green wood; a scarce thing where I live. I used dry wood and had a little breakage.

Take out the hot strip and clamp it to the underside of the strip you screwed to the tear. Don't try to glue it. You only have about a minute to work with and that won't allow for messing with glue. Get it clamped up and stick another strip in the steamer. When that strip is hot, clamp it to the strip on the other side of the tear. Working on both sides this way saves some time. Put another strip in the steamer. Now go to the original side, remove the clamps, take off your bent strip, apply lots of glue and clamp it back on. Drive in a few brads to keep it from sliding around. Rest for 10 minutes. Take the next strip out of the steamer and dry clamp it to the one you just glued up. You fall into a rhythm after awhile and at the end of the day you're done.

Image

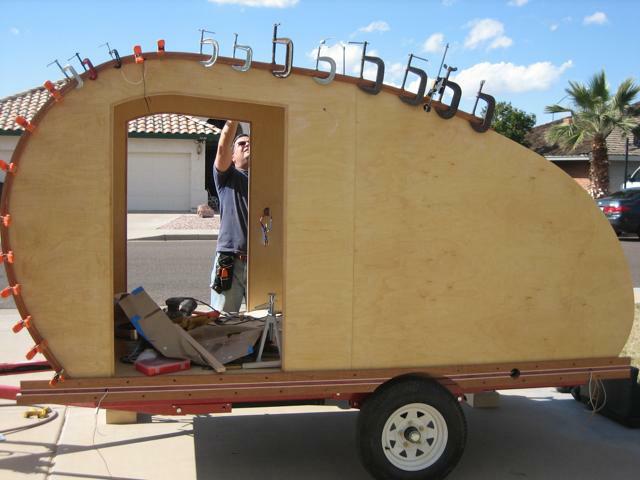
Keep going until you have built up the thickness you want or you run out of clamps (or patience).

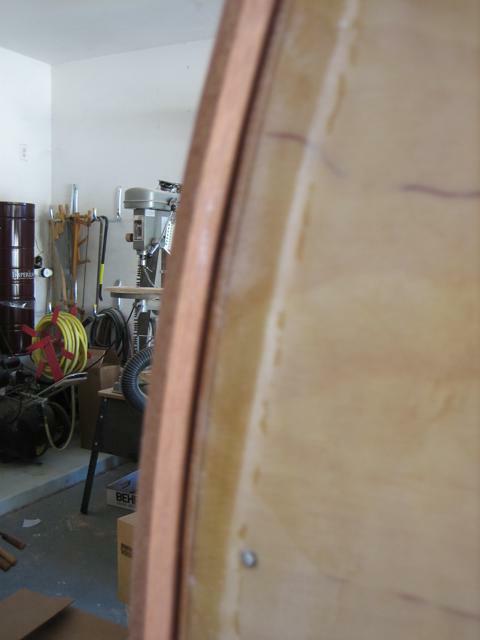
Let the whole mess rest a few days, then remove the screws holding the outer strip to the tear roof. Take off the molding and plane or sand it to final thickness. Then route any edge profile you want before you put it back on the tear. Slather on a mess of epoxy to the inside of the trim where it mates with the tear, and screw it back on. Cover up all the screws with one last wide strip glued on the top strip. The wide strips are wide enough and thin enough that you can probably get by without steaming.

The trim took a full day, including building the steamer. Maybe a bit longer than the pieced together approach, but I like it. You can do this without steam if you like. Just rip thinner strips out of extremely straight grained wood. Not having straight grained wood and not wanting to deal with 1/16 inch strips, I steamed.

BTW - the lower side trim in the last pic is mahogany, maple, and purpleheart. May not be as classy as sdtrippers, but I like it.