Customizing A Winter Warrior/ 01/09/2010 Got a profile!

Anything to do with mechanical, construction etc

Postby starleen2 » Sun Dec 20, 2009 8:53 am

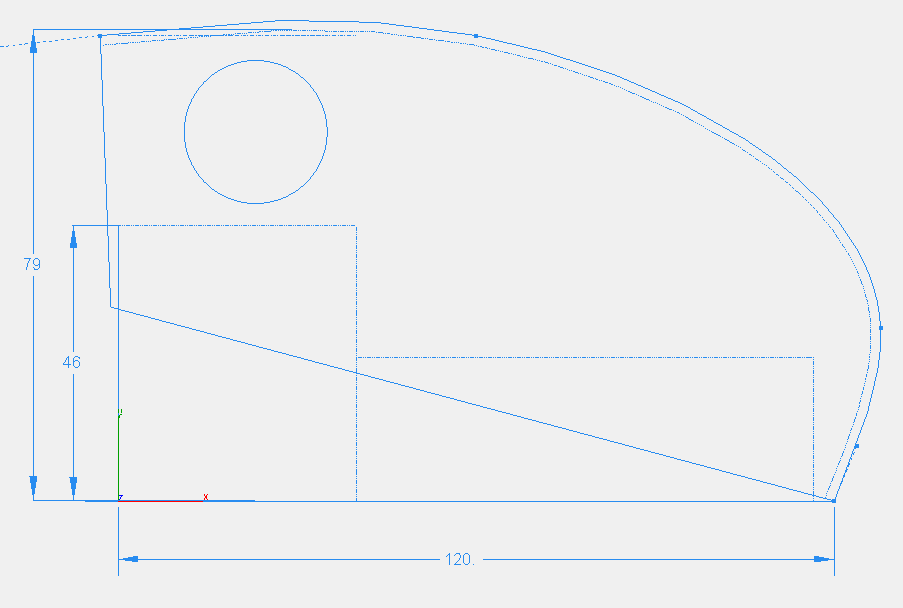
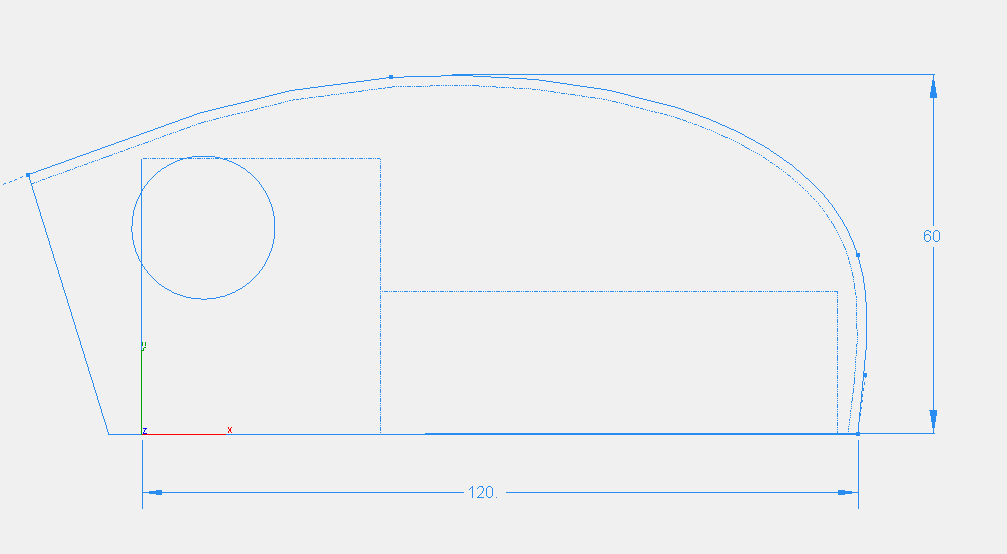
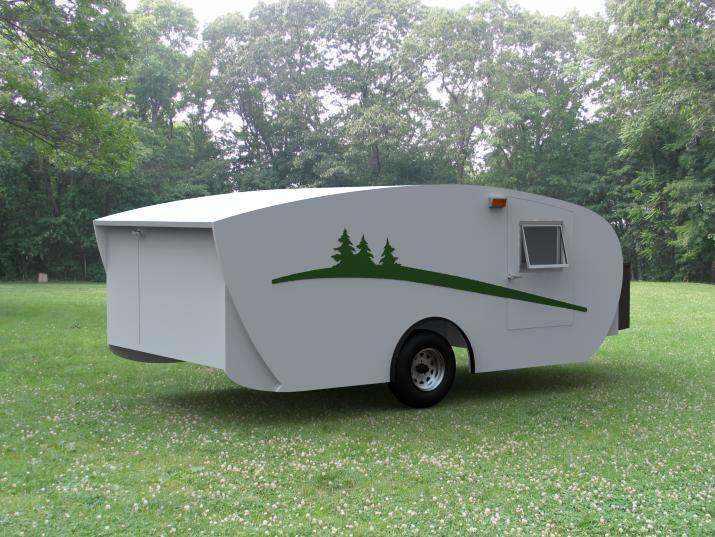
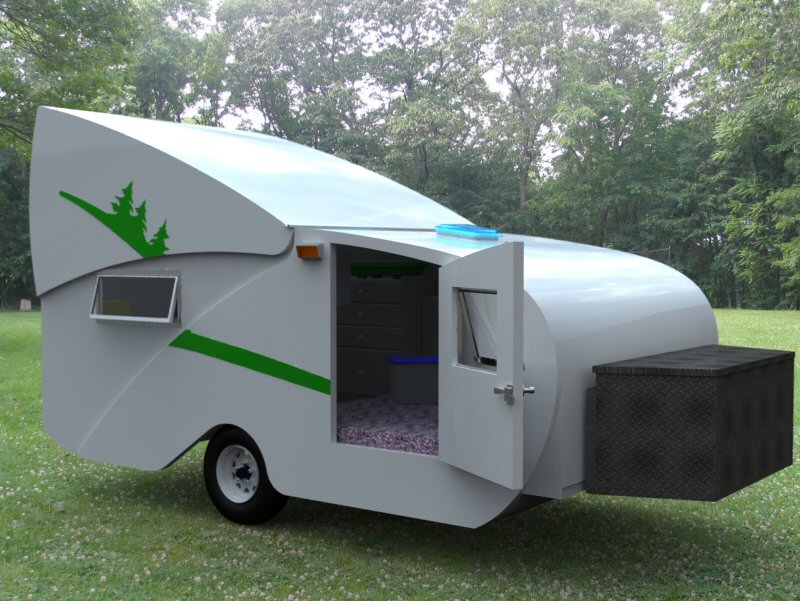
So as not to beat the proverbial horse – is 6-4 the max height or the height when you first get out of the bed. From the drawing I’m confused. If 6’4 is the max height, is it at the peak? – if it is not then why have a peak at all? I’m 6 ft tall and do not notice the curve at all in the LB. You could get a cleaner design and a greater height (ie“throwâ€
User avatar
starleen2
5th Teardrop Club
 
Posts: 16272
Images: 224
Joined: Sat May 12, 2007 8:26 pm
Location: Pea Ridge ,AR

Postby rxc463 » Sun Dec 20, 2009 12:43 pm

Scott: I'm looking to get that 6'-4" stretch right when I get out of bed. I hope to have a floor plan and some sketches posted sometime this week. Thanks for all the attention, I'm sure to need more till this is done!
Russ

Politicians and diapers have one thing in common. They should both be changed regularly, and for the same reason.
User avatar
rxc463
The 300 Club
 
Posts: 488
Images: 20
Joined: Wed Mar 12, 2008 6:05 pm
Location: Allentown, Pennsylvania

Postby rxc463 » Sun Dec 20, 2009 12:49 pm

DUH! I think it just sank in as to what you were trying to tell me! Move the hinge point forward lengthening the arc and getting a somewhat better rise at that point without the air dam. I may be able to get that with two angles in the hatch and still keep the squared off look that I want.

Told you I gotta get smacked more than once for this stuff to sink in :lol:
Russ

Politicians and diapers have one thing in common. They should both be changed regularly, and for the same reason.
User avatar
rxc463
The 300 Club
 
Posts: 488
Images: 20
Joined: Wed Mar 12, 2008 6:05 pm
Location: Allentown, Pennsylvania
Top

Postby rxc463 » Sun Dec 27, 2009 8:39 am

On the suggestions of Scott and Ageless I did a bit of fiddling with the profile and came up with this. I'm no good with CAD so I'm going to do some cardboard aided design to work out the dimensions and details. I think this is a pretty good compromise to aerodynamics and my original concept.

As long as I can work out the details for the back wall and door, I'm liking this one pretty well. I'm not real thrilled about having to layout the ellipses for framing, but I guess I'll manage. Looks like I should be able to get all the headroom I originally wanted.

Image

Looking for some feedback, so fire away. :D
Russ

Politicians and diapers have one thing in common. They should both be changed regularly, and for the same reason.
User avatar
rxc463
The 300 Club
 
Posts: 488
Images: 20
Joined: Wed Mar 12, 2008 6:05 pm
Location: Allentown, Pennsylvania
Top

Postby starleen2 » Sun Dec 27, 2009 9:05 am

I don’t know how strong you are – but I had originally had a inside height of 6’0 for the Ladybug WW, But the weight of the hatch was the reason why I shaved it down a bit – so think light or develop a lift system. Perhaps on the lower portion you could save some ellipse work by using a diagonal line from the from to the rear on the lower section of the hatch side wall. To get the geometry just right – I did the same thing with the plywood: lay it out on the floor, cut a little larger than needed, then rotate it to check for problems and required height. One thing to watch for is the offset of the main hinge. I would suggest a three to four inches offset so you won’t have the Gap at the top of the hinge area (thank Mike and Gary for this one!)
User avatar
starleen2
5th Teardrop Club
 
Posts: 16272
Images: 224
Joined: Sat May 12, 2007 8:26 pm
Location: Pea Ridge ,AR
Top

Postby starleen2 » Sun Dec 27, 2009 5:21 pm

maybe this will help:
Image

As you can see with the hatch fully extended you have a portion that really does not need to be there (salmon shaded area) Remember that this is going to be on both sides and is dead lifting weight
User avatar
starleen2
5th Teardrop Club
 
Posts: 16272
Images: 224
Joined: Sat May 12, 2007 8:26 pm
Location: Pea Ridge ,AR
Top

Postby mikeschn » Mon Dec 28, 2009 6:44 am

starleen2 wrote: One thing to watch for is the offset of the main hinge. I would suggest a three to four inches offset so you won’t have the Gap at the top of the hinge area (thank Mike and Gary for this one!)


Here's a pic of the offset hinge...

Image

And here I've turned the side into Plexiglas so you can see the triangular hole that remains covered when you open the hatch.

Image

Mike...

P.S. Scott, the new year is creeping up on you. Do you have another build planned?
The quality is remembered long after the price is forgotten, so build your teardrop with the best materials...
User avatar
mikeschn
Site Admin
 
Posts: 19202
Images: 475
Joined: Tue Apr 13, 2004 11:01 am
Location: MI
Top

Postby mikeschn » Mon Dec 28, 2009 7:54 am

Russ,

How about something like this? (Sorry about the pic size... I can't resize it, it degrades too much...)

Image

Image

Mike...
The quality is remembered long after the price is forgotten, so build your teardrop with the best materials...
User avatar
mikeschn
Site Admin
 
Posts: 19202
Images: 475
Joined: Tue Apr 13, 2004 11:01 am
Location: MI
Top

Postby Ageless » Mon Dec 28, 2009 11:18 am

Another thought; use the old style auto trunk hinge which are spring loaded to help raise the hinged top
Strangers on this road we are on; we are not two, we are one - Raymond Douglas Davies
User avatar
Ageless
Platinum Donating Member
 
Posts: 1603
Images: 8
Joined: Tue Aug 04, 2009 8:34 am
Location: Pt. Orchard, WA
Top

Postby rxc463 » Wed Dec 30, 2009 5:11 am

Thanks for the input folks! I am excited! I did some paper modeling yesterday and came up with a profile that I am quite pleased with. It has ended up a bit more aerodynamic and pleasing to my eye than the rest. Alas it has curves which I was going to try to avoid but I now have the help of an experienced body man that can do wonders with fiberglass.
As soon as I can get my camera back from my kid I'll post a few pics. Should be the next day or so.

Thanks again to all that have replied. Your suggestions keep me thinking. Trying each one helps me explore new ideas, my food for thought. Had it not been for your help, I'm afraid I would have been stuck at the first concept. I'm hoping to move this to the build threads in the next few weeks.
Viva La Evolution! :thumbsup:
Russ

Politicians and diapers have one thing in common. They should both be changed regularly, and for the same reason.
User avatar
rxc463
The 300 Club
 
Posts: 488
Images: 20
Joined: Wed Mar 12, 2008 6:05 pm
Location: Allentown, Pennsylvania
Top

Postby mikeschn » Wed Dec 30, 2009 8:37 am

Here was some of my latest thinking on the Optimized Winter Warrior.

Image

I am trying to figure out how to mount a galley in the side of the trailer, not much luck with that yet...

Here it is in the open position... notice the wheel well changed?
Image

Mike...
The quality is remembered long after the price is forgotten, so build your teardrop with the best materials...
User avatar
mikeschn
Site Admin
 
Posts: 19202
Images: 475
Joined: Tue Apr 13, 2004 11:01 am
Location: MI
Top

Postby Wolfgang92025 » Wed Dec 30, 2009 10:19 am

Mike,

I keep coming up with such great designs.:thumbsup:

Wolfgang
Wolfgang

Image
User avatar
Wolfgang92025
Lifetime member
 
Posts: 1098
Images: 660
Joined: Fri Apr 18, 2008 10:16 pm
Location: Salt Lake City area, Utah
Top

Postby kludge » Thu Dec 31, 2009 10:56 am

mikeschn wrote:Russ,

How about something like this? (Sorry about the pic size... I can't resize it, it degrades too much...)

Image

Image

Mike...


I like this a lot!
kludge
Teardrop Master
 
Posts: 177
Joined: Fri Dec 11, 2009 9:41 am
Location: Indy
Top

Postby rxc463 » Sat Jan 02, 2010 5:05 am

Still working on some of the details of the Highlander. It has come to be very similar to the O.W.W in profile (thanks Mike). Trying to decide on an ellipse or plain semi circle arc for the nose. The lazy susan swing out galley has got me thinking also. Going to see if my pencil sketches will scan ok, and try to post tomorrow.
Russ

Politicians and diapers have one thing in common. They should both be changed regularly, and for the same reason.
User avatar
rxc463
The 300 Club
 
Posts: 488
Images: 20
Joined: Wed Mar 12, 2008 6:05 pm
Location: Allentown, Pennsylvania
Top

Postby rxc463 » Sat Jan 09, 2010 9:52 am

First of all, sorry for the delay in posting. Got a little side tracked. So here it is hopefully in it's final rendition. I know it's not groundbreaking design, but I think it will work well for us and be able to use the frame we have. It is very similar to the OWW except for the size. After dabbling with the hatch design, I found one that pleases my eye and also gives me the stand up headroom at the edge of the bed space that I wanted. Pretty much resigned to the fact that some lifting aide will probably be needed.
Image
The Highlander will be a full 80" wide inside to accommodate a real queen size bed in a crosswise configuration. Planning a galley space with room for a coffee pot, a small microwave and a sink only as we do not plan to actually cook inside but would like the minimum ability to heat something up if the weather forced us inside. Still undecided at this point as to whether or not we want a micro fridge. There are so many ready to eat options available that we will probably only need a cooler to keep our drinks cold. most of our trips are going to be in the 2-3 day stay range and will likely be in established campgrounds.
I'm going to be putting down a full size floor plan in the basement to work out the rest of the interior placements for the shower/potty room and storage. I think I will do a full size wall template also to help with overall scaling. Cardboard and duct tape are such wonderfully inexpensive mediums to work in and just the ticket for curing winter boredom.

Can anyone suggest a spar size and spacing for that 80" span
:thinking:
Russ

Politicians and diapers have one thing in common. They should both be changed regularly, and for the same reason.
User avatar
rxc463
The 300 Club
 
Posts: 488
Images: 20
Joined: Wed Mar 12, 2008 6:05 pm
Location: Allentown, Pennsylvania
Top

PreviousNext

Return to Teardrop Construction Tips & Techniques

Who is online

Users browsing this forum: No registered users and 3 guests