Router vs. Jigsaw

Anything to do with mechanical, construction etc

Postby Kevin & Sandy » Mon Jan 25, 2010 8:39 am

When you say they are great for cutting rooflines, etc., what is your method? Make some kind of template? The last time I ran a router, it was hard to follow a line, so I am just wondering.

I don't doubt anybody when they say they work great, I just don't know how to use one !!

Kevin
User avatar
Kevin & Sandy
The 300 Club
 
Posts: 406
Images: 46
Joined: Mon Jun 22, 2009 6:58 pm
Location: Loomis, NE

Postby Larwyn » Mon Jan 25, 2010 8:57 am

Routers are very useful tools but are not generally used for freehand cutting. Personally, I think you can do more with only a jig saw than you can with only a router. Yes you can make very clean square cuts with a router and it will follow a template very well. But in most cases you need some way to cut a curve in order to make the template to enable the router to be superior to the jigsaw. A jigsaw (or band saw) and some type of sander is the way I generally come up with the original curved template, and if I am not going into production that template is actually part of the finished project. I still see no point in making 3 of something when the project only requires 2. I do have a few templates laying around but mostly they are cut 3/8" under/oversized and intended for use with my plasma cutter, though they will work well with the router when used with the proper sized bushing.

To chime in on the "more toys" discussion I have 7 routers if you count the table mounted router, the laminate trimmer and Roto Zip as routers, and, very near the bandsaw, I have a good Porter Cable jigsaw always plugged in and ready go near my workbench in the woodworking shop, another in the garage (normally used for metal), and a Ryobi 18 Volt cordless jigsaw shaped doorstop which I only use when an extension cord would be too much trouble.

I would vote that you get both, they make a good team, but the jigsaw is more useful on it's own. :thumbsup:
Larwyn

Keeper of the Most Out Of Control Shop (2005)

I feel bad for the man that cannot spell a word more than one way. Mark Twain
User avatar
Larwyn
Mad Kilted Texan
 
Posts: 1658
Images: 210
Joined: Sun Jun 20, 2004 12:06 pm
Location: Kerrville, Texas

Postby aggie79 » Mon Jan 25, 2010 9:15 am

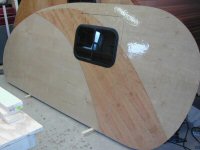
I made a template out of 1/4" MDF before cutting my sidewalls. The picture below shows the template on top of a sheet of plywood (MDO). I traced the outline onto the plywood, rough cut the profile and all of the openings for insulation (using a jig saw), and then used a flush trim pattern bit in the router to "clean things up."

Image

Image

Image

You may know this already, but a pattern bit has a bearing on the shank of the bit above the cutting edges, and the bearing is the same diameter as the cutters. The bearing rides against the pattern or template and duplicates the pattern in the material below.

Take your time, read the instrutions with your router on which direction to route, cut a little with each pass, and you'll find that it is pretty easy.

Tom
Tom (& Linda)
For build info on our former Silver Beatle teardrop:
Build Thread

93503
User avatar
aggie79
Super Duper Lifetime Member
 
Posts: 5405
Images: 686
Joined: Tue Aug 07, 2007 5:42 pm
Location: Watauga, Texas
Top

Postby NathanL » Mon Jan 25, 2010 9:15 am

First thing if you want to use a router much get/make a new base for it. Make one side flat so you can follow a guide easier...a wider base also keeps the router more stable.

You can buy or make an attachment for your new base that will allow you to follow a radius or even an ellipse. A lot of the profiles I see have the radius shown and/or the layout for the ellipse.

Freehanding a router is a recipe for disaster.

I think even Home Depot/Lowes sells a base/circle/radius attachment for routers that's pretty handy.
NathanL
The 300 Club
 
Posts: 371
Joined: Thu Sep 17, 2009 4:41 am
Top

Postby Cliffmeister2000 » Mon Jan 25, 2010 9:48 am

Here's a good video on a very simple router function, routing an edge.

http://www.youtube.com/watch?v=t0zDxXOX8gw
God Bless

Cliff

♥God. ♥People.
1 John 4:9-11

My Teardrop build pictures
User avatar
Cliffmeister2000
Titanium Donating Member
 
Posts: 3622
Images: 157
Joined: Thu Jul 26, 2007 10:18 pm
Location: Phoenix, AZ
Top

Postby bobhenry » Mon Jan 25, 2010 10:26 am

My 1st 2 teardrops were layed out with a compass made from a long slender plywod ripping. By removing the router baseplate and attaching a square of 1/8 " paneling that I had modified to match the base plate , I was able to reattach the router To my giant compass and cut the profile using the router guided by the compass for a machine like smooth cut.

Here is an old post where Andrew and I discussed laying out a 4x8 profile

http://www.mikenchell.com/forums/viewtopic.php?p=181475&highlight=#181475
Growing older but not up !
User avatar
bobhenry
Ten Grand Club
Ten Grand Club
 
Posts: 10368
Images: 2623
Joined: Fri Feb 09, 2007 7:49 am
Location: INDIANA, LINDEN
Top

Postby aggie79 » Mon Jan 25, 2010 12:06 pm

bobhenry wrote:My 1st 2 teardrops were layed out with a compass made from a long slender plywod ripping. By removing the router baseplate and attaching a square of 1/8 " paneling that I had modified to match the base plate , I was able to reattach the router To my giant compass and cut the profile using the router guided by the compass for a machine like smooth cut.


Bob's right. A router compass is the way to go on curves.

Here's one I made out of some t-track, scrap 1x's, and scrap 1/4" mdf for the base plate. The picture is not too good, but this shows the upper door radius being cut into my sidwall template.

Image

Tom :thumbsup:
Tom (& Linda)
For build info on our former Silver Beatle teardrop:
Build Thread

93503
User avatar
aggie79
Super Duper Lifetime Member
 
Posts: 5405
Images: 686
Joined: Tue Aug 07, 2007 5:42 pm
Location: Watauga, Texas
Top

Postby Cliffmeister2000 » Mon Jan 25, 2010 12:38 pm

Tom, how thick was the material you were cutting? Did you cut at one pass, or ease into it?
God Bless

Cliff

♥God. ♥People.
1 John 4:9-11

My Teardrop build pictures
User avatar
Cliffmeister2000
Titanium Donating Member
 
Posts: 3622
Images: 157
Joined: Thu Jul 26, 2007 10:18 pm
Location: Phoenix, AZ
Top

Postby aggie79 » Mon Jan 25, 2010 2:27 pm

Cliffmeister2000 wrote:Tom, how thick was the material you were cutting? Did you cut at one pass, or ease into it?


Cliff,

In the picture I was cutting 1/4 MDF with a 1/4" carbide spiral downcut bit. I cut the template full thickness with one pass (after pre-drilling a 1/4" hole to start.)

When I cut the door, I used the same bit in a plunge router, and "crept up" to the full thickness ~ 1/8" to 1/4" depth for each pass.

In case anyone was wondering, I planned on a 1/4" clearance between the door and opening. The door and the opening will each be finished with aluminum edging, so the final clearance will be about 1/8" all around.

Tom
Tom (& Linda)
For build info on our former Silver Beatle teardrop:
Build Thread

93503
User avatar
aggie79
Super Duper Lifetime Member
 
Posts: 5405
Images: 686
Joined: Tue Aug 07, 2007 5:42 pm
Location: Watauga, Texas
Top

Postby afreegreek » Mon Jan 25, 2010 9:07 pm

in my opinion you need both. one does not replace the other. each has it's uses but if you're interested in saving money go with the jigsaw (buy the correct good quality blades) because a router is useless without bits and those are expensive!! plus you need to make templates to follow in many cases which require a jig or bandsaw to make as well as the extra material to make them with.

if I was to make a project like this using a jigsaw, I'd choose 'taper ground- down cutting blades' these leave a smoother finish than 'set tooth' blades and don't fuzz up your line as you cut because the teeth cut on the down stroke. (you must turn the orbit function of the jigsaw OFF to use these blades) straight up and down only!! and hold on!! these blade want to lift the saw off the wood as you cut.

the secret to good cuts is accurate layout lines and patience. the thinner the pencil line the easier it is to follow. those 0.5mm leads are perfect. go slow and track on the edge of the line.. an accurate cut takes a while but be patient, the fit and finish will save time later and make it look crisper and cleaner. a nice even gap around the door for example.
afreegreek
500 Club
 
Posts: 723
Images: 0
Joined: Mon Jan 25, 2010 8:35 pm
Top

Postby S. Heisley » Tue Jan 26, 2010 2:50 am

NathanL wrote:
Freehanding a router is a recipe for disaster.


Okay, that makes me nervous.

So far, I have built my tiny trailer with a drill, a circular saw, a jigsaw, and an orbital sander. The sander and a rasp file works good to clean up edges and I can freehand the jigsaw fairly well on curves, etc. I've been told that I will need a router to trim the counter laminate so I bought one. But, I haven't taken it out of the box yet. If I can find a way around using it, I might just take it back...haven't decided yet. :thinking:
User avatar
S. Heisley
Super Lifetime Member
 
Posts: 8872
Images: 495
Joined: Mon Sep 17, 2007 10:02 am
Location: No. California
Top

Postby afreegreek » Tue Jan 26, 2010 3:12 am

S. Heisley wrote:NathanL wrote:
Freehanding a router is a recipe for disaster.


Okay, that makes me nervous.

So far, I have built my tiny trailer with a drill, a circular saw, a jigsaw, and an orbital sander. The sander and a rasp file works good to clean up edges and I can freehand the jigsaw fairly well on curves, etc. I've been told that I will need a router to trim the counter laminate so I bought one. But, I haven't taken it out of the box yet. If I can find a way around using it, I might just take it back...haven't decided yet. :thinking:


don't worry. you'll be using a trim bit with a bearing on it that will follow the edge of the plywood. this is not the same as "freehanding" a cut through a sheet of plywood. you only need to expose enough of the bit to trim the laminate.. less than 1/16th inch. you will not encounter any dangerous situations doing it but if you want to take the router back, go ahead. a six pack of beer will get that counter laminate trimmed for you at your local cabinet shop.
afreegreek
500 Club
 
Posts: 723
Images: 0
Joined: Mon Jan 25, 2010 8:35 pm
Top

Postby bobhenry » Tue Jan 26, 2010 8:24 am

Was outside salesman for a specialty cabinet shop that was heavy into custom counter tops. The shop foreman was an old cantankerous German. I watched him a hundred times take a handy knife with a brand new blade and score the back side if the protruding laminate and simply snap it off like a pane of glass. He backed the material with a board while scoreing and used the same board to apply pressure to the face to snap the laminate. Then he would dress the edge with a single cut metal file. Made it look so easy.

P.S. I use a light duty laminate trimmer
Growing older but not up !
User avatar
bobhenry
Ten Grand Club
Ten Grand Club
 
Posts: 10368
Images: 2623
Joined: Fri Feb 09, 2007 7:49 am
Location: INDIANA, LINDEN
Top

Postby S. Heisley » Tue Jan 26, 2010 11:07 am

afreegreek wrote:
...if you want to take the router back, go ahead. a six pack of beer will get that counter laminate trimmed for you at your local cabinet shop.


:lol: :lol: ...Didn't see that one coming! It made me laugh out loud! :lol: :lol:
User avatar
S. Heisley
Super Lifetime Member
 
Posts: 8872
Images: 495
Joined: Mon Sep 17, 2007 10:02 am
Location: No. California
Top

Postby NathanL » Tue Jan 26, 2010 8:08 pm

S. Heisley wrote:NathanL wrote:
Freehanding a router is a recipe for disaster.


Okay, that makes me nervous.

So far, I have built my tiny trailer with a drill, a circular saw, a jigsaw, and an orbital sander. The sander and a rasp file works good to clean up edges and I can freehand the jigsaw fairly well on curves, etc. I've been told that I will need a router to trim the counter laminate so I bought one. But, I haven't taken it out of the box yet. If I can find a way around using it, I might just take it back...haven't decided yet. :thinking:


Like the other person said when you are routing an edge with a bearing on the bit it's not the same as "freehanding".

To me freehanding is you try to cut a piece of plywood in half with no edge guide or other device and the router will just wander around.

Anytime you are using a router on an edge is not freehanding. It's only when you try and get creative do you chance making a boo boo. And by a recipe for disaster I mean you just mess up your material.
NathanL
The 300 Club
 
Posts: 371
Joined: Thu Sep 17, 2009 4:41 am
Top

PreviousNext

Return to Teardrop Construction Tips & Techniques

Who is online

Users browsing this forum: No registered users and 6 guests