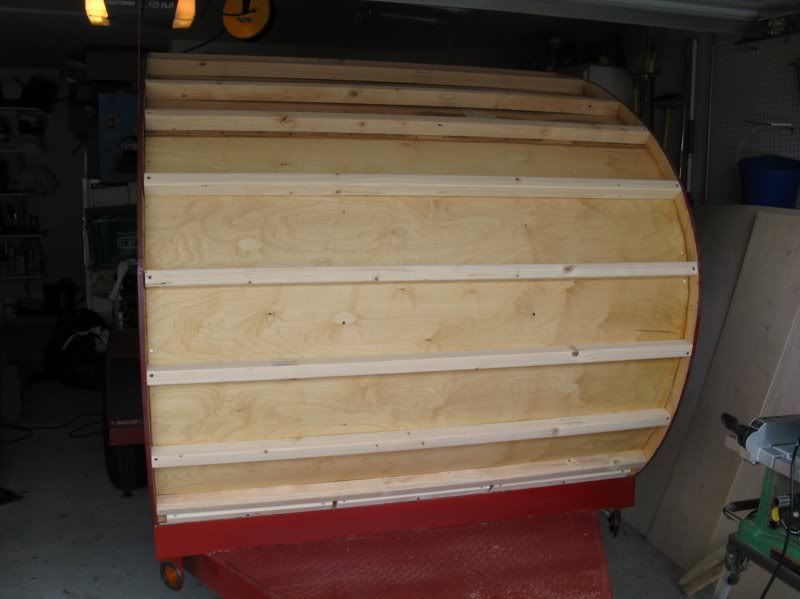
I've seen the Kuffle Creek plans and some of the things they suggest are "the hard way". I have "talked" with Halfdome Danny and the interior roof with all the little blocks is not the way "a cabinet maker" would do it. He uses a router to rabbit a notch for the beams and interior ceiling skin. Then the outer skin goes on. Seems like a lot easier (once you make a jig for your router so it doesn't tip).
As far as beams go. I don't think it matters what they are made of. If you have an interior skin and an exterior skin (say of 1/8 ply of good quality) the strenght of the beams will really be secondary to that of the skins if they are held firmly attached to the beams. On the edges of hollow core doors they use pine or sometimes particle board as you need to attach locks and hinges) but the rest of the skins are separated by a cardboard matrix. As long as the skins are held in position by the the internal supports, the skins will provide plenty of ridgidity. Just try and bend a hollow core door with cardboard holding the skins apart (although I wouldn't recommend using cardboard in a teardrop). I plan on using the parts of the 5X5 plywood that I don't need (as I'll be trimming them to 4 feet for the sides). Glue a couple pieces together, rip to desired width, and you have good beams/ribs and don't have to buy any wood. The more ribs the merrier but I don't see that they need to be more than an inch wide. The key is fastening the interior and exterior skins to the beams. Additionally, the curvature (if you don't have straight sections) of the cabin roof will add rigidity to the structure.
If there is something wrong with this plan, please "speak now or forever hold your peace". I'm certainly open to input.
Cheers,
Gus
Red Oak for Roof Spars
44 posts
• Page 2 of 3 • 1, 2, 3
I dunno?
![]() by eamarquardt » Tue Jul 13, 2010 10:12 pm
by eamarquardt » Tue Jul 13, 2010 10:12 pm
The opinions in this post are my own. My comments are directed to those that might like an alternative approach to those already espoused.There is the right way,the wrong way,the USMC way, your way, my way, and the highway.
"I'm impatient with stupidity. My people have learned to live without it." Klaatu-"The Day the Earth Stood Still"
"You can't handle the truth!"-Jack Nicholson "A Few Good Men"
"Some people spend an entire lifetime wondering if they made a difference in the world. The Marines don't have that problem"-Ronald Reagan
-
eamarquardt - Silver Donating Member
- Posts: 3179
- Images: 150
- Joined: Sat Nov 11, 2006 11:00 pm
- Location: Simi Valley, State of Euphoria (Ca)
![]() by dh » Wed Jul 14, 2010 3:09 am
by dh » Wed Jul 14, 2010 3:09 am
Hey Gus, won't you be putting fasteners into the endgrain of plywood when you attach walls and spars together? Also, I didn't mean to inply perfectly straight red oak was available at the BORG, but, for stated purpus, pretty straight 1x2 R O can be had when compared to 1x2 poplar, at least at my local Lowes.
Ignorant doesn't know any better, Stupid knows better but does it anyway.
My build page: http://www.tdbuildlog.blogspot.com/
My build page: http://www.tdbuildlog.blogspot.com/
-

dh - Gold Donating Member
- Posts: 1647
- Joined: Fri Aug 14, 2009 7:08 pm
- Location: North East Arkansas


 Mark (& Cindi)