Frustration is setting in.....

Anything to do with mechanical, construction etc

Postby bobhenry » Wed Apr 06, 2011 6:56 am

I simply waded in and started swimming. I had access to 11 7/8 by 1 1/4 thick engineered lumber ( "rim board" ) I cut a right and left and 2 center vertical ribs they were relieved at the top to accept a 2x4 and capped at the bottom with another 2x4. The lexan lays over the sidewall where a garage door bottom seal was installed. I never put serious thought into it it just happened and has worked from the moment it was installed. So some times these hatches are not as daunting as some of you make it sound!

Image 
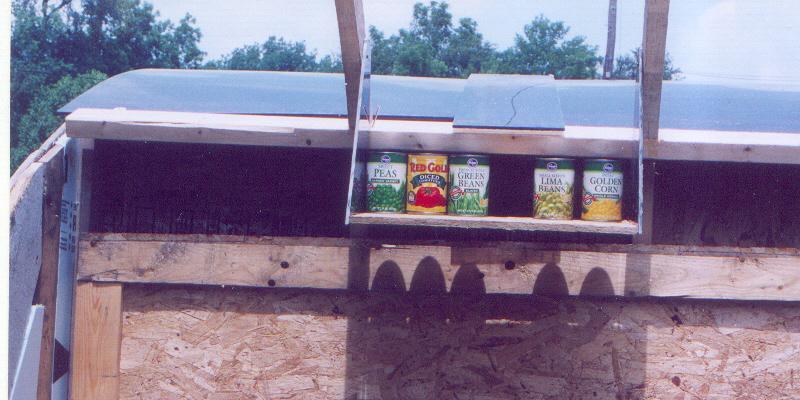
Here is the top 2x4 attached to the curved vertical ribs. The little self leveling shelf was just a science experiment

Image 
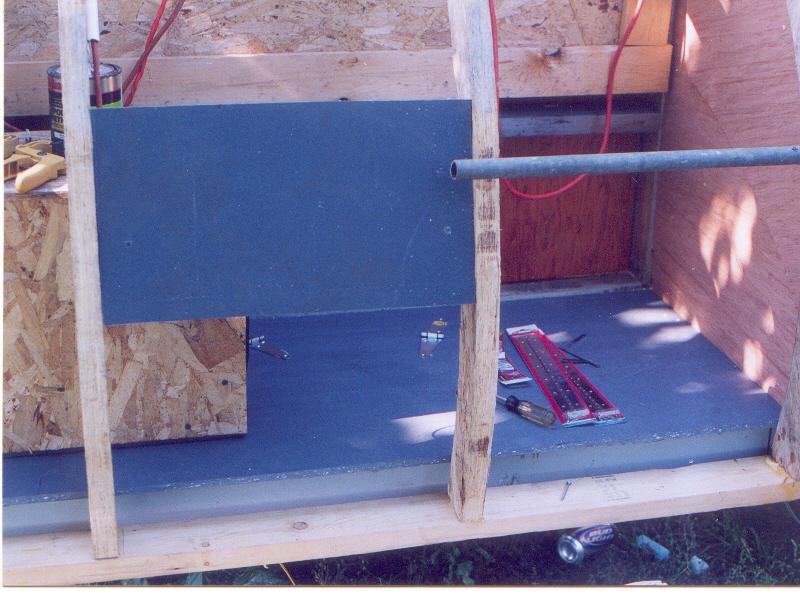
This shot shows the bottom terminating 2x4 as you see it hangs below the floor so not much chance of a leak unless water can run up hill!

Image 
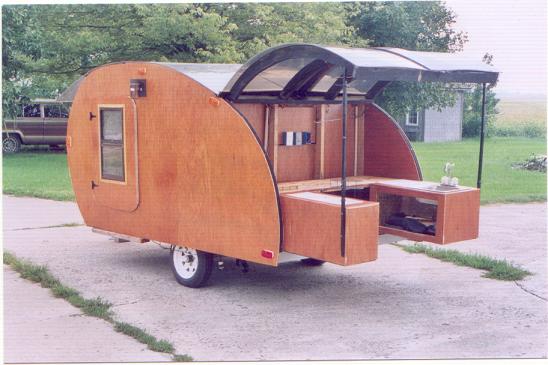
here is a shot almost finished


Image 
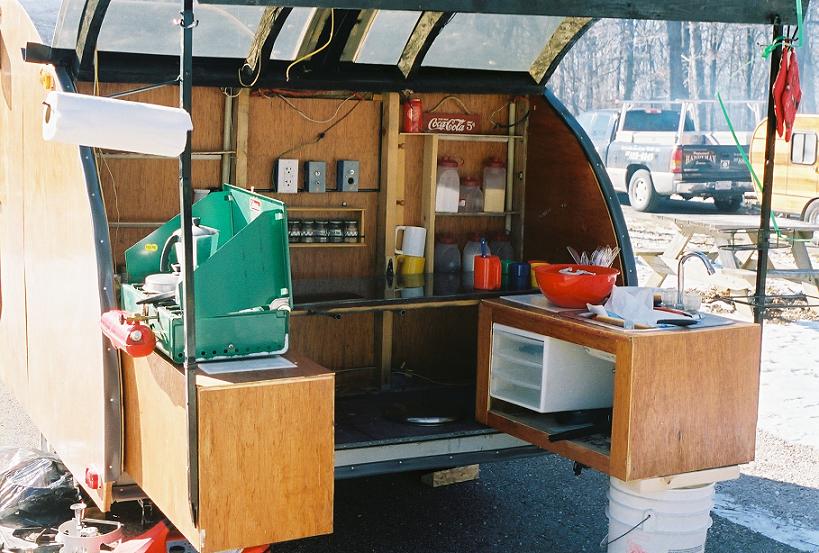
and here is the gasket on the sidewall , Note the lexan overhang that rests directly on the gasket.
Growing older but not up !
User avatar
bobhenry
Ten Grand Club
Ten Grand Club
 
Posts: 10368
Images: 2623
Joined: Fri Feb 09, 2007 7:49 am
Location: INDIANA, LINDEN

Postby Rlowell » Fri Apr 22, 2011 11:31 pm

Do not be afeared of it...it is only wood. I also had to re-build my hatch as the wind tore it up. May angles were sharp (weekender design) and I did alter the design and did some more reinforcement. Pictures in my gallery.

You are doing fine...you must be a perfectionist too... Your build is looking great.

Rod
Plan your work...work your plan...at least that's the plan. Oh, just do it anyway!
gallery/image_page.php?album_id=1425&image_id=76342
User avatar
Rlowell
2000 Club
2000 Club
 
Posts: 2004
Images: 42
Joined: Wed May 23, 2007 12:39 pm
Location: Orlando, Fl.

Second try......

Postby WildTexan » Sun Jul 31, 2011 2:34 pm

Ok, after using my first galley lid as practice I finnaly tried again. This one is slightyl less horrible, but its gonna have to work. Its was all nice and straight till I put the 1/4 inch birch on it. Now its not as sqare as it was, and has a little spring back. My 1/4 in gap all the way around is now gone as well. Nothing a little sanding won't fix. I hope anyway.


Image

Image
User avatar
WildTexan
Teardrop Advisor
 
Posts: 77
Images: 77
Joined: Thu Nov 18, 2010 3:33 pm
Location: Hickory Creek, TX
Top

Postby Miriam C. » Mon Aug 01, 2011 7:00 am

:applause: :thumbsup: Looks good from here. Wood will change with the weather and time so let it be for a while!
“Forgiveness means giving up all hope for a better past.â€
User avatar
Miriam C.
our Aunti M
 
Posts: 19675
Images: 148
Joined: Wed Feb 15, 2006 3:14 pm
Location: Southwest MO
Top

Postby Rlowell » Mon Aug 01, 2011 9:22 am

:applause: Looking good there Wild Texan.

The seals and the edge molding will cover a multitude of gaps and "oops" as you go along.

When and where is your first outing? Have fun!
Rod
Plan your work...work your plan...at least that's the plan. Oh, just do it anyway!
gallery/image_page.php?album_id=1425&image_id=76342
User avatar
Rlowell
2000 Club
2000 Club
 
Posts: 2004
Images: 42
Joined: Wed May 23, 2007 12:39 pm
Location: Orlando, Fl.
Top

Postby dh » Mon Aug 01, 2011 10:28 am

Looking good :thumbsup:
Ignorant doesn't know any better, Stupid knows better but does it anyway.

My build page: http://www.tdbuildlog.blogspot.com/
User avatar
dh
Gold Donating Member
 
Posts: 1647
Joined: Fri Aug 14, 2009 7:08 pm
Location: North East Arkansas
Top

Postby Lgboro » Mon Aug 01, 2011 11:26 am

I think my neighbor has a lower frustration threshold than I do -- so far I just take my time and build the camper at my pace. He has the impression a tear can be built in a weekend or so. I chose to build a slide out drawer for my cook space but other areas of the build have gone slow enough between health and losing my income. Your tear looks to be well built and well on the way to completion :applause: .
User avatar
Lgboro
500 Club
 
Posts: 708
Images: 53
Joined: Sun Apr 06, 2008 7:57 am
Location: Dudley, NC
Top

Postby WildTexan » Mon Aug 01, 2011 3:09 pm

Thanks guys. It's been a long time coming. My wife has already booked campsites for Labor Day. The catch....the campsites are in Colorado. I better get the doors hung quick. Wish me luck.
User avatar
WildTexan
Teardrop Advisor
 
Posts: 77
Images: 77
Joined: Thu Nov 18, 2010 3:33 pm
Location: Hickory Creek, TX
Top

Postby Rlowell » Tue Aug 02, 2011 12:57 am

:applause: :applause: Can not wait to see the "final" product...you are doing a fine job!! Have a fun and safe trip.
Rod

Take a look at my hatch and see if I could make it any more difficult. LOL
Plan your work...work your plan...at least that's the plan. Oh, just do it anyway!
gallery/image_page.php?album_id=1425&image_id=76342
User avatar
Rlowell
2000 Club
2000 Club
 
Posts: 2004
Images: 42
Joined: Wed May 23, 2007 12:39 pm
Location: Orlando, Fl.
Top

Postby Deryk the Pirate » Tue Aug 02, 2011 7:53 am

Nice Galley Bob, Plenty of counter space which is real nice!
Build Thread lil vardo 1: http://tinyurl.com/baqe6py
Build Thread lil vardo 2: http://tinyurl.com/b3rwffm
User avatar
Deryk the Pirate
500 Club
 
Posts: 809
Images: 158
Joined: Tue Aug 18, 2009 11:03 am
Location: Parlin NJ
Top

Postby Aaron Coffee » Wed Aug 03, 2011 4:01 pm

Hnag inn there, hatch rebuild on my first td is on the list for when do a rebuild on it(sometime after I finiwsh #2). Thehatch on #2 shouldn't be to bad since it is not a very tight curve, I plan on blocking the wood skin so it will take on a curve before install and plan on taking the metalskin to work(if it fits into our home project friday)and run it through the slip roller to give it some curve.
As far as frustration, sometimes it pays to take a day or two of the build, or know when to call it a day. Lately I have been spending more time searching for tools (usually tapes measures, have 3 of them in the garage and am sometime licky to find one)than actually building. Last night was one of those nights, was about to call it a night when I decided to cut the hurricane hinge down, measured and preceded to cut tried it for fit then noticed that I didn't take into account the wood trim, so now it is about 1.5 inchs short. As Homer Simpson would say, "Doh!" I said something to that affect but can't print it here.
Aaron
If I could shut my brain off, I could save myself alot of time, money and effort.
User avatar
Aaron Coffee
1000 Club
1000 Club
 
Posts: 1003
Images: 26
Joined: Thu Jun 30, 2005 4:40 pm
Location: Elk Point, SD
Top

Postby WildTexan » Sat Aug 06, 2011 4:42 pm

Alright. I decided to build the galley lid yet again. I completely forgot about the trim when building the second one, and it turn out to be 1/4'' too wide. This is the last time.....promise. I gotta hang these doors this weekend too. It's gonna be a long night. I gotta go to work just to get some rest.
User avatar
WildTexan
Teardrop Advisor
 
Posts: 77
Images: 77
Joined: Thu Nov 18, 2010 3:33 pm
Location: Hickory Creek, TX
Top

Postby WildTexan » Sat Aug 06, 2011 4:43 pm

More pics.
User avatar
WildTexan
Teardrop Advisor
 
Posts: 77
Images: 77
Joined: Thu Nov 18, 2010 3:33 pm
Location: Hickory Creek, TX
Top

Previous

Return to Teardrop Construction Tips & Techniques

Who is online

Users browsing this forum: No registered users and 5 guests