How Would You Shape This Wood?

Anything to do with mechanical, construction etc

Re: How Would You Shape This Wood?

Postby anon1 » Tue Nov 25, 2014 12:36 pm

I'm not happy with the results of my doing these cuts with a jig-saw and in the position that they were in. I'm a novice and didn't have experience with the saw other than a few test cuts in scrap. I kind of figured out a tip too late.

If you ever need to do something like this it really helps to clamp on other wood just to act as a base for the saw to ride on. 2x2s clamped to both the top side of my top plate and the front side of the corner post up around that corner allowed for BOTH sides of the saws sole to ride on wood, thus keeping the cut through the wood straighter.

I've removed the entire front and top framing and scrapped all of the parts that make up the corner curves and will be redoing them, shaping the curves a different way. :oops:
anon1
Teardrop Advisor
 
Posts: 57
Joined: Tue Jan 28, 2014 4:38 pm

Re: How Would You Shape This Wood?

Postby desertmoose » Tue Nov 25, 2014 12:41 pm

Consider it a trial run and a learning experience.

I don't believe a trailer has EVER been made without a rework/ redo involved.

Enjoy the ride, even if there are minor setbacks. :thumbsup:

Sam
User avatar
desertmoose
The 300 Club
 
Posts: 421
Images: 98
Joined: Fri Aug 27, 2010 12:20 pm

Re: How Would You Shape This Wood?

Postby tony.latham » Tue Nov 25, 2014 1:35 pm

I've removed the entire front and top framing and scrapped all of the parts that make up the corner curves and will be redoing them, shaping the curves a different way. :oops:


I've spent many a teardropping day taking two steps back after a step forward. :x :? :(

I'm big on templates and routers. Here you can see the better half making a close cut with the jigsaw, followed by a flush cut using a router pattern bit tracking the edge of the template.
Image
Image
Image

T
User avatar
tony.latham
Gold Donating Member
 
Posts: 7074
Images: 17
Joined: Mon Jul 08, 2013 4:03 pm
Location: Middle of Idaho on the edge of nowhere
Top

Re: How Would You Shape This Wood?

Postby anon1 » Sun Nov 30, 2014 12:56 pm

Hello,

Can anyone, please, direct me on specifically how to make these types of cuts for my riblets? I need specifics after ruined wood, more tools bought, and more ruined wood, and much :thinking:, :? , and :x .

I tried the 'bust out the jigsaw and go at it' route. :thumbdown: 
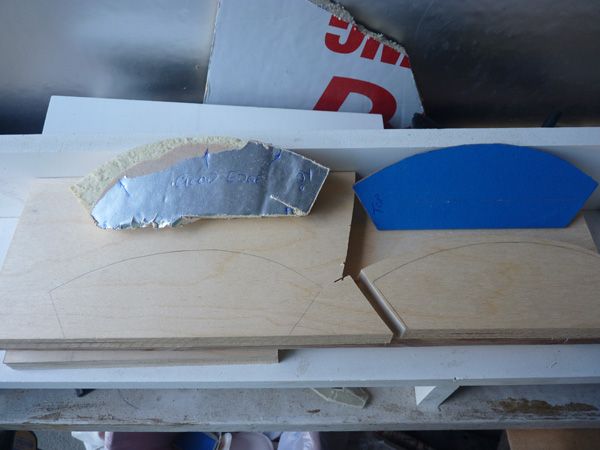
I then made a prototype from foam, transferred that into a hardboard template, bought more tools and bits, researched on woodworking forums and still cannot figure out how to make these parts with a router and template. The photo on page one of this thread shows several curved boards stacked and clamped together but I can't for the life of me figure out how it was done at once with the bits referenced in that post.

Here is my problem: the part is small ( 7" long x 2" wide at widest part of curve) and I cannot figure out how to get the template fastened to the wood, the wood fastened to a table, and still have room for the router to go around the clamps. Also, my failed foray into jig-saw land taught me that I need additional support around the perimeter of the part so that the router base has something to ride on. So now I need to clamp them together, provide support around the edge, and raise the router up above the level of the template.

I rough-cut a piece from 3/4" plywood with the jig-saw and then laid the template on top but I'm stuck here.

Alternately, how would I hold the template to the wood if I was to use a router table with a small part like this? I cant see using clamps as the table would interfere? Should I even try it on a table or would I likely lose some blood? (By the way, I started this build one day and drew first blood the next.)

Thanks for any help.

Image
anon1
Teardrop Advisor
 
Posts: 57
Joined: Tue Jan 28, 2014 4:38 pm
Top

Re: How Would You Shape This Wood?

Postby tony.latham » Sun Nov 30, 2014 2:14 pm

I'd cut those on my bandsaw, 'cause I have one. :D Or... I'd clamp them to my bench and cut 'em with my jigsaw. I don't think these pieces need to be perfect. I assume you are going to sheath them with 1/8" ply and that stuff will fix any unevenness. Just make sure you use a gap-filling adhesive like PL Premium.

If I were going to go with the router, I'd cut them close (a 1/4" or less) using your jigsaw and then attache the template to the piece using woodscrews (some use double sided tape). It's not like your riblets are going to be exposed. Since they are small you will either have to use a router table.

Here's an example or two on Youtube:
https://www.youtube.com/watch?v=JSQgTFhSwxs
https://www.youtube.com/watch?v=7LSyPVu41xI

T
User avatar
tony.latham
Gold Donating Member
 
Posts: 7074
Images: 17
Joined: Mon Jul 08, 2013 4:03 pm
Location: Middle of Idaho on the edge of nowhere
Top

Re: How Would You Shape This Wood?

Postby anon1 » Sun Nov 30, 2014 2:48 pm

tony.latham wrote:...
Since they are small you will either have to use a router table.

Here's an example or two on Youtube:
...
T


... either use a router table, or ... ?? ,
- not?
- it will explode?
- I will leak more red?
:lol: Just joking, you probably edited that sentence and just missed that word, either.

So, really short wood screws that go through the ply and into the template and then run it template side down on a router table with a top bearing bit?

or countersunk into template and then into ply. The template that I have now is only 1/8" tempered hardboard. Too thin for screws?

Thanks for the info, I'll watch the videos.
anon1
Teardrop Advisor
 
Posts: 57
Joined: Tue Jan 28, 2014 4:38 pm
Top

Re: How Would You Shape This Wood?

Postby tony.latham » Sun Nov 30, 2014 3:06 pm

Just make sure the bearing is in contact with the pattern.
User avatar
tony.latham
Gold Donating Member
 
Posts: 7074
Images: 17
Joined: Mon Jul 08, 2013 4:03 pm
Location: Middle of Idaho on the edge of nowhere
Top

Re: How Would You Shape This Wood?

Postby KCStudly » Sun Nov 30, 2014 8:56 pm

1/8 inch is a little thin for a template, IMO. I have found that most bearing bits have a small gap between the bearing and the end of the cutter, so the bearing has to have a little more something to ride on positively. I have been getting away with 5 mm (3/16 inch actual) and would not go thinner.

If your cutter is shorter than your stock, you can run the bearing along the template first, then extend the bit down and make another pass following the first cut.

Rather than surrounding your part with something to support your router shoe, you can attach a piece of scrap the same thickness as your part and template to the shoe to act as an outrigger ski, holding the outer edge of the router shoe up.

For small parts, you can double sticky tape (or screw) them to a larger scrap board, tape or clamp that to your bench and run the router around them; no blood.

To make accurate templates, I have cut out full scale drawings, used spray adhesive to attach that to my template material, fogged the cutout with spray paint, rough cut the template close to the paint line, then sanded to the final shape to smooth the saw cuts. Use this template to trace onto your stock; remove the template and use the jig saw to cut close to the line (don't risk cutting into your template that you spent so much time getting perfect); double back tape the template on, and cut each part with the top bearing bit. When you have all of the parts done, you too can clamp them together and take a nice picture to show how they all came out the same.
KC
My Build: The Poet Creek Express Hybrid Foamie

Poet Creek Or Bust
Engineering the TLAR way - "That Looks About Right"
TnTTT ORIGINAL 200A LANTERN CLUB = "The 200A Gang"
Green Lantern Corpsmen
User avatar
KCStudly
Donating Member
 
Posts: 9640
Images: 8169
Joined: Mon Feb 06, 2012 10:18 pm
Location: Southeastern CT, USA
Top

Re: How Would You Shape This Wood?

Postby anon1 » Mon Dec 01, 2014 3:30 am

Thank you KCStudly, that is the kind of detail that I might need on this.

Here's to second, or third, chances: :beer:
anon1
Teardrop Advisor
 
Posts: 57
Joined: Tue Jan 28, 2014 4:38 pm
Top

Patterns

Postby noseoil » Mon Dec 01, 2014 7:46 am

In my post showing the stack of hatch ribs, each rib was cut individually first with a jig saw. It was a sloppy cut, 1/4" too big. Then the pattern (3/4" plywood in this case) was fastened to the rough-cut rib, and the router was run around the perimeter for the finished cut. The parts were stacked in the picture to show how each is the same as the others, but they are cut one at a time.

In the case of smaller parts, I would fasten the part to a larger board, which acts as a work table. The last thing you want is a small part, a cutter at 20,000 rpm and a hand or finger anywhere near the cutter. If there's a reverse flush cut bit being used (1/2" cutter & 1/2" bearing on top), a shim would have to be placed between the part & work surface to make sure there's some clearance between the part being cut & the table. I would use 1/4" or 1/2" material for the pattern. The pattern is fastened to the part being cut from the top, with a couple of drywall screws to hold things in place. I used 3/4" material for my build, because 1 1/2" isn't necessary and is too much trouble to work with for a small build.

Most flush cut router bits can't make the cut with wood that thick & you would need to make multiple passes to get enough depth, or flip the part over and work from the other side for 1 1/2" thick wood. A 3/4" frame with 1/8" skins glued in place is more than strong enough for most small trailers, but 1/2" would really be thick enough to give enough structural strength if 1/8" skins are being used on both sides. It's a trailer not a house.
Build log: viewtopic.php?f=50&t=60248
The time you spend planning is more important than the time you spend building.........

137905
User avatar
noseoil
1000 Club
1000 Club
 
Posts: 1822
Images: 670
Joined: Sun Apr 27, 2014 8:46 am
Location: Raton, New Mexico, living the good life!
Top

Re: How Would You Shape This Wood?

Postby anon1 » Mon Dec 01, 2014 9:29 am

Thanks Noseoil, the riblets to be routered will be 3/4" plywood and attached to a 1x2 at each end.
anon1
Teardrop Advisor
 
Posts: 57
Joined: Tue Jan 28, 2014 4:38 pm
Top

Re: How Would You Shape This Wood?

Postby aggie79 » Mon Dec 01, 2014 12:53 pm

Here's what I would do:

Rough-cut to size with jigsaw. If you can't hold the piece sufficiently, temporarily fasten to a larger board.

Finish cut on router table. Use a template of 1/4" thickness or greater. Adhere the template with double sided tape. There are both top bearing and bottom bearing router bits. I have several that are 1" to 2" in length, so finding a bit with sufficient depth to cut in one pass is not a problem.

Even though you are using a bearing bit, I wouldn't completely "free-hand" that small of a piece of wood on a router table. Use the fence and "expose" the bit enough to make your cuts. (The fence is setting the depth of cut; the bearing on the bit is. The fence provides some protection from the bit.) Fasten a large board as a handle and re-position the handle as needed to cut all sides of the piece.
Tom (& Linda)
For build info on our former Silver Beatle teardrop:
Build Thread

93503
User avatar
aggie79
Super Duper Lifetime Member
 
Posts: 5405
Images: 686
Joined: Tue Aug 07, 2007 5:42 pm
Location: Watauga, Texas
Top

Previous

Return to Teardrop Construction Tips & Techniques

Who is online

Users browsing this forum: No registered users and 2 guests