Welp, here we go. Test panel #1 is done and although it not perfect, I'm calling it a success. I'm going to drop a few pictures with some notes, now and follow that up with more details on how the test was done.
For this panel, I wanted to tackle several different variables at once, so the skin section is essentially split in half with a different layup on each side, and each of the four sides and one of the four corners was done differently in some way - and the results should be helpful.
I've never vacuum bagged anything (not even fiberglass), let alone vacuum infused or even touched carbon fiber prior to this, so there were numerous "firsts" for me in this test and I've learned quite a lot that can't be learned without actually doing. YouTube is great, but it certainly has its limits.
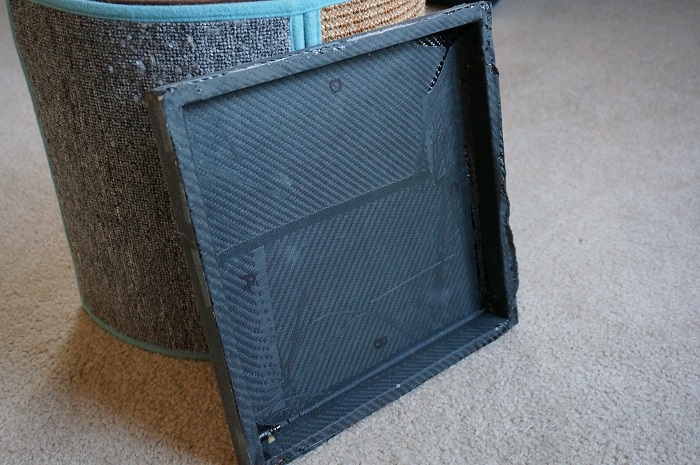
First up is a picture of the rear.
* I labeled the four sides A-D so that I can reference what was done in the layup and compare it to my notes.
* You can see the delineation between the two halves. Well call them the B-half and the D-half. The B-half has 1 layer of 3k, 5.7oz, 2x2 twill carbon fiber with 2 layers of 7.25 oz, plain weave E-glass fiberglass. The D-half has 2 layers of the 3k CF and 1 layer of 7.25 oz FG. The only real difference between the two hlaves is that you can see more pin holes on the B-half if you hold it up to a light source. Otherwise, they look and feel identical.
* If you look at the inside corners, you can see some darker black areas. This is a result of "bridging", meaning that the vacuum bag was not able to be pulled all the way into the corner when it was under vacuum. This is a result of my inexperience - I cut the bagging film a little too small, and possibly due to the cheap bagging film that I used - it doesn't really have any stretch to it.
* Note: The matte finish on this side is a result of the "peel ply" material that is used to prevent the other consumable materials from becoming part of the finished piece. When peel ply is removed, it leaves behind a perfect surface to mechanically bond to.
- DSC00011.JPG (184.12 KiB) Viewed 3016 times
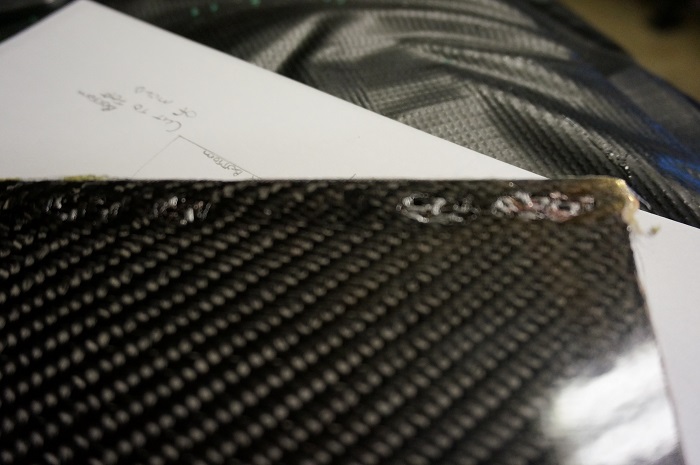
Next up, pictures of the front.
* You'll notice that there are some areas around the edges that didn't fill to a smooth finish. These, I'm pretty sure, were caused by the bridging noted on the back side. Either that or the resin just didn't flow into those areas - but I'm pretty sure it was the bridging. More testing will tell the tale.
* You'll also notice what is likely "print through" around the perimeter of the panel. Print through, in this case, is caused by the wood frame pressing down on the CF while under vacuum. The other possibility is the fact that this cloth was put in and pulled out of the mold several times, which disturbed the twill pattern. Either way, the picture actually makes it look worse than it does in person.

- DSC00010.JPG (191.68 KiB) Viewed 3016 times
- DSC00008.JPG (123.38 KiB) Viewed 3016 times
In summary, the first test wasn't perfect, but it was a huge success nonetheless. It looks incredible, it's super light (350g or 12oz) and I cannot believe how rigid it is. I might do some destructive testing on this panel at some point just to see how much torture it can withstand, but honestly I'm not sure that'll be necessary. When XPS foam board is bonded into the cavity on the backside and a sheet of whatever (luan, etc...) is bonded across the entire inside, it will be an incredibly strong structure.
I'll work on posting pictures of the layup and infusion process, but it might take me a few days. In the mean time, any questions/comments are welcome.

Steve
 .
. 

 and I spent most of the day yesterday cleaning the garage and getting it set up for panel prototyping and (hopefully) production. I still have to get a few things locally, but I hope to have some progress and pictures to post next weekend. Maybe even panel #1 will be born
 If only I would have verified that sooner.


