High School Shop project

Anything to do with mechanical, construction etc

Postby kansasman13 » Mon Feb 25, 2008 8:57 pm

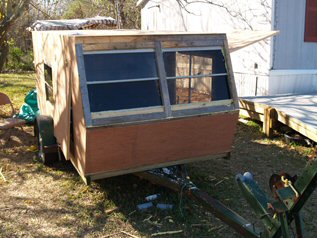
Thanks for all the comments guys. My trailer was coming along pretty good and i got the walls up but now i'm in a position where i don't know what to do next. I would like to put doors up but i dont know how much smaller to make the doors than the hole and i dont know exactly what kind of hinge to use. I found some at my hardware store that are 30 inch long and 1 and 1/2 wide and i think they will work but not sure. I was to start doing cabinets but i have no idea where to put them yet, and i would like to put electricty in but i dont know anything about electricity so that hasnt went any where yet. I took pictures to day but i left my camera at school so perhaps sometime this week they wil make it up here. Also wondering if anyone know of a build of an actually weekender that has pictures on the net. I've looked at the desert dawg alot but itd be helpful to see some pictures of the model im building.
Thanks alot guys!
Kman
kansasman13
Teardrop Inspector
 
Posts: 22
Images: 14
Joined: Wed Aug 22, 2007 8:24 pm

Postby satch » Mon Feb 25, 2008 9:18 pm

Hell, all I built in shop was a crummy bread box. Boy times have changed. Good luck with the project, keep us informed. This is the best place for help, so use it! 8)
If it itches. scratch it
Rick
User avatar
satch
Donating Member
 
Posts: 1198
Images: 63
Joined: Thu Feb 07, 2008 9:46 pm
Location: the arm pit of Cali

Postby Miriam C. » Mon Feb 25, 2008 11:10 pm

:thumbsup: Hello and welcome back. Nice to hear a good report.

The walls are up :applause: Are the roof spars in?

The door gap depends sorta on what kind of weather striping and if you are using alum. trim. and the kind of hinge you are using.

Hinge - I used regular house, outside door hinges. You can use a continuous hinge (piano) as long as it is long enough and will carry the weight of the door. Read the package for weight.

Good luck.
“Forgiveness means giving up all hope for a better past.â€
User avatar
Miriam C.
our Aunti M
 
Posts: 19675
Images: 148
Joined: Wed Feb 15, 2006 3:14 pm
Location: Southwest MO
Top

Postby Geron » Tue Feb 26, 2008 5:27 am

You can use a plastic hinge as well.

http://www.mcmaster.com/

Search for "plastic continuous hinges" or just "plastic hinge"

Look at part #1588A71 through A74 (different widths)

This Dude seals out water and air. Solves most hinge problems that could arise in one application. Works on doors and hatch.
Image

If you go this route make sure you order the "harsh environment" hinge. It's UV tolerant.

gac (pronounced jack ;) )
If it's not broken, you're not trying hard enough.
User avatar
Geron
1000 Club
1000 Club
 
Posts: 1522
Images: 173
Joined: Tue Jan 18, 2005 6:23 am
Location: Georgia, Cherrylog
Top

moment you've all waited for

Postby kansasman13 » Fri Feb 29, 2008 11:50 pm

i hope i figured this out right

Image

Image

Image

Image

Image

Image
kansasman13
Teardrop Inspector
 
Posts: 22
Images: 14
Joined: Wed Aug 22, 2007 8:24 pm
Top

sweeeetness

Postby kansasman13 » Fri Feb 29, 2008 11:51 pm

i love it when things work out, now if i can just figure out what the next step is on this thing..ive got a general idea on the electricity but thats about it
kansasman13
Teardrop Inspector
 
Posts: 22
Images: 14
Joined: Wed Aug 22, 2007 8:24 pm
Top

Postby ARKPAT » Sat Mar 01, 2008 12:07 am

kansasman13 Fantastic Job you are doing on your project.

:thumbsup: :applause:

Looks very very good from you gallery and posted pictures.

Looks like you got the insulation part going.


You are farther along than I'm now. :oops:


Good Job
:thumbsup:

Pat
Life is to short always eat dessert first.
User avatar
ARKPAT
1000 Club
1000 Club
 
Posts: 1549
Images: 77
Joined: Tue Dec 13, 2005 4:45 am
Location: Arkansas
Top

Great Job

Postby Art & Pat Burns » Sat Mar 01, 2008 7:34 am

This young person is an exception! If you listen to the news media, all the young people in this world are doing DRUGS!

Great Job keep it going.

Art
Life should NOT be a journey to the grave with the intention of arriving safely in an attractive and will preserved body, but rather to skid in sideways, Dunkin Donuts Coffee in one hand, Duffy roll in the other, body thoroughly used up, totally worn out and screaming "WOO HOO, WHAT A RIDE!"
User avatar
Art & Pat Burns
Teardrop Builder
 
Posts: 44
Images: 2
Joined: Fri Feb 15, 2008 8:40 pm
Location: Sanford, FL
Top

Postby bobhenry » Sat Mar 01, 2008 8:33 am

Looks like it's electrical time. If you wait and delay it you will create a lot of extre work for yourself. Don't ask me how I know it's a sad story. You can go all 12 volt and simply plug into 120 ac to charge up or you can go 12 volt dc and 120 ac which was my choice. Joanne's Dessert Dawg has an excellent electrical diagram that I found real helpful. I laid down as I would sleep and placed my hand flat on the sidewall this is where I placed switches for the inside/reading light. I did this on both right and left side. Then I reached in the door and placed my hand on the side wall on the latch side and this is where I placed the porch light switches (a/c & d/c) both sides. A plug in in the nose and 1 on each side and one in the galley area and you are done. Surely there is an industrial arts teacher that can give you pointers on wiring up. Ask someone they can get you started right and talk you thru it in 10 to 15 minutes and most folk love showing off a little. I strongly suggest 1/2 depth carlon ( blue plastic) boxes and some kind of conduit (pvc pipe is cheap).
This is where I made my mistake. That and I spliced together some junk wire I had laying around. Buy some good stranded wire and color code so you know what they are black white and green for ac is standard. Maybe a brown for hot dc and a lighter green for dc ground. When you flip that 1st switch and things turn on you will understand the pride we all feel in our little creations. Good luck
Growing older but not up !
User avatar
bobhenry
Ten Grand Club
Ten Grand Club
 
Posts: 10368
Images: 2623
Joined: Fri Feb 09, 2007 7:49 am
Location: INDIANA, LINDEN
Top

Postby Laredo » Sat Mar 01, 2008 4:54 pm

Excellent job and wonderful progress.

If it's not too late yet let me put in a word for putting your wiring in a chase or conduit (you can use PVC, even) so that it's a little protected when you go to do your inside finish work, and (like some of us with Old-timer's) can't remember which side of the spars you laid the wiring down along before you put the insulation over it...

Beautiful work. I sincerely hope you're getting a good grade on this project!
Mopar's what my busted knuckles bleed, working on my 318s...
User avatar
Laredo
Donating Member
 
Posts: 2017
Images: 0
Joined: Mon Jul 05, 2004 10:42 pm
Location: West Texas
Top

Re: sweeeetness

Postby TPMcGinty » Sat Mar 01, 2008 8:29 pm

kansasman13 wrote:i love it when things work out, now if i can just figure out what the next step is on this thing..ive got a general idea on the electricity but thats about it


I think this is an awesome school project! So what are your ideas on the electricity? I'm sure everyone would love to hear what your thinking of doing. I have a few extra electrical parts I could donate to your project if they fit in your plans.
Tim

Image
User avatar
TPMcGinty
Gold Donating Member
 
Posts: 1558
Images: 146
Joined: Sat Nov 10, 2007 7:16 pm
Location: Saint Michael, MN
Top

Postby s4son » Sun Mar 02, 2008 1:16 pm

Great job! The design is really nice, it's a great shape. As others have mentioned plan your electrical runs now and include a path for later in case you forget something or want to add something later. Keep those pictures coming.

Scott F. :thumbsup: :thumbsup:
Are we there yet?
ImageImage
User avatar
s4son
Donating Member
 
Posts: 1399
Images: 180
Joined: Sat Mar 05, 2005 12:29 am
Location: Smithville, MO
Top

Postby satch » Sun Mar 02, 2008 1:20 pm

SWEEEET!! :applause: Looks good. Should get an "A" 8)
If it itches. scratch it
Rick
User avatar
satch
Donating Member
 
Posts: 1198
Images: 63
Joined: Thu Feb 07, 2008 9:46 pm
Location: the arm pit of Cali
Top

Postby mikeschn » Sun Mar 02, 2008 3:53 pm

Did you already check out the Generic Benroy Plans for the sequence for your build, and for the clearance around the door? It's up there in the top menu.

You're doing a good job btw.

Mike...
The quality is remembered long after the price is forgotten, so build your teardrop with the best materials...
User avatar
mikeschn
Site Admin
 
Posts: 19202
Images: 475
Joined: Tue Apr 13, 2004 11:01 am
Location: MI
Top

Postby Miriam C. » Sun Mar 02, 2008 9:31 pm

:applause: :applause: :woohoo: :beautiful: :clapping hands: Excellent! What kind of ceiling are you doing? Will it be insulated too.

Tell the teacher we said you get top marks already.
“Forgiveness means giving up all hope for a better past.â€
User avatar
Miriam C.
our Aunti M
 
Posts: 19675
Images: 148
Joined: Wed Feb 15, 2006 3:14 pm
Location: Southwest MO
Top

PreviousNext

Return to Teardrop Construction Tips & Techniques

Who is online

Users browsing this forum: No registered users and 5 guests