RV There Yet? Towed Hall Build Journal

Anything to do with mechanical, construction etc

Postby bve » Sat Jun 20, 2009 9:54 pm

That's just awesome! :thumbsup:

Sorry if I missed it elsewhere but what are the outer dimensions of your "Towed Hall"?
Burke

KISS > COMPLEX
Image
Image

Build threads converted to PDFs.
As of 2008-08-08 I have added more build threads to the pdf collection
User avatar
bve
500 Club
 
Posts: 694
Images: 98
Joined: Sat Aug 25, 2007 1:44 am
Location: Edmonton, Alberta, Canada

Postby Barefoot » Sun Jun 21, 2009 7:07 am

It's 5'4" x 8'0" x 6'11". Yes, my garage door is also 6'11", pushed up. I'm counting on the springs settling a little when it comes off the blocks.
User avatar
Barefoot
Teardrop Master
 
Posts: 138
Images: 52
Joined: Mon Feb 16, 2009 8:44 am
Location: east central FL

Postby madprinter » Mon Jun 22, 2009 5:25 pm

Looks really good. Im impressed. :applause: :applause:
Let some air out of the tires too. That will bring it down a little to get it out of the garage.
User avatar
madprinter
The 300 Club
 
Posts: 332
Images: 26
Joined: Fri Dec 14, 2007 7:28 pm
Location: West Monroe Louisiana
Top

Postby teardrop_focus » Mon Jun 22, 2009 5:40 pm

Barefoot, that's a great little travel trailer you're building! :designing:

Remember, it's all about progress rather than perfection...

Like madprinter, I too am impressed!


Sincerely,

Another friend of Bill's.

:coffee:
.
Image

"There is something about these little trailers that brings out the best in people." - BigAl, Scotland, 2010

"Climb the mountains and get their good tidings. Nature's peace will flow into you as sunshine flows into the trees...
The winds will blow their own freshness into you and the storms their energy, while cares will drop away like autumn leaves..." - John Muir, 1898


Chris Squier / teardrop_focus :-)~
User avatar
teardrop_focus
Donating Member
 
Posts: 5975
Images: 127
Joined: Sat Apr 11, 2009 3:18 pm
Location: SoCal
Top

Postby S. Heisley » Mon Jun 22, 2009 8:24 pm

Barefoot wrote:
If I had done one of these before I could have planned in detail, had fewer backtracks (goofs), and could better answer people who want to know when it will be done, but then, this is a case of the journey being the joy.


Amen, Brother! I'm watching and cheering you on! You're doing great! It'll be done when it's done...You're on Teardrop (TTT?) Time!
User avatar
S. Heisley
Super Lifetime Member
 
Posts: 8871
Images: 495
Joined: Mon Sep 17, 2007 10:02 am
Location: No. California
Top

Postby Barefoot » Sun Jun 28, 2009 5:37 am

No picture this week as there is so little to see. I sanded everything and brought it all to two coats of polyurethane, got a window in, and did a mess of little jobs such as installing the shorter window cranks (yay), rounding the corner of the galley counter where it sticks into the doorway (ow), caulking, chasing down more parts, and so on. Also I just knocked off a couple of days. I'd been high enough on big progress to overdo it so long for so much heat that my leg muscles threatened to set up.

Caution: The poly (first coat thinned with "low odor" mineral spirits) stunk up the whole house and both times many of my fish died, most likely not a coincidence. I get no more fish until the poly is done and I do no more poly until the garage door can stay open all day. It can't be too good for people either.
User avatar
Barefoot
Teardrop Master
 
Posts: 138
Images: 52
Joined: Mon Feb 16, 2009 8:44 am
Location: east central FL
Top

Postby Barefoot » Sat Jul 04, 2009 3:30 pm

After a wek of rest (and a week after all that ployurethane stink), my legs loosened up again and I mowed and did outside chores, suddenly back to being almost unaffected by triple digit heat indexes, and I'm ready to wade back in tomorrow, that is, nothing much new to see this week either.
User avatar
Barefoot
Teardrop Master
 
Posts: 138
Images: 52
Joined: Mon Feb 16, 2009 8:44 am
Location: east central FL
Top

Postby Barefoot » Sun Jul 12, 2009 4:22 am

In Florida at least we don't have to shovel our humidity. This week we got a little break on the temperature, though, and I got in some time on Towed Hall. The work was mostly do-overs, so again nothing worth seeing this week except for the last window having come in from backorder, now installed. Setting right a bunch of those "learning experiences," has been an unexpected boost. Amazingly, after how many tries I'm still not happy with the bed but at last am clearly on the right track, so this theme of no pictures won't last. Depending on the heat next week: the bed, door, "rafters," and just maybe a little cabinet work. The ceiling panels are still due in "soon."
User avatar
Barefoot
Teardrop Master
 
Posts: 138
Images: 52
Joined: Mon Feb 16, 2009 8:44 am
Location: east central FL
Top

Postby Barefoot » Sat Jul 18, 2009 8:08 pm

Image
A little reality crept into my head where there had been just habit. At 70 I'm not apt to need a "passenger side" to the bed again, also that I have always sat with my back against the wall with my feet up, so I gave up trying to get all the fancy folding, tilting stuff to work right. I settled on a flat single unit that lifts for access to storage and the spare. The place begins to look like home (except for that garish florescent lighting), also with just the single bed, it's now suddenly HUGE. If I do another TTT, it will be much smaller, though this one would be great for extended stays, maybe in the mountains next Florida sauna season!

The ceiling panels came in and I lost a day picking up them and chasing some hardware, then picked up a one-day job (aww). The panels are white plastic with an interesting pattern, flexible enough to not fight me but stiff enough to stay curved once up. I did at least get the spars made and the door built, skinned, insulated, and ready to go in. That's not bad considering that I can't stand the heat and hunidity much past early afternoon. Well, that's the price for not having to brave sleet.
User avatar
Barefoot
Teardrop Master
 
Posts: 138
Images: 52
Joined: Mon Feb 16, 2009 8:44 am
Location: east central FL
Top

Postby bve » Sun Jul 19, 2009 6:39 pm

I'm enjoying watching your build, thanks for easing my picture withdrawal :)

On your bed... If you find you need it wider you could probably just create a slide out from 3/4 ply with a 1x3 or 1x4 skirt/ledge on the front and side with legs.

Good to see more progress.

Burke
Burke

KISS > COMPLEX
Image
Image

Build threads converted to PDFs.
As of 2008-08-08 I have added more build threads to the pdf collection
User avatar
bve
500 Club
 
Posts: 694
Images: 98
Joined: Sat Aug 25, 2007 1:44 am
Location: Edmonton, Alberta, Canada
Top

Postby Barefoot » Sun Jul 26, 2009 10:44 am

Image
Image
I did so much all in a rush this week that there's lots to write about and a few pictures, though I only thought I had stopped for shots of the spars and insulation going in, but you know what that looks like anyway. I used 1x2s on edge, with 2x2s at the seams, and the same doubled 3/4" white foam as in the walls, scored for the sharper bends. I did use slightly heavier, stiffer ply for the center section of the roof, as it is nearly flat and there's only a plastic ceiling panel on the inside of the "sandwich". (That's it in the background of the close-up.) It, like the luan, is really stout when bent, but not flat. Also, I decided to go with a conventional vent hatch of my choice later instead of the car sunroof, and framed for it towards the rear of the slightly sloping center section so it will still clear the garage door.

The luan bent fairly easily around the gentler curve at the rear with two ropes over the top from hitch to bumper, truckers' and boater's knots, a few 2x2 spacers, long screws later exchanged for short, gluing and screwing as I went along. I promise pictures of the front going in the same way next week. Contrary to reports here on other plywood, the luan bent better from end to end, but that didn't work for a 5'4" wide. The odd part was when exactly 29 minutes after finishing and going inside, I heard a huge "BANG!" out in the garage, and found a surprisingly short and thin break in the surface wood, easily repaired. Whew. I planned the narrowest piece of luan for the tighter front curve, so I can soak it in the hot tub a few minutes, then set concrete blocks (former gravity clamps) on it until it takes a set. It should go in easier then, I should hope without another bang!

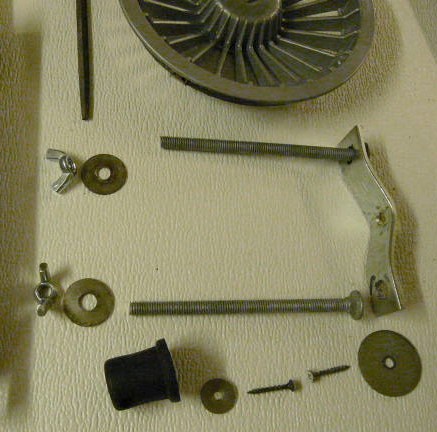
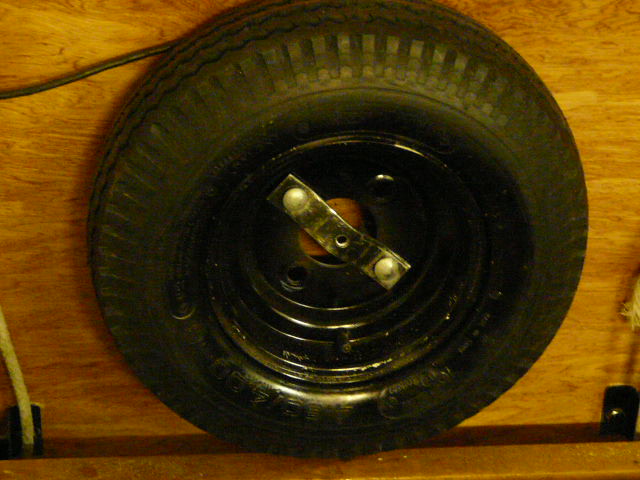
The spare is in it's fourth (and final!) location, resting on the bumper and fastened through the back wall. The close-up is of the hardware I made up from a scrap strap, hammering in a crimp so its holes match those in the wheel, then filing them square for carriage bolts (actually bought!) so they won't turn when the wing nuts are tightened or loosened (no extra wrench needed) from inside --and can't be turned from outside! The wheel cover is off a golf cart but won't fit the trailer because the hubs stick out too far. The other bits from the junque box made up a fair door bumper until I get the latch and handle in.

P.S. Yes, Burke, I could extend the bed, indeed still have the other piece of plywood and the other half of the mattress, should I be so lucky. Well, the company would be nice anyway. It's just good to be rid of all that foldy, tilty, floppy shin-busting apparatus!
User avatar
Barefoot
Teardrop Master
 
Posts: 138
Images: 52
Joined: Mon Feb 16, 2009 8:44 am
Location: east central FL
Top

Postby Barefoot » Sat Aug 01, 2009 9:32 pm

Fun week. The ceiling panels were easy to cut with shears or utility knife but holding them up and nailing at the same time was an unexpected battle. I could have used help but finally set a prop in the middle and let one end sag into a curve, which stopped the wiggling and buckling and let me manouver them into place. Also I stopped to get longer brads. They bend over easier but don't require hammering on my fingers! It was obvious once I thought of it. The insulation quit making flat spots between the spars when "scored on the curve" (as in school.) The picture also shows the trim on the ceiling and some of the interior trim. It's plastic but for some reason I'm inordinately proud of it, the way it looks I guess. Image

For the tighter front roof curve, I did prebend the plywood by soaking it in the hot tub (!) and piling on concrete blocks until it dried, locking in about half the final curve. It went on with the same rope, 2x2, and long screws system as the rear but without that panel's scary surprise BANG! ImageImage

It's a long way from done but I can see the end well enough to know I'll miss the project
User avatar
Barefoot
Teardrop Master
 
Posts: 138
Images: 52
Joined: Mon Feb 16, 2009 8:44 am
Location: east central FL
Top

Postby bve » Sat Aug 01, 2009 9:52 pm

Barefoot, your trailer is looking great.

I really like the way the ceiling looks with the dark trim on white. I know you mentioned plastic, was that the trim only or both the white and the trim? I'm curious as to what the white ceiling panel is that you used.
Burke

KISS > COMPLEX
Image
Image

Build threads converted to PDFs.
As of 2008-08-08 I have added more build threads to the pdf collection
User avatar
bve
500 Club
 
Posts: 694
Images: 98
Joined: Sat Aug 25, 2007 1:44 am
Location: Edmonton, Alberta, Canada
Top

Postby Barefoot » Sun Aug 02, 2009 5:57 am

Both the ceiling panels and the dark trim are plastic. I don't know the generic or brand names of either, just that they are staples at the local Lowe's, in varieties from $16 (too flimsy) to $32 (too spendy). The narrow stuff comes in oak and whatever this is, sassafras or something. BTW curiously they did not have brads, maybe because contractors now use air nailers, but Wal*Mart has a complete assortment.
User avatar
Barefoot
Teardrop Master
 
Posts: 138
Images: 52
Joined: Mon Feb 16, 2009 8:44 am
Location: east central FL
Top

Postby Barefoot » Sat Aug 08, 2009 9:19 pm

"Saturday Evening Post":
Correction: Lowe's does have brads; the boxes are so small that they are hard to find. Besides extra work, that's what this week has been about, trips to Lowe's to find things I didn't know existed but which I needed. This includes three different kinds of trim, a piece for the galley drain, and wooden dowels to go with small brackets I already had, to make curtain rods. Pictures next week as I get them installed. I did get all the culking done, a satisfaction but nothing much to see.
User avatar
Barefoot
Teardrop Master
 
Posts: 138
Images: 52
Joined: Mon Feb 16, 2009 8:44 am
Location: east central FL
Top

PreviousNext

Return to Teardrop Construction Tips & Techniques

Who is online

Users browsing this forum: No registered users and 2 guests