how many of what type of clamp is enough

Anything to do with mechanical, construction etc

Postby afreegreek » Sat Mar 06, 2010 2:20 am

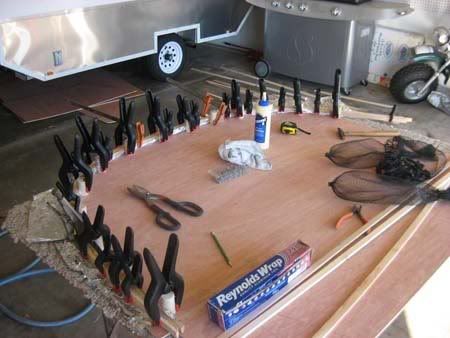
anyway, you don't have to take my word for it. I couldn't care less but you can try it with no glue to see for yourself or..... you could go buy a bunch of clamp...

btw,, I got lots of clamps...
afreegreek
500 Club
 
Posts: 723
Images: 0
Joined: Mon Jan 25, 2010 8:35 pm

Postby afreegreek » Sat Mar 06, 2010 2:40 am

bve wrote:
afreegreek wrote:how many clamps do you need to apply solid wood edges to plywood panels??

Image


Interesting, so how much tension is on the tape? It doesn't look like much just a snug wrap. I've seen it used to hold laminate and other thin pieces in place but never something as thick as that. What kind of glue is being used and what is it's set up time?


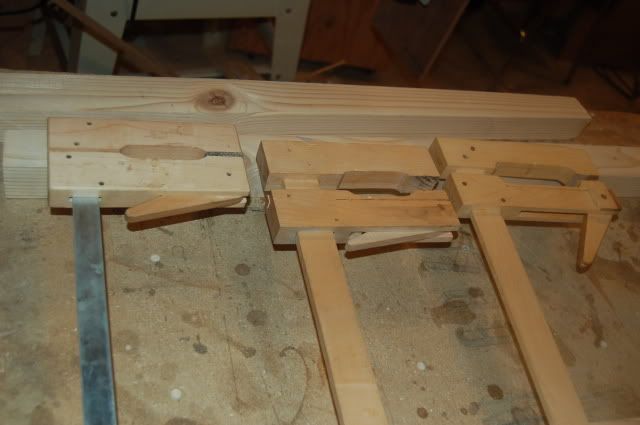
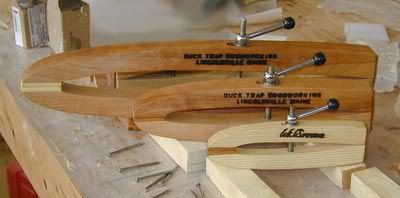
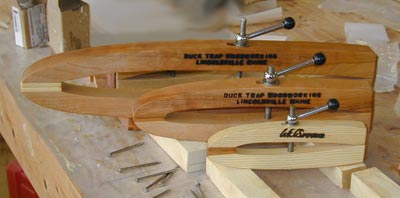
the lime green 3M tape for auto body painting is the tape. it's tougher and stretchier than the white or the blue and it's got good stick as well. I put the tape over the top (face of the trim) and push down pretty (pushing the trim against the panel) hard on the sides a few inches or so from the top ( if you look close, you can see wher my thumb dug in and distorted the tape) then stick the tape to the side of the wood..

for this I'm using Tite-Bond II. you could take the tape off in an hour in a warm shop but it's better to leave it for a few hours before working it.

in all woodwork, it's the fit of the pieces. if they fit well they don't need a lot of pressure.
afreegreek
500 Club
 
Posts: 723
Images: 0
Joined: Mon Jan 25, 2010 8:35 pm

Postby Larwyn » Sat Mar 06, 2010 8:54 am

afreegreek wrote:
Larwyn wrote:
afreegreek wrote:clamps are to hold two pieces in place. if the fit is good masking tape will work and if you use your noggin you can build without any clamps.


Now that's amazing!

what does iron have to do with wood?? and to answer your question, I'd use monofilament tape and maybe a bit of seine twine. and yes I could do it with no clamps


Your statement was about clamps, iron and wood are both building materials on which clamps are often used, you did not qualify your statement as only applying to wood.

Even if a welder did choose to use your procedure to attach the angle iron to that beam, you can bet that the temporary support cleat which you described would be clamped into place to hold it in position before/if it was tack welded. Why not save time, material and the later clean up involved with using the temporary support cleat and simply clamp the angle in place, weld it, and be done?

The horizontal strips you see in the picture of my hatch with the clamps are not battens, they are clamping cauls. In this case the cauls are oak 1x2's which I tapered from both ends to the center so that when I clamp the two ends down tight they apply a more even pressure along their full length rather than bowing up in the middle. This causes them to hold the plywood in contact with those inboard ribs which are not so easy to reach with a clamp.

The anvil was used on the flat wall panels to serve much the same purpose as the cauls served on the hatch. In your case, I suppose if you need a "gravity clamp" you would certainly have a container of some sort which you could fill with something heavy to serve the same purpose (a crock comes to mind). :lol:
Larwyn

Keeper of the Most Out Of Control Shop (2005)

I feel bad for the man that cannot spell a word more than one way. Mark Twain
User avatar
Larwyn
Mad Kilted Texan
 
Posts: 1658
Images: 210
Joined: Sun Jun 20, 2004 12:06 pm
Location: Kerrville, Texas
Top

Postby afreegreek » Sat Mar 06, 2010 11:10 am

Larwyn wrote:
afreegreek wrote:
Larwyn wrote:
afreegreek wrote:clamps are to hold two pieces in place. if the fit is good masking tape will work and if you use your noggin you can build without any clamps.


Now that's amazing!

what does iron have to do with wood?? and to answer your question, I'd use monofilament tape and maybe a bit of seine twine. and yes I could do it with no clamps


Your statement was about clamps, iron and wood are both building materials on which clamps are often used, you did not qualify your statement as only applying to wood.

Even if a welder did choose to use your procedure to attach the angle iron to that beam, you can bet that the temporary support cleat which you described would be clamped into place to hold it in position before/if it was tack welded. Why not save time, material and the later clean up involved with using the temporary support cleat and simply clamp the angle in place, weld it, and be done?

The horizontal strips you see in the picture of my hatch with the clamps are not battens, they are clamping cauls. In this case the cauls are oak 1x2's which I tapered from both ends to the center so that when I clamp the two ends down tight they apply a more even pressure along their full length rather than bowing up in the middle. This causes them to hold the plywood in contact with those inboard ribs which are not so easy to reach with a clamp.

The anvil was used on the flat wall panels to serve much the same purpose as the cauls served on the hatch. In your case, I suppose if you need a "gravity clamp" you would certainly have a container of some sort which you could fill with something heavy to serve the same purpose (a crock comes to mind). :lol:
I gave an answer as to HOW it COULD be done WITHOUT clamps to illustrate that things CAN be done without them. not which is the faster more efficient way.. the moral of the story is... if you got 'em, use 'em.. if not, use your head rather than you wallet..
afreegreek
500 Club
 
Posts: 723
Images: 0
Joined: Mon Jan 25, 2010 8:35 pm
Top

Postby starleen2 » Sat Mar 06, 2010 11:47 am

Image

You can NEVER have enough clamps!
User avatar
starleen2
5th Teardrop Club
 
Posts: 16272
Images: 224
Joined: Sat May 12, 2007 8:26 pm
Location: Pea Ridge ,AR
Top

Postby starleen2 » Sat Mar 06, 2010 11:47 am

Image
User avatar
starleen2
5th Teardrop Club
 
Posts: 16272
Images: 224
Joined: Sat May 12, 2007 8:26 pm
Location: Pea Ridge ,AR
Top

Postby Larwyn » Sat Mar 06, 2010 3:09 pm

What a crock of clamps.................. :lol: :lol:

Image
Larwyn

Keeper of the Most Out Of Control Shop (2005)

I feel bad for the man that cannot spell a word more than one way. Mark Twain
User avatar
Larwyn
Mad Kilted Texan
 
Posts: 1658
Images: 210
Joined: Sun Jun 20, 2004 12:06 pm
Location: Kerrville, Texas
Top

Postby Grid Runner Adventures » Sun Mar 07, 2010 8:11 am

so why all the clamps. why not glue n screw?
www.offgridrving.com
Follow my build of a off grid camper that is 6x8 and I will live in it for an entire year!
Google Is My College
User avatar
Grid Runner Adventures
Teardrop Master
 
Posts: 273
Images: 4
Joined: Sun Feb 28, 2010 6:15 pm
Location: southern wisconsin
Top

Postby GreatPumpkin » Sun Mar 07, 2010 12:03 pm

Glue and screw is fine for some applications, but you don't always want screws to be visible, or to mar the beauty of the wood.

For example...my bulkhead walls that I recently put together I used a Kreg jig to drill and screw the framework together, gluing all the joints. I also used clamps to hold it together properly as the screwing action may cause the pieces to misalign if not held in place.

I then glued and clamped the 1/8" Baltic Birch to the framework. This part is visible, and I do not want fasteners visible (screws, nails, etc) that would detract from the natural beauty of the wood. This requires a lot of clamps and weight to ensure the glued surfaces stay where they are supposed to while the glue cures.
Custom Benroy/Grunman/Hybrid...In Progress
2001 Dodge Ram 1500
2001 Honda XR650R

"In regione caecorum rex est luscus." GP
User avatar
GreatPumpkin
Teardrop Master
 
Posts: 124
Images: 5
Joined: Sun Oct 11, 2009 12:47 am
Location: Colville, WA
Top

Postby Grid Runner Adventures » Sun Mar 07, 2010 12:24 pm

ah. i will be all set for glue n screw. im putting truck bed liner on the entire outside of my camper. and inside floor.
www.offgridrving.com
Follow my build of a off grid camper that is 6x8 and I will live in it for an entire year!
Google Is My College
User avatar
Grid Runner Adventures
Teardrop Master
 
Posts: 273
Images: 4
Joined: Sun Feb 28, 2010 6:15 pm
Location: southern wisconsin
Top

Postby Mauleskinner » Sun Mar 07, 2010 11:48 pm

I pretty much quit buying them a while back...the left one is boughten, the others are homemade...

Image

...and a little closer view

Image

I also bought the drawings for this one, and scaled them down to about a 6" overall length (3 inch reach)...available at www.duck-trap.com

http://www.duck-trap.com/lapclamps14-.jpg

[/u]
User avatar
Mauleskinner
The 300 Club
 
Posts: 350
Joined: Tue Aug 21, 2007 8:57 pm
Location: Southern MN
Top

Postby Lou Park » Mon Mar 08, 2010 7:56 am

I learned how to do these 30-35 years ago and I'll be honest. I forgot about these types of clamps a long time ago. Very nice job.
Lou

Mauleskinner wrote:I pretty much quit buying them a while back...the left one is boughten, the others are homemade...

Image


[/u]
Lou Park
The 300 Club
 
Posts: 433
Images: 5
Joined: Fri Feb 01, 2008 8:27 pm
Location: Northen Illinois
Top

Postby Grid Runner Adventures » Mon Mar 08, 2010 10:31 am

i couldnt find the plans to make those clamps
www.offgridrving.com
Follow my build of a off grid camper that is 6x8 and I will live in it for an entire year!
Google Is My College
User avatar
Grid Runner Adventures
Teardrop Master
 
Posts: 273
Images: 4
Joined: Sun Feb 28, 2010 6:15 pm
Location: southern wisconsin
Top

Postby Miriam C. » Mon Mar 08, 2010 12:14 pm

:thinking: :lol: Well you can do it without clamps but you will need something and a reusable bunch of clamps has got to be cheaper than buying tape every time you want to hold something.

Hey and lets not forget to clean the tape residue off....
“Forgiveness means giving up all hope for a better past.â€
User avatar
Miriam C.
our Aunti M
 
Posts: 19675
Images: 148
Joined: Wed Feb 15, 2006 3:14 pm
Location: Southwest MO
Top

Postby Mauleskinner » Tue Mar 09, 2010 8:06 pm

Grid Runner Adventures wrote:i couldnt find the plans to make those clamps

I may have been a little confusing...the plans I mentioned previously are for this one
Image

The cam clamps I made based on the original boughten one...the heads are three pieces laminated together so I didn't have to chop mortises, etc. I made the arms 1/4" thick and 1 1/4" wide. They flex a little excessively with longer reaches, so I'll probably start making the arms 1/2" thick and see what happens.

You can find plans for cam clamps with one-piece heads at http://www.woodshoptips.com/tips/050304/index.htm

This one cuts slots instead of mortises for the arm...it requires a subscription, but it has a free trial available.
http://www.finewoodworking.com/FWNPDF/011117050.pdf

David
User avatar
Mauleskinner
The 300 Club
 
Posts: 350
Joined: Tue Aug 21, 2007 8:57 pm
Location: Southern MN
Top

Previous

Return to Teardrop Construction Tips & Techniques

Who is online

Users browsing this forum: No registered users and 5 guests