Show me your hatch detail please

Anything to do with mechanical, construction etc

Postby thobbs » Thu Jul 20, 2006 11:21 am

I agree with Miriam. We need to put together an album of closeups on galley hatches and hinges and such. I'm still trying to figure out which way to do mine as well. :?
User avatar
thobbs
Teardrop Master
 
Posts: 103
Images: 21
Joined: Thu Oct 13, 2005 12:23 pm
Location: Utah

Postby bledsoe3 » Sun Jul 23, 2006 3:00 am

Here's what I got.
Image
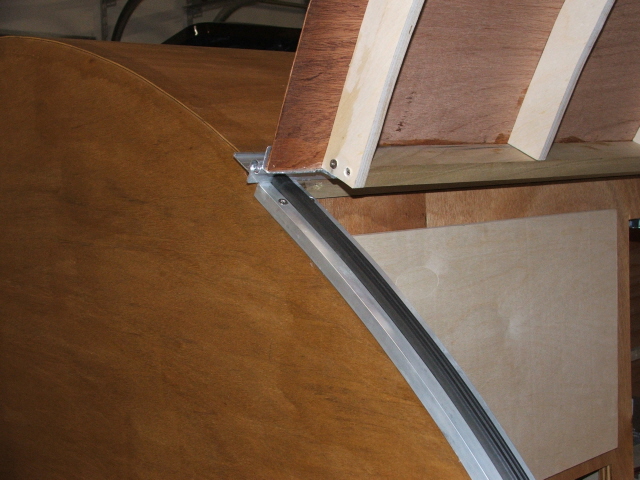
You brought this topic up, so I went out and did it. 1/2" angle inside and out (annealed and bent to the radius). Aluminium valley flashing cut to fit in between and Grants hatch seal. The side walls are notched 3/8" per the generic benroy plans. Notice Grants hinge sits above the angle.
If you do what you've always done, you'll get what you've always got.
User avatar
bledsoe3
3000 Club
3000 Club
 
Posts: 3694
Images: 112
Joined: Tue Jun 07, 2005 5:55 am
Location: Oregon, Portland

Postby Miriam C. » Sun Jul 23, 2006 7:51 am

:applause: Bledso,
That is exactly what I was hoping for. Nice job there, clean and neat.

BTW-
Aluminium valley flashing cut to fit in between

What is aluminium valley flashing and where is between? :oops: 8)

Thank you so much
Miriam
“Forgiveness means giving up all hope for a better past.â€
User avatar
Miriam C.
our Aunti M
 
Posts: 19675
Images: 148
Joined: Wed Feb 15, 2006 3:14 pm
Location: Southwest MO
Top

Postby bledsoe3 » Sun Jul 23, 2006 2:25 pm

AuntieM, Aluminium valley flashing is found in the box stores in the roofing section. In my picture it doesn't show because the seal is over it. Look between the two pieces of angle on this picture.
Image
It looks the same on the hatch. The flashing is cut the entire width of the side so the angle covers it and the screws that hold the angle go through the flashing as well.
If you do what you've always done, you'll get what you've always got.
User avatar
bledsoe3
3000 Club
3000 Club
 
Posts: 3694
Images: 112
Joined: Tue Jun 07, 2005 5:55 am
Location: Oregon, Portland
Top

Postby Miriam C. » Sun Jul 23, 2006 3:23 pm

;) What a great picture!!!! I hadn't realized there were 3 different pieces of metal on the door either. :thinking: Seems you have solved 2 major mysteries for me with one very fine close up.

Thank you so much from a bunch of us. :thumbsup: :applause:
Aunti M
“Forgiveness means giving up all hope for a better past.â€
User avatar
Miriam C.
our Aunti M
 
Posts: 19675
Images: 148
Joined: Wed Feb 15, 2006 3:14 pm
Location: Southwest MO
Top

Postby Nobody » Sun Jul 23, 2006 6:35 pm

bledsoe, it appears you used flashing & aluminum angle everywhere on both the door frame & the doors themselves, except for the T-molding on the outer perimeter of the doors. Is that the case for sure? Thanks,
Harvey -

- - - - - - - - - - - - - - - -

Doing the right thing ain't always easy but, . . . it's always right!
User avatar
Nobody
1000 Club
1000 Club
 
Posts: 1196
Images: 342
Joined: Wed Jan 25, 2006 1:09 pm
Location: Benton, Arkansas
Top

Postby rampage » Sun Jul 23, 2006 8:35 pm

Bledsoe, Thats one more thing I'll be copying from your build. :lol:
"If you can't be a good example, then you'll just have to be a horrible warning"
User avatar
rampage
Donating Member
 
Posts: 286
Images: 5
Joined: Tue Jan 24, 2006 12:02 pm
Location: Florida
Top

Postby bledsoe3 » Sun Jul 23, 2006 10:10 pm

Nobody wrote:bledsoe, it appears you used flashing & aluminum angle everywhere on both the door frame & the doors themselves, except for the T-molding on the outer perimeter of the doors. Is that the case for sure? Thanks,

That is the case. I used the t-molding for the sealing of the doors.
If you do what you've always done, you'll get what you've always got.
User avatar
bledsoe3
3000 Club
3000 Club
 
Posts: 3694
Images: 112
Joined: Tue Jun 07, 2005 5:55 am
Location: Oregon, Portland
Top

Previous

Return to Teardrop Construction Tips & Techniques

Who is online

Users browsing this forum: No registered users and 2 guests