RV There Yet? Towed Hall Build Journal

Anything to do with mechanical, construction etc

Postby bve » Sun Aug 16, 2009 10:28 pm

Hey Barefoot how are you doing, how's progress going?
Burke

KISS > COMPLEX
Image
Image

Build threads converted to PDFs.
As of 2008-08-08 I have added more build threads to the pdf collection
User avatar
bve
500 Club
 
Posts: 694
Images: 98
Joined: Sat Aug 25, 2007 1:44 am
Location: Edmonton, Alberta, Canada

Postby Barefoot » Mon Aug 17, 2009 8:57 am

"Hey Barefoot how are you doing, how's progress going?
--Burke"

Hey, you noticed that I usually post on Saturday night (and am late). Going well, thank you, even though I have "chores" and a little work and the heat and humidity force me to quit by early afternoon.

Image

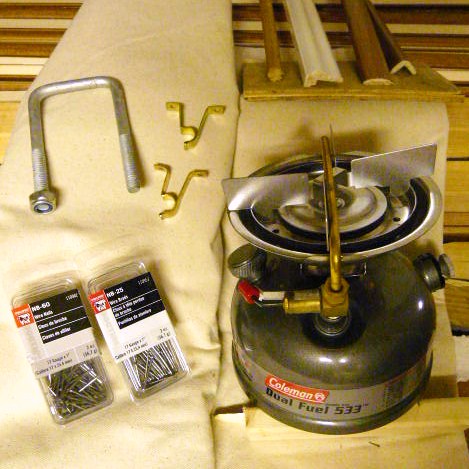
Here is some of the stuff I found last week: The pieces at the upper right, left to right, are 1/2" x 3' dowels (for curtain rods using the hooks in the upper center), something called 1-1/4" cap molding (to lap up on and trim out the exterior of the window flanges), more of the almost flat 1" plastic strips I've been using to trim in many places, and the very small corner molding (to trim the interior of the windows). At the upper left is one of the oxymoronic square U-bolts for lowering the axle / raising the frame. At the lower left --just for fun-- are those 1" brads for saving my fingers. At the lower right is a real prize and something else I didn't know existed, a one-burner Colman gasoline stove. It's plenty for me. Now the tow car, generator, TTT, and even the mower all use the same fuel. With a Pet Cool, 12v. and 110v. lights, no propane to plumb!
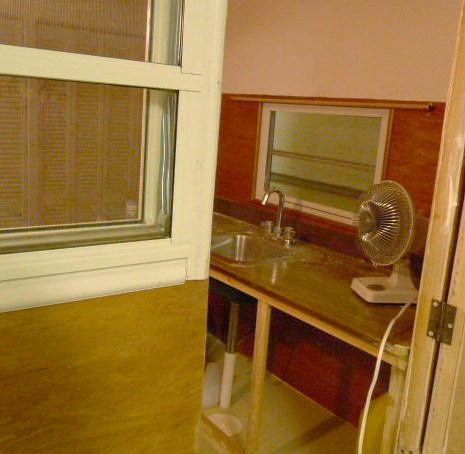
Here is the trim a curtain rod installed, along with a simple galley drain and my version of a ball valve (Hi, Aunti M) there on the floor:

Image
User avatar
Barefoot
Teardrop Master
 
Posts: 138
Images: 52
Joined: Mon Feb 16, 2009 8:44 am
Location: east central FL

Postby Barefoot » Sat Aug 22, 2009 10:40 pm

Absolutely nothing to report this week but picking up a couple of parts. The heat has finally gotten the best of me BUT it has begun to cool off just a little some evenings, so getting back to it is not far off.
User avatar
Barefoot
Teardrop Master
 
Posts: 138
Images: 52
Joined: Mon Feb 16, 2009 8:44 am
Location: east central FL
Top

Postby Barefoot » Sat Sep 05, 2009 6:04 pm

Well! It has continued cooling off a smidge (scientific term) per day and after two weeks off I'm up to gotting a little "work" done, especially on the cool(er) concrete floor!

The "lowering" blocks, in this case raising blocks, are done. I made them from a scrap of the hardest wood I've ever had, adding a longer through bolt with the head ground down for a locating lug and a short piece of spring from a long-gone boat trailer to serve as a sort of overload spring should a pothole threaten the floor with the axle. The clearance under the frame has gone from the factory two inches to three, now with three inder the semi-dropped floor as well. With the taller tires, the clearance under the fully dropped floor is almost eight inches, and under the side "skirts," a foot.

Speaking of clearance, I had figured it all on paper but it was a relief to see it work in real life. There's all of 5/8" under the garage door with the nose "kneeled" down to make the taper towards the back come out level. It's 5/8" all the way along. Whew! That means no roof vent, but then I had broken down and bought a PetCool from another T&TTT member, so will have less use for one.

Yes, the jack needs redone. It's a JC Whitney and it --and the Harbor Freight frame-- are sort of...limber and need all the help they can get, but for $16 I can fiddle some. Definitely must paint that Chinese red tongue. Good to be back in harness.

Image Image
User avatar
Barefoot
Teardrop Master
 
Posts: 138
Images: 52
Joined: Mon Feb 16, 2009 8:44 am
Location: east central FL
Top

Postby Miriam C. » Sat Sep 05, 2009 10:20 pm

:thumbsup: :applause: Oh yeah. It is almost done. :thumbsup: :twisted: Need lots of pictures........ 8) :D
“Forgiveness means giving up all hope for a better past.â€
User avatar
Miriam C.
our Aunti M
 
Posts: 19675
Images: 148
Joined: Wed Feb 15, 2006 3:14 pm
Location: Southwest MO
Top

Postby bve » Sun Sep 06, 2009 12:07 am

Nice work, I'm looking forward to seeing it hooked to the 'toad' vehicle on it's way to the first camp out.
Burke

KISS > COMPLEX
Image
Image

Build threads converted to PDFs.
As of 2008-08-08 I have added more build threads to the pdf collection
User avatar
bve
500 Club
 
Posts: 694
Images: 98
Joined: Sat Aug 25, 2007 1:44 am
Location: Edmonton, Alberta, Canada
Top

Postby Barefoot » Sun Sep 13, 2009 8:56 pm

The slightly cooler weather early and late in the day continued improving and I've gotten more done.
As promised I painted the tongue, to match the window frames and wheels. I figured out what ailed the jack and concocted a way to fix that and improved on my first try, too. Under the wheel, by the way, is my favorite chock, good for the whole trailer, a concrete sprinkler head ring, all of a dollar-something. The small handle above the coupler is handy, too. Both have survived a cargo trailer and few boat trailers.
Image
The fridge is from a church yard sale a few yers ago. It ran and runs fine but didn't have a freezer door and I'm rather pleased with my fix. The dowel of course can't be long enough to stay in the holes if pushed to either side but the wire ties hold it to the door, and the side panels center the door. The weight of metal handle helps it swing shut. In a primitive camp frozen water bottles or ice bags in the freezer compartment or top rack would make it a fair cooler.
Image

The deadbolt was still in the original hard plastic shell package, but I got it out anyway! Alas, the directions were incomplete and the screws were too short for the door thickness it was supposed to fit. Mine is the same as the walls, 1-7/8". I figured out the first and fixed the second by insetting the inside flange its own depth, the same as the 5.2mm ply. The handle is from the junque box and may be temporary. Good thing I remembered to include a chunk of 2x6 for all that before skinning the door.
Image
Lord willing, see you next Sunday evening with the PetCool figured out.
User avatar
Barefoot
Teardrop Master
 
Posts: 138
Images: 52
Joined: Mon Feb 16, 2009 8:44 am
Location: east central FL
Top

Postby Barefoot » Sun Sep 20, 2009 7:53 pm

The heat and humidity came back. I spent much of the week avoiding it, deciding where to put it, figuring out how, and false starts but today, all in a long push, I got the PetCool almost completely installed. Tomorrow after I find an odd sort of screws or nails it will need, I'll likely finish, take a photo or two, and find and start the next sub-project.
User avatar
Barefoot
Teardrop Master
 
Posts: 138
Images: 52
Joined: Mon Feb 16, 2009 8:44 am
Location: east central FL
Top

Postby bve » Mon Sep 21, 2009 11:19 pm

Too bad about the heat and humidity, you'll have to get it done to give yourself a vacation away from it :) :lol:
Burke

KISS > COMPLEX
Image
Image

Build threads converted to PDFs.
As of 2008-08-08 I have added more build threads to the pdf collection
User avatar
bve
500 Club
 
Posts: 694
Images: 98
Joined: Sat Aug 25, 2007 1:44 am
Location: Edmonton, Alberta, Canada
Top

Postby Joe Staller » Wed Sep 23, 2009 1:12 pm

Barefoot,

I have the same jack and a Harbor Freight trailer, and my set-up is not very solid. Can you give us some details on how you modified it to make it work better?
Joe Staller
Teardrop Inspector
 
Posts: 23
Joined: Fri Jun 29, 2007 1:24 pm
Location: Tempe, Arizona
Top

Postby Barefoot » Wed Sep 23, 2009 5:14 pm

Joe Staller wrote:Barefoot,

I have the same jack and a Harbor Freight trailer, and my set-up is not very solid. Can you give us some details on how you modified it to make it work better?


Sure. You'll notice that the large mounting pad, the piece fastened to the jack itself, has four flat spots where the bolts go through. Even with the pad turned horizontal as I have it, the top and bottom flat spots will not both rest on the frame at the same time, leaving one pair and the hollow center of the mounting pad not touching anything much and the the jack rocking enough to lean way over, maybe even twisting the frame rail some.

What I did was slip a narrow piece of luan (1/4" might be better) between the mounting pad and the outside of the frame, and now the center of the pad rests solid on the plywood when the bolts are drawn up. In the photo you can see the near end of it sticking out. I also slipped a piece of 1/4" between the bottom bolts and the bottom of the frame rail, though on top would work, too. I tightened the top bolts until the flat spots hit pretty solid, then the bottoms until they were tight.

Though it might have been unecessary, I also moved the whole jack as far forward as I dared, as the doubled frame by the coupler is more solid. I THINK the crank end cap will swing over the square of the ball mount and not into it or the bumper, but I may have to move t back some. Please let me know how it goes, so I can tweak my descrition if need be.
User avatar
Barefoot
Teardrop Master
 
Posts: 138
Images: 52
Joined: Mon Feb 16, 2009 8:44 am
Location: east central FL
Top

Postby mikeschn » Wed Sep 23, 2009 6:22 pm

Barefoot,

That's a very nice looking build you got going there. Also I glad you finally figured out how to use the IMG button, several pages back!!!

The 8' length is the same as a Stubby design that TJ is working on. It's good to see that it actually works. Thanks for sharing your build with us!

Mike...
The quality is remembered long after the price is forgotten, so build your teardrop with the best materials...
User avatar
mikeschn
Site Admin
 
Posts: 19202
Images: 475
Joined: Tue Apr 13, 2004 11:01 am
Location: MI
Top

Postby Barefoot » Sat Sep 26, 2009 5:35 pm

I moved to Florida so long ago for the climate, but all we've had since is weather. The promised improvement is still due "next week." The PetCool installation I promised is done. The odd-ball screws I needed had to be small and threaded all the way up to hold in the exterior plywood. The louvers are screened soffit vents. I'll make and caulk little "eyebrows" over them as they're too flimsy to hold caulk themselves.
Image

A sewing table, as my mom called it and used it, that has been mine since early childhood never really found a proper place in this house but is perfect for a night stand / dresser for the TT with the extra more room from the bed now being single. Yes, it's fastened down.
Image

Just teasing about the PetCool photo. Here's the key interior shot. It sits on a foam carpet pad turned up onto the sides, so it should run without droning vibration. Yes, I glued in a divider between the exterior in and out vents. The silver stuff is flexible but super-sticky (Peel and Stick?) roofing tape slit in two lengthwise. That makes the "ducts" to and from the outside all of three inches long. That and no hoses at all inside should let it run efficiently, also as a loooong time Floridian I'm happy anyway at anything below 85 degrees, with a little breeze and low humidity.
Image

Next is shelving and whatever looks like fun next.
User avatar
Barefoot
Teardrop Master
 
Posts: 138
Images: 52
Joined: Mon Feb 16, 2009 8:44 am
Location: east central FL
Top

Postby Barefoot » Sun Oct 04, 2009 7:56 pm

The cool(er) weather was a false start but while it lasted I got poly on all the luan added since that scary first time. Some may remember the stench that killed all my goldfish (and as it turned out, all the houseplants) and stiffened my legs for a couple of days. Some may also recall my troubles with some of it not drying and that I finally remembered getting Windex and a Febreeze clone (not bug spray as I said in another forum)on that very spot. Maybe you connected the dots as I finally did, that those chemicals combiing had to have produced the toxic stink. The proof is that this time the odor was almost pleasant!

Otherwise, details, details, details, mostly picky but the main ones being a wall behind the fridge to create a hanging space and room on the floor for loose stuff too big for under the bunk, like a Yamaha (Honda clone) generator and grey water tank, and the start of galley shelving and doors. It's so quiet in there! I bet it will sleep "real good."
Image
Image
User avatar
Barefoot
Teardrop Master
 
Posts: 138
Images: 52
Joined: Mon Feb 16, 2009 8:44 am
Location: east central FL
Top

Postby bve » Tue Oct 06, 2009 8:28 am

Hey Barefoot that is shaping up pretty nicely, great storage space behind the fridge.

Glad the poly this time around was a better experience.

Looking forward to seeing more progress and pictures.
Burke

KISS > COMPLEX
Image
Image

Build threads converted to PDFs.
As of 2008-08-08 I have added more build threads to the pdf collection
User avatar
bve
500 Club
 
Posts: 694
Images: 98
Joined: Sat Aug 25, 2007 1:44 am
Location: Edmonton, Alberta, Canada
Top

PreviousNext

Return to Teardrop Construction Tips & Techniques

Who is online

Users browsing this forum: No registered users and 2 guests