Stripping side two of the SlumberMAX SO - Could get long

Anything to do with mechanical, construction etc

Postby BrianB » Tue Nov 27, 2007 3:04 pm

Fantastic thread, Juneaudave! I hope you keep it going when you get back to work on the tear!
User avatar
BrianB
Teardrop Master
 
Posts: 258
Joined: Sun Oct 17, 2004 11:23 am
Location: Casina, Italy

Postby Juneaudave » Sat Dec 01, 2007 7:25 pm

Thanks Brian...

I thought maybe it would be usefull to show how I fill the cracks with epoxy. You know, it just seems that no matter how careful you are, you still get cracks, chips, gouges and all sorts of distressing ailments. But fortunately, epoxy makes a wonderful filler that can be made almost invisible. Here's how I do it...

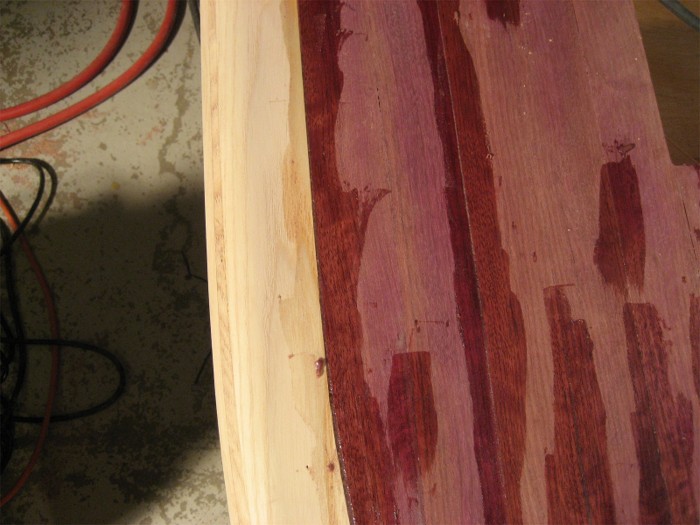
On side two, I started the filling process by first laying down the side and rough sanding it. I used the handy dandy belt sander (my new best friend) to level it up... then a quick pass with the random orbital (ROS) at 100 grit to remove any sanding scratches. On the softer cedar, I also took a few licks with a fairing board to give me the flattest side that I could get.

Image

While I was sanding with the ROS, I collected the dust out of the bag and set it aside. In this case, I have the purple heart dust in one container, some cedar dust in another. Your going to need those to get that good match. I also have available a variety of fillers from West (in differnt shades), clear plastic cups I can use to mix in, reusable stirring sticks, disposable gloves and so forth.

Image

You start by mixing up some epoxy...notice that crack by the cup where the purple heart meets the ash? That's a very typical place to get a nice gap when you are scribing a fit (with one too many in ya). Because I am currently filling the purple heart, I'll start by adding the purple dust. In general, the initial sawdust /epoxy mix will be darker than the wood you want to match, so I will add various fillers a bit at a time till it is just the shade I want. I tend to use a lot of the West 403 to lighten.

Image

After the filler is the right color and consitancy, I use the the plastic stirring stick to press the paste down in the cracks. I quickly have them all filled up. On the larger cracks, I may have to go over it with a second pass of filler once it cures and I sand the side down again.

It's pretty easy to get carried away with filling...the smallest of cracks begin to look like the Grand Canyon. Just remember...you'll have to sand all that extra off once it cures. Remember that crack in the picture above? You can see...I got a pretty good match and you will have to look to find it once the side is epoxied !!!

Image

Image


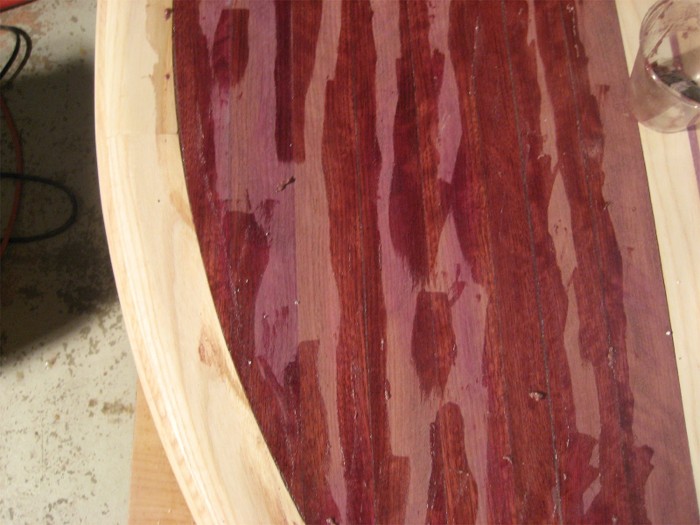
I'll repeat the process for each type of wood...and let it cure at least overnight.

And that's how I do it!!!! :thumbsup:
Last edited by Juneaudave on Sat Dec 01, 2007 8:52 pm, edited 1 time in total.
User avatar
Juneaudave
Super Duper Lifetime Member
 
Posts: 3237
Images: 380
Joined: Sun Jul 03, 2005 12:11 pm
Location: Juneau, Alaska

Postby prohandyman » Sat Dec 01, 2007 7:34 pm

Nice instructural Dave! That's going to be fantastic looking! :thumbsup: :thumbsup:
Dan
155200 Facebook group 164774163701
User avatar
prohandyman
Super Lifetime Member
 
Posts: 1919
Images: 785
Joined: Fri Dec 22, 2006 3:21 pm
Location: Greenwood, IN
Top

Postby Juneaudave » Sat Dec 01, 2007 8:47 pm

prohandyman wrote:Nice instructural Dave! That's going to be fantastic looking! :thumbsup: :thumbsup:


Dan or anyone else...be sure to add any tips you have into ths post!!! (In Dan's case, I feel like the Grasshopper talking to the Master....) What we really need in this post is a toolbox of tricks to use for anyone considering building a stripper!!!

One thing that I didn't say is that there are hundreds of ways that canoe and kayak builders fill cracks...let's see...some of the best use a mixture of Durham's Rock Puttty and sawdust, some builders add regular bread flour to their epoxy paste to lighten it rather than microfibers...and eveyone has his or her way of doing it!!! The filling method I decribed is pretty common though, and is very forgiving.

:thumbsup: Juneaudave..sanding away with a full face respirator!!!
User avatar
Juneaudave
Super Duper Lifetime Member
 
Posts: 3237
Images: 380
Joined: Sun Jul 03, 2005 12:11 pm
Location: Juneau, Alaska
Top

Postby Classic Finn » Sun Dec 02, 2007 1:29 pm

Juneau Dave your build is sooooooo awesome. Just Beautiful. :applause: :applause: :applause: :applause:

Classic Finn :thumbsup: :thumbsup:
Royal Teardrop Society Scandinavian Bureau Chief of Staff

Image
User avatar
Classic Finn
Midnight Sun Voyager
 
Posts: 17488
Images: 146
Joined: Fri Apr 29, 2005 4:29 am
Location: Country of Finland
Top

Postby Juneaudave » Sun Dec 02, 2007 2:46 pm

Finn...Thanks...but it don't look so good this morning...this is what I ended up with for sanding today!!! :cry:

Image

:roll: :roll: :roll: :roll: :roll: :roll: :roll: :roll:
User avatar
Juneaudave
Super Duper Lifetime Member
 
Posts: 3237
Images: 380
Joined: Sun Jul 03, 2005 12:11 pm
Location: Juneau, Alaska
Top

Postby Steve Frederick » Sun Dec 02, 2007 3:10 pm

Another way to fill cracks, is to take a pocket knife and whittle little slivers of the offending wood. Wet the sliver a bit, and while wet, force it in the crack, using a bit of glue. When the glue has set, scrape the excess wood flush and sand.
Blessings, Steve
Adirondacks, Upstate New York
Building Journals
The Shop Manual's 8-years old!! Thank's everyone!
New! 'Rondack Lodge Plans!Order Here!
Image
User avatar
Steve Frederick
Custom Teardrop Builder
 
Posts: 1984
Images: 29
Joined: Thu Apr 15, 2004 5:02 pm
Location: Upstate New York, Adirondacks (Great Sacandaga Lake)
Top

Postby Podunkfla » Mon Dec 03, 2007 3:46 am

Steve Frederick wrote:Another way to fill cracks, is to take a pocket knife and whittle little slivers of the offending wood. Wet the sliver a bit, and while wet, force it in the crack, using a bit of glue. When the glue has set, scrape the excess wood flush and sand.

Yep... I like the "sliver method" and use it a lot... Only I make the slivers on the table saw from scrap matching wood. I don't wet them. I just use a little titebond II on the edge and tap them in place. Makes for an invisible repair most times. :thumbsup:
<B>~ Brick
<I>... I've done so much with so little for so long... Now I can do almost anything with nothing! </I></B>
Image...Lots more pix here!
User avatar
Podunkfla
ol' noodle haid
 
Posts: 2261
Images: 5
Joined: Fri Aug 04, 2006 9:25 pm
Location: North Florida near the Suwannee River
Top

Strips

Postby prohandyman » Mon Dec 03, 2007 11:57 am

Dave
This strapping may work for you when you strip the top. I connected the front of the strap to the tongue, and ran the other end into the roof vent opening, and hooked it around a 2x4 that is pulled tight againt the roof framing. Then put a 2x4 under the strap as I tightened it.
Image
Dan
155200 Facebook group 164774163701
User avatar
prohandyman
Super Lifetime Member
 
Posts: 1919
Images: 785
Joined: Fri Dec 22, 2006 3:21 pm
Location: Greenwood, IN
Top

Postby Juneaudave » Sun Dec 16, 2007 2:22 am

Ya can't build a stripper without sealing it up with a health dose of epoxy...and that is what this final post on this thread is about.

Long before I started construction on the SlumberMAX, I began to look around and try to figure out how I might fiberglass whatever I ended up building. Looking long and hard, there seemed to be two camps...use a lightweight glass under epoxy, or forego the glass and simply give the Tear multiple coats of epoxy under a varnish or auto clear coat for UV protection. I decided for my purposes that I would just give the sides epoxy only, and use a 3.8 oz cloth on the top and bottom for strength and abrasion resistance.

To start your epoxy job, you have to first have some basic tools that include: gloves, mixing pots, small rollers, disposable rolling pan liners, mixing sticks and brushes to tip off the brush marks. In the pic below, you will also see that I have a small can of acetone. On side one of the SlumberMAX, when I hit the purple heart with epoxy, it simply balled up like oil on water...I found that by wiping down the surface of the oily woods like purple heart or teak with acetone about 15 minutes ahead of epoxy time, you draw out those surface oils and the epoxy will lay down fine.

Image

Rollers are pretty important part of getting a good job. I like those West System rollers, cut in half, on a smaller roller. I've found that some of the rollers sold as epoxy rollers, leave bits of lint, others don't carry the proper load of epoxy. You canalso see in this post the sanded, bare cedar. I took it down to 120 grit with a random orbital sander. You don not need to go finer.

Image

Epoxy is the final part of the equation...and I have had good results with West, Raka, and MAS. Other brands like System Three such as US Composites are reported to work well but I haven't tried them. Some thoughts on epoxy:


    Epoxy doesn't smell strong (unlike CPES), but you can get sensitive to it over time and that is problematic. Do read the safety lables, minimize your exposure. wear disposable gloves and avoid skin contact.

    Hardeners come in variuos speeds, I like the MAS Slow. Reason is, your second and third coats must be applied prior to the previous coat curing. That gives a chemical bond. If you wait too long, you have to sand to re-establish a physical bond. With the MAS slow, I can put on a coat at night, wake up in the morning for coat two, and put the third on that evening...and that just convenient to me.

    Always start epoxying with the temps of your wood and workspace warm, and let those temps drop as you start working. That prevents outgassing, and the epoxy is drawn into the wood better.

    Finally...I rely on the epoxy pumps to do my measuring....but that may not be your best choice. John Michne in his web article entitled Fiberglassing 101 has some really good information.

    Fiberglassing 101

Image


Going without cloth simplifies matters. As you work, apply epoxy to about a two by two foot area with the roller, then lightly drag the brush over the wet epoxy to smoothe it out. Try not to overwork the area to induce excessive bubbles, but...those fine bubbles you do get will dissipate. I try to keep a wet edges as I work.

Image


Finished....now I'll just let this sit overnight with the slow hardener and in the morning it will be hard so as to not be tacky...but soft enough that I can dent it with a fingernail. That's a good time to apply coat two and get that important chemical bond.

Image
User avatar
Juneaudave
Super Duper Lifetime Member
 
Posts: 3237
Images: 380
Joined: Sun Jul 03, 2005 12:11 pm
Location: Juneau, Alaska
Top

Postby prohandyman » Sun Dec 16, 2007 5:21 am

Dave
Looking good! :thumbsup:
Doing the panels horizontal is nice. Thats how I did my sides. The front was a different matter though. I expected it to be difficult and it was. I used a fast hardener, and had to stay close by as it dried, and every few minutes a brushed the sags and runs. The second coat wasn't as bad.
Dan
155200 Facebook group 164774163701
User avatar
prohandyman
Super Lifetime Member
 
Posts: 1919
Images: 785
Joined: Fri Dec 22, 2006 3:21 pm
Location: Greenwood, IN
Top

Postby Classic Finn » Sun Dec 16, 2007 8:27 am

Wow

Dave youve done a exceptional job on your tear. Its really nice to see the work. Always looking forward in seeing the next photos of the completed work.

Just Awesome. :applause: :applause: :applause: :applause:

Classic Finn
Royal Teardrop Society Scandinavian Bureau Chief of Staff

Image
User avatar
Classic Finn
Midnight Sun Voyager
 
Posts: 17488
Images: 146
Joined: Fri Apr 29, 2005 4:29 am
Location: Country of Finland
Top

Postby Juneaudave » Sun Dec 16, 2007 10:31 am

prohandyman wrote:Dave
Looking good! :thumbsup:
Doing the panels horizontal is nice. Thats how I did my sides. The front was a different matter though. I expected it to be difficult and it was. I used a fast hardener, and had to stay close by as it dried, and every few minutes a brushed the sags and runs. The second coat wasn't as bad.


Using a fast harder on the vertical parts of the roof might help with runs. I think Doug has epoxied with his sides in the vertical position. He might have some ideas too!!! Steve F. is also an epoxy junkie....

:thinking: :thinking:
User avatar
Juneaudave
Super Duper Lifetime Member
 
Posts: 3237
Images: 380
Joined: Sun Jul 03, 2005 12:11 pm
Location: Juneau, Alaska
Top

Postby Miriam C. » Sun Dec 16, 2007 7:24 pm

:applause: :thumbsup: thanks Dave for the great tutorial. You have some great pictures and information here.

And then there is the Tearddrop it's self. I can't wait to see if finished. :twisted:

Image
“Forgiveness means giving up all hope for a better past.â€
User avatar
Miriam C.
our Aunti M
 
Posts: 19675
Images: 148
Joined: Wed Feb 15, 2006 3:14 pm
Location: Southwest MO
Top

Postby Juneaudave » Sun Dec 16, 2007 7:34 pm

Miriam C. wrote::applause: :thumbsup: thanks Dave for the great tutorial. You have some great pictures and information here.

And then there is the Tearddrop it's self. I can't wait to see if finished. :twisted:

Image


Thanks back at ya, Mariam...Now if I can only entice a couple other people (besides Dan) to build a stripper....I'll feel like the Pied Piper of stripper teardrops!!! I know Steve F. is waivering, as a kayak builder (and he only needs to get his priorities straight) ...it's only a matter of time before he he won't be able to resist the urge!!! 8) 8) :twisted:
User avatar
Juneaudave
Super Duper Lifetime Member
 
Posts: 3237
Images: 380
Joined: Sun Jul 03, 2005 12:11 pm
Location: Juneau, Alaska
Top

PreviousNext

Return to Teardrop Construction Tips & Techniques

Who is online

Users browsing this forum: Google [Bot], Jimbodub and 2 guests