Page 1 of 2

Inkwell Update

PostPosted: Tue Feb 20, 2007 11:45 pm
by Lynn Coleman
Hi all,

Well it's been five weeks since we started building the Inkwell and I'm proud to report we have two sidewalls. After the major mistake of building two left hand walls, I'm happy to report that those repairs have been done and we're on the polishing up end of the serious reconstruction.

Our goal now, is to make certain the curve is identical on both sides and at both ends. If we can get the extra hands to help put the walls in place on the trailer, our goal is to have that done this weekend.

Here's a pic of the two walls laying one on top of the other. Image

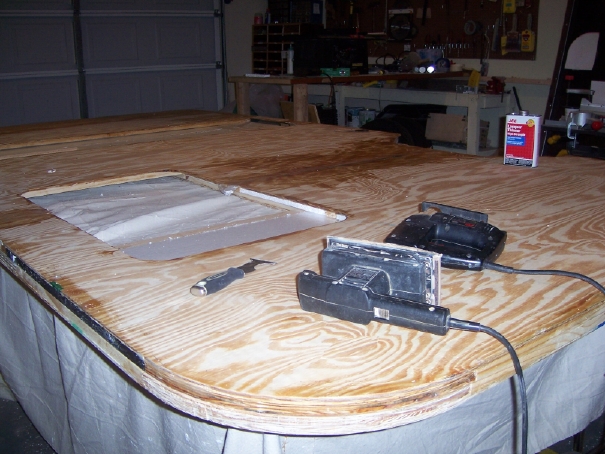
We're starting to feel like we might actually get this trailer built. I picked up an old Stanley hand plane on ebay this past week and it works wonderful, gotta love the old hand tools.

Lynn

PostPosted: Wed Feb 21, 2007 12:00 am
by Mary K
:applause: :thumbsup: :applause: :thumbsup: :applause:

YEAH!!! Good Job!!! I'm happy to hear you fixed the wall and put it all behind you as a learning experience.

I find, I do alot on standing and staring at my build, just to make sure I don't get something backwards....... and I still did it anyway.

Mk

PostPosted: Wed Feb 21, 2007 1:06 am
by jdarkoregon
" I find, I do alot on standing and staring at my build, " said Mary K. I hear ya lady, I have to have an objective when I go into the shop, I schedule so much time and although I usually go over, I do stay with the objective, OR I TOO would be looking and dreaming

John

PostPosted: Wed Feb 21, 2007 8:50 am
by Ira
Getting the sides the same is really easy, although a lot of people get nervous about it. I mean, all you gotta do is clamp 'em together and use that sander.

It's actually FUN!!!

Today's progress

PostPosted: Thu Feb 22, 2007 10:05 pm
by Lynn Coleman
Hi all,

Thanks for the comments. Today we put up the side walls on the trailer. We still have to do some final securing but that will be on Saturday.

Image This is while we're putting up the right hand wall.

Here's a slightly blurry picture after a few supports and the two walls are up.
Image

We're actually very excited that the two walls went up. We did need to do some slight trimming around the wheelwells but apart from that it was an easy wall raising.

Saturday we hope to get it fully secure and some of the front and back exterior walls up.

Lynn & Paul

PostPosted: Thu Feb 22, 2007 10:21 pm
by Miriam C.
:applause: :applause: :thumbsup:
Great job Lynn and Paul. Ya dun good.

GirRdun :thumbsup:

Today's Progress

PostPosted: Mon Mar 05, 2007 11:58 pm
by Lynn Coleman
Hi all,

Well, we managed to get a few things done on the Inkwell since I last posted. The roof is on and secured. The exterior front and rear walls are on. And the interior rear wall is in.

We've discovered we'll be using some sort of trim to hide some of our many mistakes. This will be done much later after we're certain we haven't made any more. (Don't worry, we anticipate there will be many more.)

We had rain this past weekend and one of our exterior plywood panels became a sponge. It now has a little bubble but went down tremendously from when we first spotted it. One of the things we did to keep the water at bay was to set up a space heater in the trailer and have it drying out the walls as much as possible. In the end we'll probably have to remove the warped piece of wall and replace with a spline. Something we learned how to do from another mistake.

Anyway, here's a couple pics to show the progress
This is before the exterior front panel was put on today.
Image

This is a shot after we put on the front panel.
Image

And last but not least here's the interior rear wall in place.
Image

It's really exciting to see the interior wall up. Oh, Paul was on the roof today and it didn't fall down. :applause:

Enjoying the process,
Lynn & Paul

PostPosted: Tue Mar 06, 2007 12:25 am
by bdosborn
Cool, that's a big one! Can't wait to watch it progress, keep up with the pics. :thumbsup:
Bruce

PostPosted: Tue Mar 06, 2007 6:19 am
by toypusher
Really starting to shap up there! Should be done in no time now.

PostPosted: Tue Mar 06, 2007 7:42 am
by bobhenry
Hey Lynn how come we don't see you in there hard at work gathering splinters, and don't try and use that excuse that " I'm the photographer "

:thinking:

PostPosted: Tue Mar 06, 2007 1:52 pm
by Lynn Coleman
bobhenry wrote:Hey Lynn how come we don't see you in there hard at work gathering splinters, and don't try and use that excuse that " I'm the photographer "

:thinking:


thanks Bruce & Kerry, we're excited and pleased that it is coming together. I don't think we'll make our outer shell deadline by the end of the month but we're going to give it a good try.

BobHenry, you're right I'm the photographer. However, on my website I have probably one of the worse shots of me. It was at the end of a long day and Paul clicked a picture. The link ishttp://www.lynncoleman.com/inkwell.shtml Scroll down to March 1st and click exhausted, if you really want to see me.

Today while hubby is working I'm sanding the exterior ply and getting it ready to be sealed and painted. Thankfully, there are no cameras around. :D

Lynn

PostPosted: Tue Mar 06, 2007 1:59 pm
by Miriam C.
:applause: :applause: :thumbsup:
Well I went to exhausted and you just don't look exhausted to me. You do look like it is hot there. You are getting a lot done. Can't wait to see the interior work. 8)

GitRdun

PostPosted: Tue Mar 06, 2007 2:22 pm
by Lynn Coleman
Miriam C. wrote::applause: :applause: :thumbsup:
Well I went to exhausted and you just don't look exhausted to me. You do look like it is hot there. You are getting a lot done. Can't wait to see the interior work. 8)

GitRdun


Temps today are wonderful at 72. On the first they were in the 70's as well. Over the weekend they dropped down to the 50's during the day and 30's at night. The low 70's are perfect temp for us thin blooded folks to work in. :R

Lynn

Today's Progress

PostPosted: Fri Mar 09, 2007 11:00 pm
by Lynn Coleman
Well we had a busy day today. We put the interior rear panels up. The couch/bed is in. The portapotty cabinet is framed. And last but not least, the front bend on the roof is on.

Here's a picture of the couch/bed.
Image
You'll see a green stained board that is a leg, that sits on a 3/4" board on the floor, so when you pull out board to turn the couch into a bed, it will have a middle leg for support. Tomorrow I'll begin the process of several coats of polyurethane.

You can see a bit of the interior rear walls around the couch.

Finally we managed to get a board to curve around the very tight curve of our frame. When I joined this forum, someone (I believe it was Brick) suggested that a curve wasn't that difficult...ugh! It looks pretty but it has been a process and we're not done yet.
Here's the exterior shot taken tonight as the panel is drying in place on the Inkwell.
Image
Here's a shot of the interior where you can see the many scores we had to make for this wood to curve.
Image
Tomorrow Paul has to work, so we'll only get a few items done tomorrow night. As for me, I've got to write, my current deadline is coming up quick.

Enjoying the build,
Paul & Lynn[/img]

PostPosted: Fri Mar 09, 2007 11:17 pm
by Miriam C.
ImageYou have done an excellent job with that plywood. It will be more than worth it when you go down the road and the grand kids brag about who made itImage