Page 1 of 2
looking for advice---restarting the galley.

Posted:
Fri Apr 20, 2007 11:22 amby Miriam C.
As you can see in the picture, the ends of the camper are totally unsupported. This is allowing them to bow out when not clamped to the hatch.
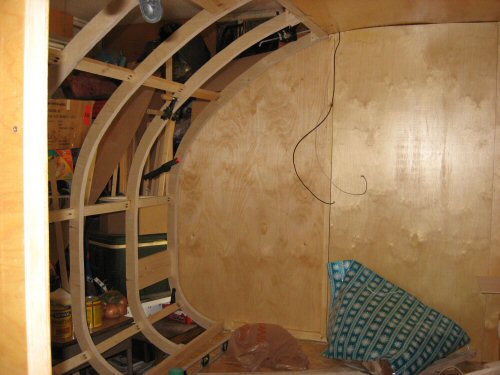
The cabinet will still leave the last 12 inches hanging out there.
I am looking for the best way to build cabinets to keep this errant sides in where they belong. My original idea was to have a book case type tower on this wall and the other with a counter in between.

Btw the wall is 3/4" thick.
Posted:
Fri Apr 20, 2007 11:28 amby Mary K
I think once you get the counter installed it will pull the sides in. That would be a start.
I'm sure other folks will have some ideas on what else you could do.
Mk
Posted:
Fri Apr 20, 2007 12:55 pmby rbeemer
Auntie,
MK is correct but when you put in you counter you want to have your hatch in place so you do not pull it in to much making your hatch not fit.
Your ciouter will act as a spar for the side walls. If you are not putting in a coutner across the back, your tower of shelves will need to be securly fastend to the wall and floor, this is not as good as having a counter go from side to side but it will help
Posted:
Fri Apr 20, 2007 1:05 pmby halfdome, Danny
How far bowed out are you talking about? How are the two sheets connected? Where will your bulkhead (cabinet back) be in relation to that plywood seam with molding on it? That seam would have been better somewhere else. Inquiring minds want to know  Danny
Danny
Posted:
Fri Apr 20, 2007 1:16 pmby Miriam C.
halfdome, Danny wrote:How far bowed out are you talking about? How are the two sheets connected? Where will your bulkhead (cabinet back) be in relation to that plywood seam with molding on it? That seam would have been better somewhere else. Inquiring minds want to know Danny
It wants to come out a 1/2 inch maybe more, on each side. I allowed a 1/4".
That is not a seam it is where I originally intended to fasten the bulkhead wall. It is solid and square with the floor. (the seam is out of view.) The walls are 5x5 Baltic birch.(3/8" ) I have built up the galley wall to 3/4".
If I attach something wall to wall do I need to drill through my sides.
The 12 inch radius hangs in the air so it is out of play.

Thanks.

Posted:
Fri Apr 20, 2007 1:36 pmby apratt
Miriam, if the countertop is going wall to wall, make it the width you want it and use pocket hole screws. That will suck the walls in. If you do not have a pocket hole jig, you screw a brace under the countertop then screw through the brace to the wall. That way no screws are seen from the outside.
Posted:
Fri Apr 20, 2007 2:40 pmby halfdome, Danny
apratt wrote:Miriam, if the countertop is going wall to wall, make it the width you want it and use pocket hole screws. That will suck the walls in. If you do not have a pocket hole jig, you screw a brace under the countertop then screw through the brace to the wall. That way no screws are seen from the outside.
Good advice.  If you do the brace thing hold it back a scosche so it will pull better.
  Danny
Danny
Posted:
Fri Apr 20, 2007 8:14 pmby Miriam C.
Thanks guys
I guess that means I should make the counter (or something) all the way across and use pocket screws.
Anybody know if 1 1/4" are too long for 3/4" sides?
Going for more plywood tomorrow.
Posted:
Fri Apr 20, 2007 8:20 pmby Steve_Cox
Miriam C. wrote:Thanks guys
I guess that means I should make the counter (or something) all the way across and use pocket screws.
Anybody know if 1 1/4" are too long for 3/4" sides?
Going for more plywood tomorrow.
Auntie M,
Doesn't the length of screw being too long also depend on how thick the piece of wood is that you are attaching to your 3/4" side? I don't have the pocket hole jig and put 1X2 cleats under my counter top epoxied and screwed with 1 1/4" wood screws driven at a 90 degree angle. Did I miss something here?
Posted:
Fri Apr 20, 2007 9:02 pmby Miriam C.
And now it comes back to haunt me. I lost my bookmarks so I lost the site with directions for pocket holes.
It doesn't send them in at 90 degrees. It has a pocket the screw sits in. YOu can change the distance away from the end of the wood by moving the stop ring.
My question was if I set it for 1x2 stiles will it go through the sides. My fear is if I crank it down to pull the sides in will it go through. Don't know how deep it goes in because of the angle.
Posted:
Fri Apr 20, 2007 9:09 pmby doug hodder
Miriam...what Steve said...
that's how I do it anyway...Doug
Posted:
Fri Apr 20, 2007 10:03 pmby Mary K
Miriam C. wrote:Thanks guys
I guess that means I should make the counter (or something) all the way across and use pocket screws.
Anybody know if 1 1/4" are too long for 3/4" sides?
Going for more plywood tomorrow.
Auntie M, I have the 3/4" sides and used pocket screws to install all my cabinets. I used 1" screws...had to go double check...and Yes, 1 inchers
I had to keep an eye to make sure I didn go through the sides....If I'd of know I was going to skin the sides then, I would have screwed the cabinets from the outside.
Mk
Posted:
Fri Apr 20, 2007 10:03 pmby halfdome, Danny
Miriam, Always do a test/dry run in a piece of scrap first after setting up a pocket hole jig. Danny
Posted:
Fri Apr 20, 2007 10:26 pmby Miriam C.
Ok, one test on the edge where the trim will go anyway. I did use them on 1x2's but they are the hairiest bit wider.
Thank you all.

Posted:
Fri Apr 20, 2007 11:12 pmby diverguy
Hey miriam,
i bought a kreg jig kit at Lowes yesterday, 35 buck and wish i had bought it sooner. the scale it gives is to use a 1 1/4 screw for 3/4 material. i have tried some test runs and i was saying to myself "that has to be to long". but on all test runs so far it is perfect. i really like this little kit. simple, easy, comes with a scale for drill depth guide, and screw length on the inside cover. i have NEVER used one before but i found it to be very user friendly and easy to understand. sorry but i am no carpenter and i am totally confused on your problem so no advise there, LOL.
good luck looks great so far.