Page 1 of 2

Cheap side table, cheap mud flaps

PostPosted: Mon Apr 23, 2007 2:55 pm
by EZ
Having some leftover 1/2" ply I decided I needed a side table. Using the aluminum extrusion that Madjack has referred to and his nutplate idea made the installation easy. A piece of aluminum tubing, a scrap piece of formica from Menards and a little paint and that is it. About $15 all told.

Image

Image

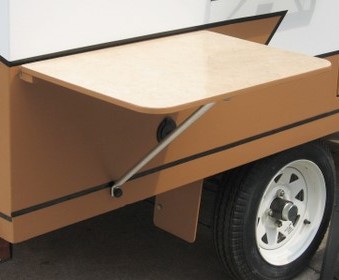
If you build over the wheels, the way the Harbor Freight trailer is made with the bracket for the casters to attach to it just begs for some quick-to-install mud flaps. I was going to use actual ones from the auto parts store but due to the short budget I just trimmed and painted some lauan and stuck it on there with a rubber bushing to add a rearward slant to the thing. Cost: $0. It deflects road spray and actually doesn't look too bad. I think I will replace them with rubber or plastic some day but for now at least I have flaps.


Image

Image

Ed

PostPosted: Mon Apr 23, 2007 3:00 pm
by halfdome, Danny
Looks really nice Ed :thumbsup: . How about a photo of the bracket with the table top removed. :) Danny

PostPosted: Mon Apr 23, 2007 3:08 pm
by EZ
Danny, I edited my post above with a fuzzy picture of the mount. I am not really keen on the look of the extrusion against the paint but it does work really well. I can see where it would look good on an aluminum covered tear. This camper is for camping and not for looking at so I guess it is OK. Function before beauty and inexpense before function. Something like that.

Ed

PostPosted: Mon Apr 23, 2007 4:28 pm
by madjack
Ed, who ya callin' a nutplate :shock: :o :lol: ...looks good... :thumbsup: ......................... 8)

PostPosted: Mon Apr 23, 2007 10:30 pm
by EZ
:lol: :R
Madjack, I had to re-read my post to get the full benefit of yours. Yup, another nutplate idea from Madjack.....

EZ

PostPosted: Mon Apr 23, 2007 10:50 pm
by madjack
EZ wrote::lol: :R
Madjack, I had to re-read my post to get the full benefit of yours. Yup, another nutplate idea from Madjack.....

EZ


...yup folks...I gotta million of 'em :lol: :lol: :lol: ................................ 8)

PostPosted: Tue Apr 24, 2007 12:56 pm
by b.bodemer
EZ,

looks great!

:thumbsup: :thumbsup: :thumbsup:

Barb

Re: Cheap side table, cheap mud flaps

PostPosted: Thu Apr 26, 2007 10:58 pm
by steve wolverton
EZ wrote:Using the aluminum extrusion that Madjack has referred to and his nutplate idea made the installation easy.


I really like this idea. What is the extrusion that's used, and what is Madjack's nutplate idea?

I'm going to add one of these tables to my setup.

Steve

PostPosted: Thu Apr 26, 2007 11:41 pm
by madjack
Steve, this is the mounting extrusion http://www.tjtrailers.com/store/table-support.html
...as far as nutplate ideas go, I have no idea what Ed is referring to since all my ideas are absolutely gold(ask my wife)...unless he was talking about the down leg....in that case, an appropriate length of 1/2" EMT was used, the end "smushed"(tech term) and bent at the appropriate angle to mount under the table with a winged bolt into an insert in the bottom of table...the bottom end was beveled and a 1/4' hole drilled thru both side near the end...a piece of 3/4" Al channel, 2"s long with a 1/4" hole drilled thru both legs, was mounted at the edge of the wall for the conduit to fit and be pinned too...giving your table a solid mount to the side of your camper.....
madjack 8)

PostPosted: Fri Apr 27, 2007 3:47 am
by asianflava
EZ wrote:I am not really keen on the look of the extrusion against the paint but it does work really well.


Waddabout painting the bracket to match?

PostPosted: Fri Apr 27, 2007 8:30 am
by EZ
Oh, nutplate again. I think that is a term for a type of hardware that is used when building airplanes but it is used for lots of stuff I am sure. They actually had mounts on the side to attach this 'nut' with wood screws so it remained in place over a hole when you insert the bolt. Anyway, what I used were T-nuts. Yikes!

Now I admit using T-nuts to attach the bracket might have been a nutplate idea. I used 1 T-nut on the side of the camper and another on the bottom of the table. Then I just smashed the ends of some leftover aluminum tubing and drilled some holes. Works great.

I thought about painting the bracket (and the T-nut) and I might, but can I paint it with latex? I am concerned that every time the table is installed it will just rub the paint right off.

EZ

PostPosted: Fri Apr 27, 2007 11:31 am
by madjack
Ed, I don't think you would wanna paint the bracket...it would get all scratched up and as tight a fit as it has, it may actually jam up on paint....
madjack 8)

PostPosted: Fri Apr 27, 2007 3:14 pm
by asianflava
Yeah the paint will get scratched up but what about masking off the insides of the channels where the other side slides into. You would paint the flat part (the part most visible) and leave the contact area alone. It's just s thought, I'm unsure how your pieces slide together.

PostPosted: Sun Apr 29, 2007 10:28 pm
by steve wolverton
EZ & Madjack - Thanks guys. I ordered the hardware tonight. :thumbsup:

PostPosted: Mon Apr 30, 2007 9:25 am
by dguff
Image

I also built a side table out of scrap and covered it with aluminum. It just hooks onto the wall and the legs can be adjusted to be level on any terrain.

Image

Jerome :)