Teardrop/Cycle Hauler Build 4.0: The Rise of The Phoenix
Well Sportsfans,
With a fresh new start to my build, I wanted to put the past behind me so I deleted all the pics from my album of past failures and started this new thread where hopefully I will detail the completion of my teardrop/cycler hauler build which I am now calling "The Phoenix" since this is the 4th and final attempt at building my own tenament on wheels. Much has been learned from everyone's advice on my last failure so I am incorporating a few design changes this time to help keep the structure straight and true.
I redid the entire subfloor joist system and ripped the 2x4's down to exactly 3" tall to make them dead even with the 3" steel angle rails of my trailer. When I got finished with the subfloor, I secured the floor down using six 3/8" x 5 carriage bolts with steel washers and nylon locknuts to hold the teardrop to the trailer. I spent yesterday under the trailer putting another coat of asphalt emulsion on the floor and on the new subfloor system. Satisfied that the floor perfectly in place and ready, I went to troweling huge amounts of Robert's Outdoor Carpet Adhesive to the inside of both newly made walls. I ended up using 1 gallon bucket per wall and allowed the adhesive to set up for 20 minutes before lowering the carpet in place and rolling it smooth with a roller.
I let the carpet set up overnight and came back every few hours and smoothed out any lumps or folds in the carpet. The next morning, I had two very nicely carpeted walls. I took my carpet blade and went all over trimming the excess carpet off so it would take the shape of the teardrop wall. As long as I kept a sharp blade in my carpet knife, it went very smooth and the results were very pleasing...boy did I need that to bolster my shattered confidence from the previous teardrop fisaco.
Anyway, here is pics of the Progress thus far...

Here's the two new freshly routed and sanded wall panels being dryfit on the floor to make sure everything will line up.

Here's a front shot of the dryfitting walls. I have seen this step before...oh yeah, I have actually made it this far once.

Here's both walls after being carpeted with indoor/outdoor carpet and then trimmed with a carpet knife.

After trimming the newly installed carpet, I made a nice 1 1/2" tape line where I could finish putting asphalt emulsion on the part of the wall that will be exposted to the elements. It came out pretty nice and clean.

A nice close up of the nice even line of asphalt emulsion. Yep, I am finally doing something right.

Here's the foundation of the teardrop all ready for the walls to be glued and screwed back into place.....AGAIN!!!

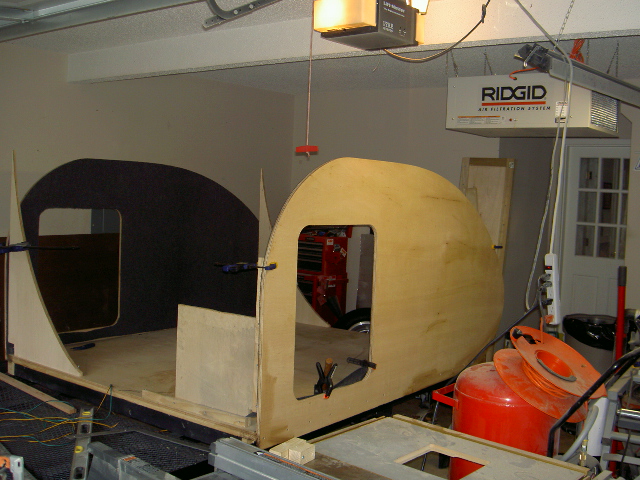
I spent all of today preparing the walls to be glued and screwed to the foor assembly with the addition of MadJack's patended aluminum angle providing extra support for the wall by also being screwed and glued to the floor. Both walls have been glued and screwed into place.

Another angle of the freshly installed walls. Instead of using Liquid Nails, I followed MadJack's advice about using the PL Brand adhesive and must say this stuff was much nicer to work with but it sets up quicker than the Liquid Nails.

A nice shot through the doorway of the freshly installed walls with carpeting. I left the carpet loose at the bottom so I could gain access to install the angle iron reinforcements. After both angle irons are installed, the rest of the carpet will be glued down all the way to the floor.
With a fresh new start to my build, I wanted to put the past behind me so I deleted all the pics from my album of past failures and started this new thread where hopefully I will detail the completion of my teardrop/cycler hauler build which I am now calling "The Phoenix" since this is the 4th and final attempt at building my own tenament on wheels. Much has been learned from everyone's advice on my last failure so I am incorporating a few design changes this time to help keep the structure straight and true.
I redid the entire subfloor joist system and ripped the 2x4's down to exactly 3" tall to make them dead even with the 3" steel angle rails of my trailer. When I got finished with the subfloor, I secured the floor down using six 3/8" x 5 carriage bolts with steel washers and nylon locknuts to hold the teardrop to the trailer. I spent yesterday under the trailer putting another coat of asphalt emulsion on the floor and on the new subfloor system. Satisfied that the floor perfectly in place and ready, I went to troweling huge amounts of Robert's Outdoor Carpet Adhesive to the inside of both newly made walls. I ended up using 1 gallon bucket per wall and allowed the adhesive to set up for 20 minutes before lowering the carpet in place and rolling it smooth with a roller.
I let the carpet set up overnight and came back every few hours and smoothed out any lumps or folds in the carpet. The next morning, I had two very nicely carpeted walls. I took my carpet blade and went all over trimming the excess carpet off so it would take the shape of the teardrop wall. As long as I kept a sharp blade in my carpet knife, it went very smooth and the results were very pleasing...boy did I need that to bolster my shattered confidence from the previous teardrop fisaco.
Anyway, here is pics of the Progress thus far...
Here's the two new freshly routed and sanded wall panels being dryfit on the floor to make sure everything will line up.
Here's a front shot of the dryfitting walls. I have seen this step before...oh yeah, I have actually made it this far once.

Here's both walls after being carpeted with indoor/outdoor carpet and then trimmed with a carpet knife.
After trimming the newly installed carpet, I made a nice 1 1/2" tape line where I could finish putting asphalt emulsion on the part of the wall that will be exposted to the elements. It came out pretty nice and clean.
A nice close up of the nice even line of asphalt emulsion. Yep, I am finally doing something right.

Here's the foundation of the teardrop all ready for the walls to be glued and screwed back into place.....AGAIN!!!
I spent all of today preparing the walls to be glued and screwed to the foor assembly with the addition of MadJack's patended aluminum angle providing extra support for the wall by also being screwed and glued to the floor. Both walls have been glued and screwed into place.
Another angle of the freshly installed walls. Instead of using Liquid Nails, I followed MadJack's advice about using the PL Brand adhesive and must say this stuff was much nicer to work with but it sets up quicker than the Liquid Nails.
A nice shot through the doorway of the freshly installed walls with carpeting. I left the carpet loose at the bottom so I could gain access to install the angle iron reinforcements. After both angle irons are installed, the rest of the carpet will be glued down all the way to the floor.


