Page 1 of 3
Third coat of epoxy...I'm dissapointed..FIXED

Posted:
Sun Aug 26, 2007 8:36 pmby Micro469
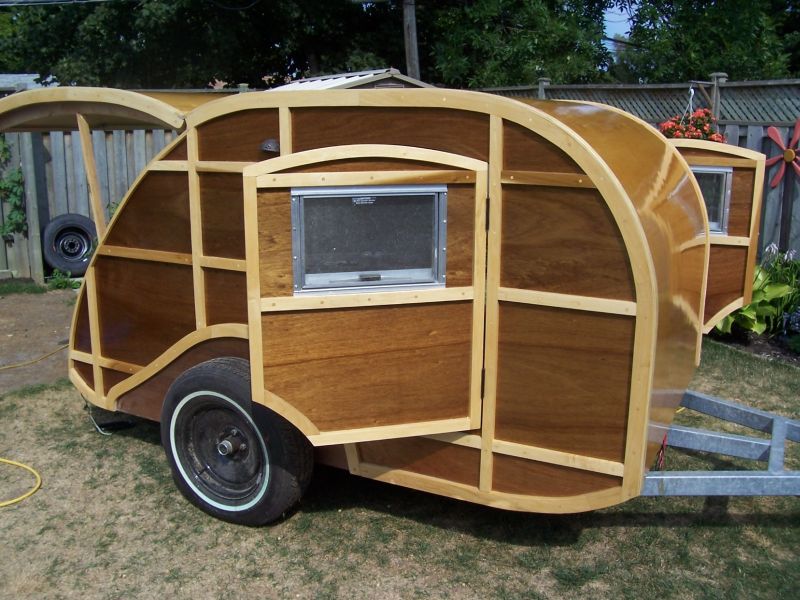
I just put the third coat of epoxy on my tear, and I'm dissapointed with the result. I was looking for a smooth glassy finish, and instead got the orange peel effect. Most noticable on the sides, the roof turned out good. Also noticed that I attracted about a zillion flying ants....I want to put on a few more coats... but don't want them on the final coat.
For the sides I am using cheap dollar store pure brissal brushes, I sanded between coats. What am I doing wrong? Not sanding enough? Cheap brushes? So far I am going through 6 sheets of sandpaper for each coat.
I need help to obtain the perfect finish... I don't want to keep applying epoxy if it's not going to get better.
Edit.. One other question.. When I get to the final coat, and want to apply clearcoat... Do I have to sand it AGAIN???

All you Epoxy Guru's.... Any advice??? Doug?????
Posted:
Sun Aug 26, 2007 8:45 pmby Arne
At least the first coat, I would put it on with a squeegee, not a brush, to fill the pours.... using a brush leaves glops...
Assuming you did not put cloth on, I would roll the second coat and tip it with a brush to help it flow....
I never use a brush to apply epoxy.
Posted:
Sun Aug 26, 2007 8:48 pmby Micro469
Arne... Kinda hard to use a roller.... But your squeegee idea might work...sand it down and put the next coat on with a squeegee....

Posted:
Sun Aug 26, 2007 9:06 pmby Arne
Last time I did mine, I used a roller cut in half, or about 4.5 inches.... much easier than the typical 9"..
and in your case, get a small squeegee or cut one down... yes, I see your problem, but I still think it's the way to go...
Glad I'm not helping you sand it/g/..
Thing is, epoxy does not flow real well and it's thick (unless you thin it). So, it has to be flattened mechanically....
And, my technique is from step one.. you are onto step 3 already, so I see a lot of elbow grease in your future.
Posted:
Sun Aug 26, 2007 9:07 pmby doug hodder
John....I only use a brush on the edges of the "framing" on the woody sides...the rest I use a roller and tip it off with a chunk of a roller held in a spring clamp...Brushes put it on too thick in my opinion and they can shed. A roller gives you better thickness control while applying, and you can cover more ground in a hurry.
If you look in my woody build photos, I did the sides up with epoxy prior to the install of the contrasting framing, while they were flat...too late for you on that now. I'd say, let it cure really well, so that it sands into a white dust, sand it down and reapply using a roller. If it is on really thick...it is going to need more cure time. I usually have a couple of days on the cure before an additional coat, although it can be done earlier without sanding. But if there is a problem in that layer, you are just laying another on top. I just like to sand the last coat and get it really smooth before the next one goes on. Sanding is a pain, you might also want to try using wet paper. I get more life out of it when doing epoxy over a dry paper.
You'll know when you have it sanded down where it needs to be as it will all have a flat appearance in the epoxy. Use a hard rubber backing block to sand the fields, it will keep them really flat, and unfortunately, a lot of it is going to need to be done by hand, especially the corners and the edges where the framing is.
Since your framing is already on, you are going to have to be more careful in how you apply and it will take longer. Use a brush for the edges of the framing, and a roller on the open panels. I cut a roller in 1/2 and use it on a shorty handle. Do 1 panel at a time, brush the frame, roll the field and tip it off. Use the roller on the framing also...tip it off with a roller skin cut in half lengthwise and held in a spring clamp. Move on to the next one. It will drag it out really smooth..You can't do a heavy coat when it is in a vertical position as it will tend to sag. A number of thin coats work out much better and less serious sanding over a saggy heavy one. I can only speak from the point of using the West System products however and my experience is only with their line. I don't doctor the recipe...(thin). I can't however imagine that the new application of epoxy had any effect on the previous coatings regardless of whose epoxy system it is. To me, that sounds more like an application issue....just my thoughts however. I could be wrong. Doug
Posted:
Sun Aug 26, 2007 9:17 pmby Micro469
doug hodder wrote:John....I only use a brush on the edges of the "framing" on the woody sides...the rest I use a roller and tip it off with a chunk of a roller held in a spring clamp...Brushes put it on too thick in my opinion and they can shed. A roller gives you better thickness control while applying, and you can cover more ground in a hurry.
If you look in my woody build photos, I did the sides up with epoxy prior to the install of the contrasting framing, while they were flat...too late for you on that now. I'd say, let it cure really well, so that it sands into a white dust, sand it down and reapply using a roller. If it is on really thick...it is going to need more cure time. I usually have a couple of days on the cure before an additional coat, although it can be done earlier without sanding. But if there is a problem in that layer, you are just laying another on top. I just like to sand the last coat and get it really smooth before the next one goes on. Sanding is a pain, you might also want to try using wet paper. I get more life out of it when doing epoxy over a dry paper.
You'll know when you have it sanded down where it needs to be as it will all have a flat appearance in the epoxy. Use a hard rubber backing block to sand the fields, it will keep them really flat, and unfortunately, a lot of it is going to need to be done by hand, especially the corners and the edges where the framing is.
Since your framing is already on, you are going to have to be more careful in how you apply and it will take longer. Use a brush for the edges of the framing, and a roller on the open panels. I cut a roller in 1/2 and use it on a shorty handle. Do 1 panel at a time, brush the frame, roll the field and tip it off. Use the roller on the framing also...tip it off with a roller skin cut in half lengthwise and held in a spring clamp. Move on to the next one. It will drag it out really smooth..You can't do a heavy coat when it is in a vertical position as it will tend to sag. A number of thin coats work out much better and less serious sanding over a saggy heavy one. I can only speak from the point of using the West System products however and my experience is only with their line. I can't however imagine that the new application of epoxy had any effect on the previous coatings. To me, that sounds more like an application issue....just my thoughts however. I could be wrong. Doug
Your right Doug, it is an application error. Never having worked with epoxy before, I didn't understand it's properties. Now, having seen first hand what it will and will not do, I have to fix it. That's where all the great advice found on this forum comes in real handy....Any way any of you can make it easier for me to fix it will be greatly appreciated.... but as it stands now, I've got a heck of a lot of sanding ahead of me........

Posted:
Sun Aug 26, 2007 9:27 pmby doug hodder
John...yes, unfortunately it is a tough sand on your tear, I didn't see your pics prior to my last response...you've got some pretty small areas to smooth out...but if you have them all covered really well and can sand them smooth, without cutting through the epoxy, additional coats won't necessarily be required. While more coats do give you more depth to the finish. A really smooth sand and then you could top coat it with whatever you are planning on using and gain the depth in the finish with the top coat. Just an idea. Sorry, I just never found a quick way around the sanding thing....sanding is sanding, but I do know that if I didn't do it right, I'll always look at that spot and think of what I should have done. Your tear still looks damn good however!!! and if someone is picking out an issue on the finish, they just might not be your friend. Doug
Posted:
Sun Aug 26, 2007 11:00 pmby Mary K
John, I think it looks awesome! Sorry about the flying ants.

I feel your sanding woes. My shoulders are about to give out on me.
I'm am still working on my trim and trying to hang the damn doors...what PITA!!!
Question!!!! What does "Tip off" mean?
Mk
Posted:
Sun Aug 26, 2007 11:22 pmby Greg M
Mary K wrote:
Question!!!! What does "Tip off" mean?
Mk
Mary,
Tipping off is where you very lightly run a brush over the rolled surface to knock down the high spots and generally smooth out the surface.
-Greg
Posted:
Mon Aug 27, 2007 3:26 amby Podunkfla
John... Your tear is looking fantastic!

As for the third coat of epoxy not looking as smooth as you'd like;
Doug's advise is very good... and that dude can PAINT!
The thing I'm thinking is that epoxy is not known for being UV resistant
and most folks in the boating world use spar varnish for the final finishing.
It does flow on a lot easier than epoxy. You still have to sand (what a pain)
enough to get the orange peel sorta gone... then brush (or spray)
on the spar varnish (thinned to good flowing consistancy if needed).
I'm thinking you could get a very nice final finish this way.
Of course, you could just tip the tear over on it side to finish the sides?

...just kidding ha ha.
Posted:
Mon Aug 27, 2007 4:40 pmby Alphacarina
Each coat will give you a smoother and glossier finish than the previous coat, so long as you're sanding in between
The first coat largely sinks in and seals the wood, leaving a very rough finish. Sand and for the second coat, mixing in a thickener like microballons will fil in 90% of the imperfections and then after a sanding and a third clear coat, you should have a pretty smooth finish
Epoxy doesn't have any UV inhibitors in it, so a final sanding and a coat of spar varnish or cleay poly with a UV inhibitor in it would be a good idea . . . . though probably not really necessary if you keep your tear in the garage when it's not being used. In that case, a couple coats of car wax on it every year is probably all you really need
Don
Posted:
Mon Aug 27, 2007 5:09 pmby madjack
Don, I could be wrong(probably am) but I don't think you can use microballons(or any other filler) in your epoxy, if you want a clear finish such as John has on his Woody....everytime I have used them, they added color and opacity to the mix.............
madjack

Posted:
Mon Aug 27, 2007 6:55 pmby Arne
forgot to mention... easier if you do it before assembly. I plan on doing as much finish work to individual pieces before it goes together, inside and out..
There will be touch up, but the inside should be much easier.
With all those outside decorative pieces, it would have been less difficult to do it before they were all on....
20/20 hindsight.. I'm really good at it, but thought I'd mention it anyway... if just to remind myself.
Posted:
Mon Aug 27, 2007 10:21 pmby Micro469
I went out today and bought a set of cabinet scrapers. I burnished one of them and tried it on a section of the tear. It went really well, and removed most of the orange peel effect in about five minutes. This will cut down my sanding time enormously. I still have to sand....Dangit, but it won't take as much time as I previously thought.... I think I can fix it......

Posted:
Mon Aug 27, 2007 10:31 pmby Chaotica
John, a properly used cabinet scraper should eliminate the need to sand heavily. If this is the first time you have used one, practice with it on a bare piece of hardwood stock and you will find that it will give you the smoothest finish possible. A light sanding after the scraping should be all you need to get a tooth for your finish coat.