Page 1 of 2
How do you work out body shapes

Posted:
Wed Sep 19, 2007 3:01 amby Mr_k QLD
I have seen some nice body shapes
How do I work out the shapes to make them consistant

Posted:
Wed Sep 19, 2007 8:33 amby Ira
Hey, Mister.
If you see one here that you like, that person may have his or her X/Y coordinates to give you:
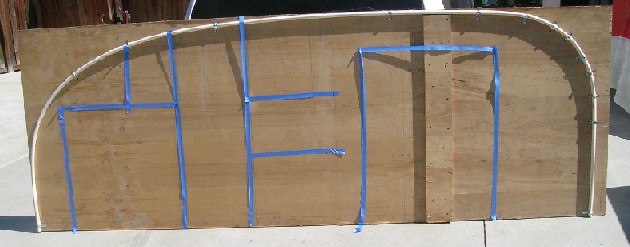
The first point is, of course, usually 0/0 at the very corner of the sheet. Then the next one will be, say 12/10, always measuring off that 0/0.
Once all the dots are on the wood, you tack a small nail into them. You then take a thin wood dowel and bend it around nail to nail, and trace with a pencil.
Once that side is cut, you just trace it to onto the ply for the other side.
Posted:
Wed Sep 19, 2007 8:46 amby madjack
Ira wrote:Hey, Mister.
If you see one here that you like, that person may have his or her X/Y coordinates to give you:
The first point is, of course, usually 0/0 at the very corner of the sheet. Then the next one will be, say 12/10, always measuring off that 0/0.
Once all the dots are on the wood, you tack a small nail into them. You then take a thin wood dowel and bend it around nail to nail, and trace with a pencil.
Once that side is cut, you just trace it to onto the ply for the other side.
..then, you can clamp 'em together and use a belt sander to insure uniformity or make a template and use a router to cut them out...some just use the MK! eyeball in conjunction with Ira's method and a belt sander...basically, whatever works for you...
madjack

Body shapes
Posted:
Wed Sep 19, 2007 8:58 amby eamarquardt
To allow me to mock up my side profile I got a couple of pieces of plywood, joined them end to end to give me the length I wanted, and then used schedule 125 pvc pipe held in place with conduit clamps screwed to the plywood. This gives really nice graceful curves and allows you to really see the profile. See my album.
Cheers,
Gus
Posted:
Wed Sep 19, 2007 8:58 amby bobhenry
I drew the shape I liked out to scale on paper. I calced the radius I wanted for the top front the bottom front and the slope to the rear. To go to full size I simply took a rip of 2x4 ( a real long yard stick) and used it as a compass with a nail for the pivot and a hole at the correct distances for the pencil. Grabbed a jig saw and there it was. Try not to overthink the process that leads to fear of making a mistake and that fear becomes paralysis. I actually did not like "Chubbys" profile but steamed ahead anyway. (Too lazy to cut a different profile.) I was looking for the sleak lines of the cubby and thought it was way to round. You know what it wound up 5'6" inside and I wired it setting very comfortably in my camping chair. It wasn't a mistake I just thought it was. It's a lot like getting into a cold swimming pool ease in and freeze or just jump in and swim.
Just go for it !
body shape
Posted:
Wed Sep 19, 2007 9:05 amby eamarquardt
I have a philosophical problem with "just go for it". When I worked for our uncle in the "Big Green Machine", we had a saying. Proper Prior Planning Prevents Piss Poor Performance. Think everything through first. That way you don't end up looking at your nice paint job from the corner you've just painted yourself into. Besides a lot of the fun is planning and designing. Sometimes realization is only half as fun as anticipation.
Cheers,
Gus
Posted:
Wed Sep 19, 2007 9:19 amby bobhenry
I mentioned drawing it out on paper first That's kinda like pre planning ain't it

Looked in your album to see how your trailer is coming along !
I'm so sorry I couldn't find it. Perhaps all that "Proper planning " is the problem !
I reiterate
" JUST GO FOR IT "
My Trailer
Posted:
Wed Sep 19, 2007 9:57 amby eamarquardt
Hi,
A friend of mine really wants to help but has had several deaths in his family this summer and I have deferred a lot of the actual construction till his family matters are sorted out. In addition I have a fairly severe problem with chronic pain (according to the literature the most painful affliction known to the practice of medicine) so I don't procede as fast as I used to. Some days, as a result of the intense pain, answering the phone is beyond my abilities. Look up trigeminal neuralgia (which is only the tip of the iceberg of my nerve problems).
If you did view my album you have seen some of the results of my planning (and actual fabrication). In addition you must (if you had your eyes open) have seen the picture of the dump trailer I HAVE built from my own design and from nothing more than a few purchased parts (axles, fenders, etc) and a pile of metal.
I have viewed your album and have seen some creative work on your part. I meant no disrespect to you personnaly, just the concept of "just go for it". After viewing your album, I did come to the conclusion that we do things much differently. W'ere here to exchange ideas and learn from each other.
Have a nice day (I plan to as I'm experiencing only moderate to severe pain).
Cheers,
Gus
p.s.: I thought the electrical plug hanging from the bottom of your trailer a nice touch (the devil made me say that).
Posted:
Wed Sep 19, 2007 10:12 amby madjack
...while there are certainly, "wrong ways' of doin' it, there is no absolutely right way of doin' it...only your way and that is one of the great attractions of building it yourself...as long as it is safe to tow, it doesn't matter how you doit. I have seen some VERY nice and usable units that came from the "goforit" school but most of the very "top shelf" units had a lot of thought and planning put into them...the old saying is that the proof is in the pudding and there is plenty to go around for both sides........
madjack
Posted:
Wed Sep 19, 2007 10:27 amby bobhenry
Damn it Gus... Now I feel like the guy in the powder blue tux at a very crowded wedding that just pee'ed his pants. How many ways can I say I'm sorry . I have been grousing and grumbling because I have a blown out knee and can't get much done to finish "Chubby" before the 10/7 outing here in Indiana and our long trip on 10/11. Truthfully I spent 3 month this winter drawing and redrawing a multitude of profiles and multiple drawings of the flip out galley. I even built scale models of the galley to be sure the cabinets would clear each other. Once fullsize we tried out the sleepy side and found I needed to move the galley wall thank God I used screws. Some things just don't jump out at you on paper. I should have "designed" the electrical I just rigged it with what I had, a big mistake. Electrical should be put in in such a way you can add or change out any wire after the fact. Yes planning is important but there ain't nothin" like saw dust up your nose and splinters in your fingers to know you'r havin" fun buildin'
Hope today is a good day for you
No harm, no foul.
Posted:
Wed Sep 19, 2007 10:59 amby eamarquardt
Ha! I think we're more on the same page than we'd like to admit. I have thought about the wiring and agree that it should be run in conduit of some sort so you can change or replace in the future. I am thinking of using the poly tubing (like they use to hook up icemakers on refrigerators). I also plan on using LED lighting so the wiring can be light gauge (read small and easy to pull through the poly tubing). You can blow dental floss through the tubing with compressed air, and then use it to pull a messenger or the wire depending on the clearances. I've used this technique to repair the power lines for my tig welder (about a 12 gauge wire in 1/4 vinyl tubing that carries 300 amps (yes 300) because the whole thing is water cooled).
Hope your knee gets better, but according to the 250 doctors I've been to not much hope for me (unless part of the brain dies, not a cheery thought). I have been to Pittsburgh three times, not a big deal to some, but when you're from So.Cal. it's a long trip (particularly when they've bored a hole in the thickest part of your overly thick skull to expose the cranial nerves where they enter the brain). Although the brain has no pain nerves, the bone and tissue they destoy to enter the brain do, it hurt!
I've posted (or will post haste) a few more pictures of my shop and some of the things I've built. Of particular interest to those that like to wire might be the single to three phase converter I built for my milling machine (for those that like to wire). The only thing originally present in the original set up are the two large contactors in the middle of the top box. the rest of the relays, transfromer, capacitors, and idler motor were added to produce a close approximation of three phase so I can run my lathe and mill.
Have a nice day,
Cheers,
Gus
Posted:
Wed Sep 19, 2007 11:39 amby jeepr
I took a piece of wood with a nail on one side and a pencil on the other to draw my front curve. I just made sure it met the front edge and the top edge in the arch.
For the rear I used a piece of string and drew a quarter of an ellipse.
video of the idea
like this
After I cut one side I used it as a template and cut the other side. Strapped them together and belt sanded them the same. You can see my profile in my album.
Posted:
Wed Sep 19, 2007 3:07 pmby Podunkfla
Like Madjack says... there is no one right way of doing it. Some folks are better at "winging it" and working without plans; and others are more comfortable working with an accurate pattern. I often build things without plans... but I will admit it is much faster and you are less likely to make mistakes with a good set of plans to work from. There are free plans for most of the classic teardrop styles and some others available free in the forum design library. You could start with one of those and alter it to suit your needs. I don't have a problem saying just go for it... That's how you learn. Good luck with you project.

Posted:
Wed Sep 19, 2007 6:52 pmby martha24
Mr K
If you want a design already done, there is a design library above. Also Lil Bear (Grant) will do a pattern for almost nothing if you provide paper & pattern or a little more if he does. He will draw in where what goes where in these trailers too.
http://www.lilbear.teardrops.net/plans.html
That would be the easy way or design your own by one of the suggestions above.
Best of luck
Martha

Posted:
Wed Sep 19, 2007 7:33 pmby Steve_Cox
Mister,
I started with a sheet and a half of plywood standing up on the side of my frame. Took a 1/2" square cypress stick and started bending curves around some finishing nails til I got a shape I liked. If I was going to build another Tear Drop trailer I would probably use one of the the classic shapes.