How to do a trolley top...at least this is how I did it....
While there might not be much interest in this type of detail, I think it's a neat idea and this is how I did it, if anyone is interested.
First, after the cross members are installed between the walls, pick out what you think is going to be a nice profile. I tried to match the curve of the front of the trailer to the top. I planned on doing this to cut down on the harsh look of the flat roof line that I had with the vintage profile. Cut up a piece of hardboard for a template, use your imagination and many chunks of material.. This template is sitting about 1.5" high to allow for it to fit in on the upcoming longsills. Total lift to the top is about 7" overall
Mark the centers of the crossmembers, use each side of the walls for each crossmember, cuz, if you're off on the wall width, it'll show if you only use 1 side. Measure your top width from that center line, (faint lines in pencil on each side of the heavy black mark)...approx 12" on mine on each side.
Back up each crossmember with a piece of sacrificial wood, I used strips ripped from a 2x4. I screwed them with 2 screws on each end outside of the pencil marks.
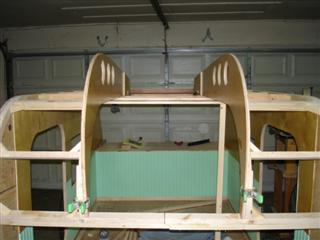
Use whatever works for you to cut out the center ribs...I used a scroll saw, just make sure that you don't cut into the backing strips. The backing ribs keep the shape of the tear in place when you cut out the centers.
install and glue longsills along the cut out sides. For me...just epoxy and an air brad, no screws These allow you to attach the lifted portion and gives you a lip to attach the outer roof material to when the lifted roof portion is installed.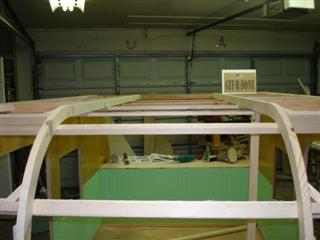
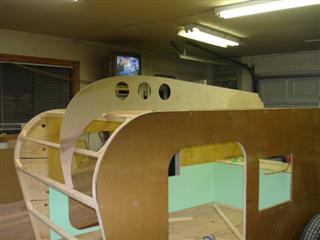
Install the cut out roof sides, again...no screws, just epoxy and clamps. Whether or not you choose to do a porthole as I have done, or any other sort of window, it's up to you. I just like the extra light that it gives. I laminate up the interior finish wood that I want and have it already finished prior to the install. I don't insulate the sides, but the ceiling will have 3/4" insulation. The rest of the ceiling has 1.5"
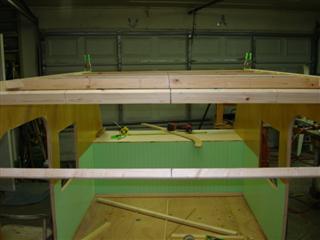
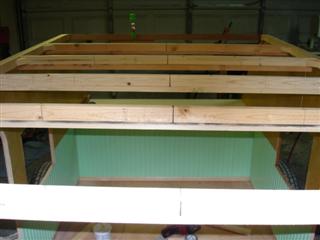
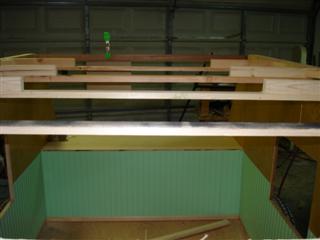
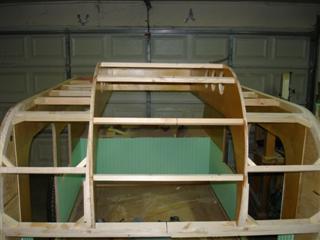
Install the lifted roof cross members. I only used 3/4 x 3/4" spaced at 8" and used material that I ripped out of the centers that I cut out. It will be insulated. A lot more strength will be gained once it's skinned on the interior and the exterior, and I didn't use any gusseting in the upper roof. I think once the skin is on the interior and exterior, that isn't going to be necessary, at least it wasn't on the last one.
More pics to follow as the skinning, insulation, wiring continue. Doug
First, after the cross members are installed between the walls, pick out what you think is going to be a nice profile. I tried to match the curve of the front of the trailer to the top. I planned on doing this to cut down on the harsh look of the flat roof line that I had with the vintage profile. Cut up a piece of hardboard for a template, use your imagination and many chunks of material.. This template is sitting about 1.5" high to allow for it to fit in on the upcoming longsills. Total lift to the top is about 7" overall
Mark the centers of the crossmembers, use each side of the walls for each crossmember, cuz, if you're off on the wall width, it'll show if you only use 1 side. Measure your top width from that center line, (faint lines in pencil on each side of the heavy black mark)...approx 12" on mine on each side.
Back up each crossmember with a piece of sacrificial wood, I used strips ripped from a 2x4. I screwed them with 2 screws on each end outside of the pencil marks.
Use whatever works for you to cut out the center ribs...I used a scroll saw, just make sure that you don't cut into the backing strips. The backing ribs keep the shape of the tear in place when you cut out the centers.
install and glue longsills along the cut out sides. For me...just epoxy and an air brad, no screws These allow you to attach the lifted portion and gives you a lip to attach the outer roof material to when the lifted roof portion is installed.
Install the cut out roof sides, again...no screws, just epoxy and clamps. Whether or not you choose to do a porthole as I have done, or any other sort of window, it's up to you. I just like the extra light that it gives. I laminate up the interior finish wood that I want and have it already finished prior to the install. I don't insulate the sides, but the ceiling will have 3/4" insulation. The rest of the ceiling has 1.5"
Install the lifted roof cross members. I only used 3/4 x 3/4" spaced at 8" and used material that I ripped out of the centers that I cut out. It will be insulated. A lot more strength will be gained once it's skinned on the interior and the exterior, and I didn't use any gusseting in the upper roof. I think once the skin is on the interior and exterior, that isn't going to be necessary, at least it wasn't on the last one.
More pics to follow as the skinning, insulation, wiring continue. Doug


 Now why am I thinking it can't be as easy as you have made it look. Wonderful tutorial...

 Well, Back to the drawing board. Later, Milo.
 .........thanks for showing us your engineering Doug, you make it look all so simple...hmmmmmmm