Page 1 of 2
5x8 Cabin Ceiling Issues

Posted:
Tue Dec 04, 2007 2:15 pmby cfiles
My teardrop is 5x8 and it is about time to put the cabin ceiling in place. I am looking for ideas on how and what to use. I would like to use 1/8" birch plywood. However, I would also like to avoid a seam and I cannot manage to find larger sized plywood near me (Central Arkansas).
So...
Does anybody know where I can find over sized plywood near me? Is there another material that I can use? Is it possible to use 4x8 sheets and somehow hide the seam?
Posted:
Tue Dec 04, 2007 2:29 pmby doug hodder
You can always make a piece of strip molding to cover the strip. I don't try to hide them...in fact I put up a piece of material in contrasting wood that matches the cabinet frames. If you can't hide it, make it a decorating accent! Doug
Posted:
Tue Dec 04, 2007 2:37 pmby bobhenry
If you look at a lot of the high top vans they run a center spine of material or a lighting box or just a couple of pieces of trim but in this false beam look they place lights speakers switches ect. Maybe this would be a course of action that could be designed in , to highlight the features like the vent , interior lighting ,reading lights and switches.
Posted:
Tue Dec 04, 2007 3:08 pmby toypusher
You can put two pieces of plywood together and have the seam virtually impossible to see. If you have a jointer, run the edges to be joined thru it first and get the as straight and square as possible. If not you can clamp them down together and put a straight edge on then run a router down the seam with a straight cutting or downspiral bit, ensuring that that bit is centered on the joint. It also has to be as small a diameter as possible and you need to ensure a very strainght cut. Then you can put them together with a overlapping strip on the back to keep the together. Just glue on a good flat surface and weight the joint down really good. If there is any sign of a crack after the glue dries, use a mixture (consitency of peanut butter) of glue and sawdust from a sander used on a scrap piece of the same plywood.
You should also check the grain/pattern and try to match it closely before trying to fit them together.
Just my opinion and experience!!
Posted:
Tue Dec 04, 2007 3:32 pmby Tripmaker
doug hodder wrote:You can always make a piece of strip molding to cover the strip. I don't try to hide them...in fact I put up a piece of material in contrasting wood that matches the cabinet frames. If you can't hide it, make it a decorating accent! Doug
Ditto! The technical term for a piece of moulding like that is a "
Feature Strip". Tell everyone it is part of the design. They will be in awe of what you built no matter how you do it.
Posted:
Tue Dec 04, 2007 9:55 pmby Ralf
Add two more feature strips evenly spaced for a symetric look. Dress up the strips with stainless steel oval head screws in stainless trip rings (fancy washers) my local Lowes store carries these. I used 5x10 1/8 ply for my ceiling. I didnt have any seems but I used rows of the screws with trim rings into my spars. My ceiling was glued and brad nailed the screws just give it the r tro look and an extra hold in case joint works loose.
Posted:
Tue Dec 04, 2007 10:57 pmby starleen2
One piece ceilings are a REALLY nice feature. However, we have a three-piece ceiling in our camper with the "Feature Strip". Not due to design, but due to a roof leak! Our ceiling was virtually seamless (filled in the joint and sanded it smooth). After about a weeks worth of severe thunderstorms in the spring, I noticed the telltale signs of water infiltration on the ceiling. Had to cut the ceiling out and replace it. It was much harder to do since the camper was finished and everything had to come through a small door. Not many want to think about leakage, but it does happen occasionally. A point to consider when thinking of the one-piece look.
Posted:
Wed Dec 05, 2007 9:39 amby Miriam C.
You can get 5' wide Baltic Birch but watch carefully for football patches in it. Also it is only 5' long. I used 4x8 Birch and ran it length ways across the tear. Plan where your seams are so you can put shelving and trim.

Posted:
Wed Dec 05, 2007 11:22 amby Kens
Space the ply so that the seams are inside the front and back cabinets if you are installing them. This is what I did.
Posted:
Thu Dec 06, 2007 10:10 amby cfiles
Thanks for all the help, I know what I am going to do now...
Posted:
Thu Dec 06, 2007 10:32 amby bobhenry
cfiles wrote:Thanks for all the help, I know what I am going to do now...
WELL LET US IN ON THE SECRET !
after all we tried to help

Posted:
Thu Dec 06, 2007 11:00 amby cfiles
Okay then...
I am actually going to use all of the the techniques. I cannot find 5x plywood, I have called all over the state. So I am going to try and place the seams behind the cabinets as much as I can, then use a feature strip on the seams; more than likely T molding. That is all well and good for the cabin. But I still have the inside galley cover. For that I am going to try and flush the joint using my router and filler. Of course if it does not look right I will just use a feature strip.
We will see how it goes. I should start doing this next week. I have to finish the electrical this weekend then add insulation.
Posted:
Thu Dec 06, 2007 12:12 pmby Miriam C.
If you look at Mary K's pictures she ran the seam on her hatch down the middle and put decorative washers/screws so she could get to the wiring if she needed.

Posted:
Fri Dec 07, 2007 8:30 amby Tripmaker
cfiles,
I got 5 x 5 1/8 birch at Home Depot. They had some that someone ordered but was damaged on one edge. I was able to cut off the damage and use it. They did tell me though that if I wanted good stuff they could order it and have it in a few days. HD should be able to get what you need.
Jim
Posted:
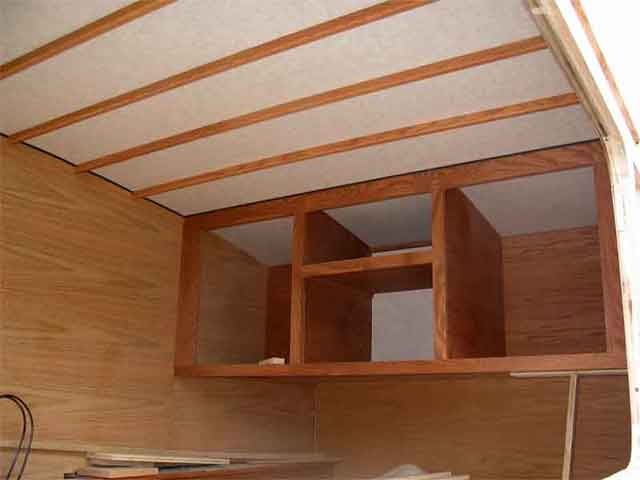
Fri Dec 07, 2007 4:04 pmby jdarkoregon
Chad Files, It sounds like you have a good plan, I had the same issues with my ceiling
(which is 5'6" wide) and like Doug decided to make sure people new they were there,
The end result for me was that you can't tell they are there.
Have Fun
John
(Darn, I have to get my build done so I can tell people what I did)