Page 1 of 2

Getting Wall into Position Suggestions Please

PostPosted: Sat Feb 16, 2008 7:04 am
by Michele
Image

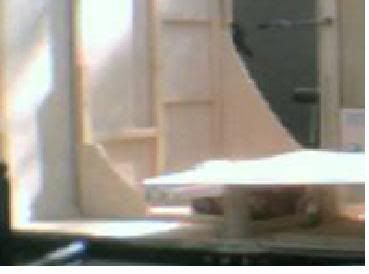
This is my wall and this is my floor with the cleat attached.

Image

The wall is going to sit flush against the frame with 4 inches overhanging the floor to cover the frame. It will be attached to the cleat and to the frame. The wall is 5/8 ply. It's 5' 7" high and 10'7" long. It's fairly heavy and really awkward to deal with. I don't know how to get it into place and hold it level and steady so I can attach it. Someone has suggested that I use car jacks to lift it into place. But I don't know how steady that will be or if one of the jacks will tip over and send the wall crashing down. I was thinking that maybe I could take the wheels off of the trailer.....but I just don't know. Does anyone have any suggestions?

PostPosted: Sat Feb 16, 2008 8:10 am
by WarPony
Michele, if you are worried about keeping it EXACTLY 90 degrees when it's attached........ don't. Just get both walls attached to the cleats and then you can square them up before the spars are added. I hope that's what you were asking.......

Oh, one thing you should consider is coating the overhang part with some sort of waterproofing. Once the wall is up, there will be no way to get at that area and water will start to rot the ply rather quickly. Don't forget the bottom edge, too.

Jeff

PostPosted: Sat Feb 16, 2008 8:19 am
by bobhenry
I put in my galley wall 1st and used it to help steady the walls.

Just a thought~~~~

Image

Notice I put a 1x4 the full length to help carry the weight of the wall !
If your electrical runs come up from underneath leave a break or drill some holes in the 1x4 before attaching its easier.

PostPosted: Sat Feb 16, 2008 8:43 am
by Michele
Thanks guys, but my concern is the actual lifting, lifting a heavy tall wall 18 inches off the ground and holding in just the right spot long enough to get it attached. I understand the 90 degree thing is not critical but lining it up on the ends is, too far up or too far back and I will have a real problem.

PostPosted: Sat Feb 16, 2008 8:49 am
by Miriam C.
Michele, if you are working alone try suspending the wall from the ceiling or a tree. Some clamps and a rope if nothing else. ;)

What will help is to attach some 90 degree corner boards to the wall. You will need to make cutouts for your cleat to fit. This will allow you to screw the support to the floor and hold it steady while you attach to the sides.

Image

You can also cut out doors/windows first. That will not only cut down on the weight but give you places to hold on to that aren't so far apart.

Some clamps from the cleat to the wall will help keep it in position too.

Again a friend or a rope will help you get that up safely.

PostPosted: Sat Feb 16, 2008 8:58 am
by toypusher
Try putting the wall up against the trailer and tip it onto the trailer. Attach a board (2x2 or something) to the top (or near the top) of the wall. Make sure the cleat is over (actually past) you cleat on the floor, then tip the wall up into place and fasten the board that you have attaced to the top of the wall to the floor someplace. That should hold it in place until you can fasten the sides to the floor.

Drag sidewall up on floor like this:
Image

Stand sidewall up like this:
Image

PostPosted: Sat Feb 16, 2008 12:31 pm
by AmyH
Michelle, I had to lift the sides of my trailer and get them in place by myself as well, and man it was a pain. However, it was doable. If you can't find anyone to help you out, here is how I manuevered my sides into place. First, I brought the sides in and roughly lined them up with the chassis. Then I smeared the areas that would touch with some polyurethane glue. I had clamps ready to go for the next step. I lifted one end up and got a clamp on it to hold it to the floor. It wasn't perfect at this point, I just wanted to have something holding it in place until I could get the other end up and clamped. So, then I went to the other end, and very slowly and carefully lifted it up, set it in place and got some clamps on it. That is the tough part, and if you have any way of helping with the weight (ie. Miriam's suggestion), I would try it. I think I used a few cusswords during this part. Once I had the side roughly clamped in place, I used a couple of right angle jigs to square it up and get it clamped better. Here, this might help:

Image

It isn't that easy to do on your own, particularly if your sides are on the heavy side, as mine were. If I hadn't been so impatient to get them in place that particular day, I would have tried enlisting some help from friends. Anyhow, it is doable, it is just a bit of a pain. Good luck with it.

Re: Getting Wall into Position Suggestions Please

PostPosted: Sat Feb 16, 2008 1:37 pm
by steve wolverton
Michele wrote:Image


I love that profile! :thumbsup:

The little 2x2 (or whatever that is) on your floor is what I had screwed to the sides of my camper. I then hoisted my sides on the camper and that little 2x2 supported the walls until I could screw a 2x4 into the sides to keep it from laying over. I actually managed to do it by myself, but it was a bit nerve racking.

You probably could screw a few 2x2's to the bottom of the sides to act as a lip for the wall to sit on the trailer with. Then you can remove them after everything gets tied together.

Just in case I haven't mentioned it - I love that profile. :D

Steve

PostPosted: Sat Feb 16, 2008 3:47 pm
by SmokeyBob
Michele
There are several ways to do this. The easiest is to invite a couple of friends over for lunch. Have them lift your wall while you attach it.

Or do what I did. Build yourself a lifting gantry. I built mine from 2x4s and I used this hoist I got from Cabela's for under $20.00, there on sale now for $7.99. It's used for lifting deer but it works great on camper walls. I attached two clamps to the top of my wall about three feet apart. Attached a rope to the clamps and attached the hoist to the rope and up it comes. I can only use one arm so it should be real easy for you.

Pic of the hoist.
Link to where I got it.
Click to Link for lift

Image

A link to a home built gantry. Give you some idea of what I'm talking about.
http://www.backyardmetalcasting.com/bighoist01.html

PostPosted: Sat Feb 16, 2008 4:07 pm
by Miriam C.
AmyH wrote:Michelle, I had to lift the sides of my trailer and get them in place by myself as well, and man it was a pain. However, it was doable. If you can't find anyone to help you out, here is how I manuevered my sides into place. First, I brought the sides in and roughly lined them up with the chassis. Then I smeared the areas that would touch with some polyurethane glue. I had clamps ready to go for the next step. I lifted one end up and got a clamp on it to hold it to the floor. It wasn't perfect at this point, I just wanted to have something holding it in place until I could get the other end up and clamped. So, then I went to the other end, and very slowly and carefully lifted it up, set it in place and got some clamps on it. That is the tough part, and if you have any way of helping with the weight (ie. Miriam's suggestion), I would try it. I think I used a few cusswords during this part. Once I had the side roughly clamped in place, I used a couple of right angle jigs to square it up and get it clamped better. Here, this might help:

Image

It isn't that easy to do on your own, particularly if your sides are on the heavy side, as mine were. If I hadn't been so impatient to get them in place that particular day, I would have tried enlisting some help from friends. Anyhow, it is doable, it is just a bit of a pain. Good luck with it.


Amy your clamped jigs are so much better than my screwed ones. I had help though.

Michele, if you clamp jigs like Amy's on the sides while it is laying on the floor you can go through the door/front/back and walk it up. This should allow you to clamp the bottom of the jigs to the floor. ;)

PS---I'd still add a rope for safety. :thumbsup:

PostPosted: Sun Feb 17, 2008 9:21 pm
by kiacker
Michele,
Like Amy I fitted the sides on by myself (and plenty of cuss words flew here too!). I muscled the sides onto the floor of the trailer then tipped them up into position from there. I did set up a couple buckets and wood braces to catch the bottom of the side near the trailer so it wouldn't fall down. It was a little off but got it close enough. I had positioned a cleat along the inside of the side where it would rest on the floor - this helped to keep it from falling too. I then clamped into place the clamp jigs. To get it even along the front and back edges, a good rubber mallet helped to move things. Things will square up as you get in your spars and galley walls.

I noticed you have a 2x2 already mounted to the edge of your floor to help attach the side to. Can you temporarily attach a 10 ft. 1x4 (or 2x4) to the bottoms of your upright 2x2's on your sides so that it would create a channel for your floor cleat to fit into? Then you could lift your side up from the trailer floor and let it drop onto your floor cleat giving you some control until you get the side attached. You could then remove that 1x4 and go on your way. Just a thought. Either way, be careful!!

PostPosted: Sun Feb 17, 2008 11:54 pm
by Donutboy
While the walls were laying on the ground I temporarily mounted a 2" L-Bracket at each end of the wall that would precisely locate the wall where it needed to be up-and-down. I then muscled the wall onto the trailer, got a helper (my wife) to push in on the wall and hold it upright against the floor, and used a couple of clamps to clamp it to the floor while I screwed it on. After that I also used the "propboard" suggested by toypusher to reinforce it until I had a few spars mounted. Good luck!

PostPosted: Sat Feb 23, 2008 7:41 pm
by Michele
Thank you everyone for all of your great suggestions. I'm pleased to say that my walls are now attached. I was very worried about doing this but once I read that there were women that did it alone, it gave to the courage to go for it.

I used Amy's idea for the clamped on braces

Image

And Steve's idea for the 2X2 shelf/lip

Image

Two car jacks

Image

And two friends to keep the walls from falling off of the jacks

Image
Image

PostPosted: Sat Feb 23, 2008 9:00 pm
by AmyH
Very nice work there Michele!! :thumbsup: :thumbsup:

PostPosted: Sun Feb 24, 2008 2:44 pm
by b.bodemer
Glad it all worked out. Walls up and lookin' good. :thumbsup: :thumbsup:
Barb