Page 1 of 1

Hatch Seal Method

PostPosted: Thu Apr 03, 2008 3:58 pm
by Toytaco2
I plan to dry fit my walls, mark and drill all the spar locations and the bulkhead locations this weekend. Afterwards, I’ll disassemble everything and insulate the walls and attach the interior wall skins – And—cut out the “dreaded hatch notch”. Thanks to all the great help on this forum, I think everything should go well. But, I confess I’ve never even seen a finished teardrop except the photos on this board. So I’m a little fuzzy on the best way to seal the hatch (let alone the doors which will come later). I could use some opinions:

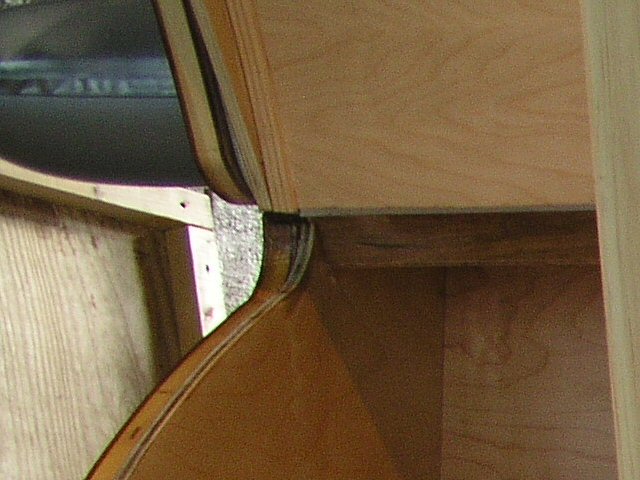
Is it better to cut the full 3/8” notch out of the side walls (as in Generic Benroy plans) or use my router and cut a sort of rabbit on the outside edge where the hatch will meet the side walls, something like ½ inch wide x ¼ or 3/8” deep for the weather stripping? It seems like the router approach leaving a “hard lip” next to the galley would be the easiest to do and perhaps the most efficient, but, I have no experience to go by. I can do it either way, but, would like some thoughts on the best and most leak proof way to go. BTW my walls are 1/4" outer skin, 3/4" framing and 1/8" interior sandwich style construction.

Thanks,
Mike

PostPosted: Thu Apr 03, 2008 7:27 pm
by mikeschn
I know what you're asking, but it's late and I'm tired... and I don't have the Lil Diner and the Benroy sitting in the driveway to look at... :cry:

But let me dust off the old cobwebs...
Image

Look at this pic... the black stripe under the hatch is the weather stripping. It is 3/4" wide. And it sits on the plywood walls, which are also 3/4" wide.

If you were to route out a rabbit, let's say you made it 3/8 x 3/8. It would work, as long as you used insulation that was say, perhaps, 1/2" thick. That way you could compress it for your sealing effect.

I don't think you'll gain much unless you build a hatch, like was on the Lil Diner...
Image

But as you can see that is quite a bit more complicated. You might want to get Steve Fredericks manual to help you with that if you decide to go that route.

Mike...

PostPosted: Thu Apr 03, 2008 9:16 pm
by boomboomtulum
I cut this with a router. and now have it epoxied to make it stronger and waterproof. I plan as you can see on placing the weather strip on the flat area any water will run to the outside at the bottom.
Dave

Image

PostPosted: Thu Apr 03, 2008 10:05 pm
by jplock
This method has worked good for me so far.

Image
Slots routed out for 3/8" weatherstrip

Image
Application of weatherstrip

Image
Finished product
Hatch was hung on hurricane hinge from Grant Whipp
jplock
:) :) :)

PostPosted: Fri Apr 04, 2008 8:00 pm
by Airspeed
I used some rubber coated steel U channel I got from McMaster Carr, it worked great and gave the edge a nice finished look. It just caps the edge of the plywood and when I close my hatch the aluminum trim fits against it nice and snug. I haven't driven it in the rain but I did test it with the pressure sprayer at the car wash and it didnt leak a drop. They also have the same trim with a bulb gasket on the top or side
Image

PostPosted: Sat Apr 05, 2008 4:14 am
by Creamcracker
Airspeed wrote:I used some rubber coated steel U channel I got from McMaster Carr, it worked great and gave the edge a nice finished look. It just caps the edge of the plywood and when I close my hatch the aluminum trim fits against it nice and snug. I haven't driven it in the rain but I did test it with the pressure sprayer at the car wash and it didnt leak a drop. They also have the same trim with a bulb gasket on the top or side
Image

Did you notch the side walls before fitting the U gasket? If so how deep a notch?
Philip

PostPosted: Sat Apr 05, 2008 6:44 am
by Airspeed
I notched the top edge down about 1/4", the thickness of the trim, when I close the hatch it seals so tight that I can hear air rushing out and the air cushions the hatch as it closes.
Aaron

PostPosted: Sun Apr 06, 2008 6:06 pm
by jplock
If memory serves me it was about 1/4" deep and about 3/8" wide slot, and the trim was 3/8"x 3/8" with adhesive backing on the weatherstrip.
jplock
:) :) :)