Page 1 of 1
screws.. question

Posted:
Fri May 09, 2008 2:39 amby looped
question on screws.. specifically these..
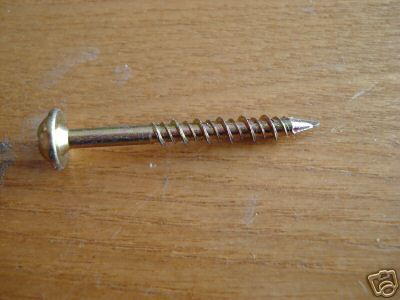
"Round Washer Quadrex Hd Hi-Low Thread TY-S with 2/3 RD HTZY. "
seems there are so many screws that would do the job and with many there are drawbacks of one sort or another. would there be any drawbacks to using these? I'm thinking to use these to hold the walls to the floor on the outside. there are various lengths available but the ones i am homing in on are 1". the walls will be 2 sheets of 1/4 with foam sandwiched in.
thanks
note i dont know what quadrex, ty-s, or rd htzy means. My construction background just dealt with screws and nails of the plain variety, none of the fancy jargon was thrown in there. so some info on the acronyms would be cool too..
Posted:
Fri May 09, 2008 7:46 amby looped
okay the cute thread title has a reversingly constructive effect. either that or i have already met my quota of free questions...
Posted:
Fri May 09, 2008 8:37 amby goldcoop
QUADREX= A combo drive of Square & Phillips.
Cheers,
Coop
Posted:
Fri May 09, 2008 8:44 amby Miriam C.

Looped I used deck screws because they could be counter sunk or in your case at least made flat. A lot of folks use stainless steel.
If you use a screw with a rounded, raised head then you need to figure out what to do with the head. Trimming won't be easy and with 1/4" walls you can't really sink it.
Posted:
Fri May 09, 2008 10:03 amby looped
Miriam C. wrote::o Looped I used deck screws because they could be counter sunk or in your case at least made flat. A lot of folks use stainless steel.
If you use a screw with a rounded, raised head then you need to figure out what to do with the head. Trimming won't be easy and with 1/4" walls you can't really sink it.
ahh so deck composite screws all around is a good choice?
if so then Yippee!!!! i got plenty of those!
I will still get some of the button head ones for the aluminium corner strips tho.. they would just look right there.
Posted:
Fri May 09, 2008 2:08 pmby TPMcGinty
I used stainless deck screws.
Posted:
Fri May 09, 2008 2:30 pmby MrBuzz
I found screws very similar to that at my local home improvement store in 2 puond boxes in the same area as the drywall screws & general purpose / deck screws.
I think they were called "pan head" screws...the ones I bought werer phillips heads. I used them specifically for attaching the aluminum on my galley hatch and for the roof vent. In both cases I needed a flat surface and could not use a counter-sink type of screw.
You can kind of get the idea fromt this photo...
Posted:
Fri May 09, 2008 6:41 pmby 48Rob
Hi,
The screw you have pictured appears to be a self drilling hi-low thread.
In general, they are used for/in low density material (like particle board, plastic, etc.)
The design helps to prevent splitting the piece, and they don't pull out as easily.
If I understood your post correctly, you are attaching 2 sheets of ply, with foam in between to the floor?
If you are screwing into the "end grain" of the plywood, then these screws will hold better than common deck screws.
The 1" length though, is a concern!
If you have 1/2" of ply, + foam you have less than 1/2" of the threads of the screw holding in the end grain of the ply!
1.5" minimum, and closer to two inches length of actual threads holding the walls would be my choice.
That would require a screw around 2.5" in overall length.
Rob
Posted:
Fri May 09, 2008 8:45 pmby Miriam C.
Looped is your floor framing 1x3 or 2x? btw love the corner brackets.

Posted:
Fri May 09, 2008 9:51 pmby alffink
The screw that you show in your image, looks tobe the same screw that Krieg would use for their pocket hole tooling, withe the pocket hole there is no need for the counter sink since the round head would be below the surface already, pocket holes are very strong and fast but are for areas out of sight, great for face frames, drawers, Hardwood edges on plywood
counters and tables, etc.
Posted:
Fri May 09, 2008 10:17 pmby Miriam C.
alffink wrote:The screw that you show in your image, looks tobe the same screw that Krieg would use for their pocket hole tooling, withe the pocket hole there is no need for the counter sink since the round head would be below the surface already, pocket holes are very strong and fast but are for areas out of sight, great for face frames, drawers, Hardwood edges on plywood
counters and tables, etc.
Good point
Posted:
Fri May 09, 2008 11:01 pmby looped
Mrbuzz thanks for that info. i will be getting some of those as well.
48rob. the floor is already attached. the 1/4 - foam - 1/4 is going to be the walls. there will be framing in there too the walls will be sitting on top of the floor and the outer skin will go down the side covering the deck sides.
Miriam, The floor is made from 1/2 inch ply and 2x4 framing and 2x2 cross framing. the reason for overbuilding this is because the square of the trailer frame is 43 inches wide and 36 inches long. the floor is 42 and change wide and 58 inches long. once i get the new tongue for the trailer (longer) i will be building a true 2" spacer under the front edge so that the front overhang can have sure footing. i may decide to put a square u bolt in there to secure it if flex becomes an issue.
the corner brackets are from home depot in the deck building bracket area, if memory serves me correctly they were something like 60-80 cents each and they are galvanized. with the floor primered with zinzer and then coated in automotive undercoating they can hardly be seen now.
Afflink so those screws i pictured wouldnt really serve well in widescale use on this? not knowing what they are actually made of i dont know if they would rust or not.
thank you
Posted:
Tue May 20, 2008 8:13 amby Thunderknight
I just picked up some screws at Lowes last night for my TTT walls. I went with a box of lathe screws. They are 1 5/8" long, wood pointed, with an integrated washer....I was trying to figure out what to use...and I figured the built in washer was a good idea for extra holding power (less chance of the 1/4" wood giving way under the head). That will give me about 1 1/4 inches of penetration in to my framing.
I also figure I could dab a bit of glue under each washer just before I tighten it down to provide some extra weatherproofing around the penetration.
I think it was about $7 for 120...with a driver bit (something like pozi-drive).