Another side up on pop up

Anything to do with mechanical, construction etc

Another side up on pop up

Postby GeorgeT » Sun Feb 27, 2005 11:33 pm

Finally got three of the sides up and working on my pop up. Took a while as it has a couple of lights and a mirror in the side wall.

Image

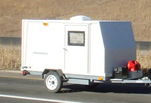
Starting to take shape. Looks like it's gonna camp............someday!

Image

Inside you can see the mirror and light above it. The wiring is under/inside the framing. It is secured into place by a slide bar latch at each end.

Image

A weather seal is accomplished with a piece of flat aluminum at each corner. The side walls tilt up and compress a rubber seal behind each of these aluminum pieces. The bar latches on the inside hold the compression.

Image
Lookin' up in da skize with ize on da prize
http://home.earthlink.net/~g.teague/
User avatar
GeorgeT
The 300 Club
 
Posts: 319
Joined: Wed Oct 20, 2004 1:21 pm
Location: Austin and Gomorrah

Re: Another side up on pop up

Postby steve wolverton » Mon Feb 28, 2005 12:09 am

GeorgeT wrote:Finally got three of the sides up and working on my pop up. Took a while as it has a couple of lights and a mirror in the side wall.


George that thing is crazy. :thumbsup: I sure hope you'll be able to bring it to the Purtis Creek gathering.

Steve
�veni, vidi, vici.�
User avatar
steve wolverton
1000 Club
1000 Club
 
Posts: 1676
Images: 11
Joined: Sun Nov 07, 2004 9:39 pm
Location: Brazoria, TX

Postby GeorgeT » Mon Feb 28, 2005 12:33 am

Yeah and its makin' me crazy too! :? I sure want to come to the Purtis Creek meet. It'll be close. I still got a couple of hard things to do before I disassemble this thing and paint it. But I'm workin' on it every day....we'll see. ;)
Lookin' up in da skize with ize on da prize
http://home.earthlink.net/~g.teague/
User avatar
GeorgeT
The 300 Club
 
Posts: 319
Joined: Wed Oct 20, 2004 1:21 pm
Location: Austin and Gomorrah
Top

Postby asianflava » Mon Feb 28, 2005 3:16 am

You're further along than I am. I want to bring it out but I don't know if I'll get it weather tight..... I'm shooting for weather tight because I know I'm not gonna finish. I haven't even started the hatch and frame yet. I don't anticipate the frame taking more than a weekend though, the hatch is a different story.
User avatar
asianflava
8000 Club
8000 Club
 
Posts: 8412
Images: 45
Joined: Mon Aug 02, 2004 5:11 am
Location: CO, Longmont
Top

Postby BobR » Mon Feb 28, 2005 6:25 am

George...looking good. Do you have any close ups of how the roof panel engages the walls. How do you raise the roof?
Bob Richert
Parrish, FL
"Be glad of life because it gives you the chance to love and to work and to play and to look up at the stars"
User avatar
BobR
Donating Member
 
Posts: 387
Images: 1
Joined: Thu Nov 04, 2004 8:12 pm
Location: San Antonio, TX
Top

Postby Chip » Mon Feb 28, 2005 7:44 am

GeorgeT,,, what can I say, where do I start???? thats probably what you have said a hundred times already,, building a hatch that fits should be nothing to you now. ya got yaself and engineering marvel (or nightmare) as the case may be,, would love to see ya rig in person in the future,,

looking good,,,,, keep the progress pictures coming

:thumbsup: :? :applause:

chip
Living large,,,travling small !!!
54"x9'4" tear
4'x8' tear
Serro Scotty rebuild(in progress)
User avatar
Chip
2000 Club
2000 Club
 
Posts: 2534
Images: 49
Joined: Sat Apr 17, 2004 7:33 pm
Location: Greenville, S.C.
Top

Postby GeorgeT » Mon Feb 28, 2005 9:27 am

BobR wrote:George...looking good. Do you have any close ups of how the roof panel engages the walls. How do you raise the roof?


My roof raising apparatus is very low tech but works very well. I muscle it up from inside. It's actually fairly easy. I just push up on the back wall and the roof goes with it as it swings up. Then I push up on the front wall and the roof goes with it. The top of the wall slides along a little guide made of aluminum and at the end of the guide there is a notch that the roof falls into and locks into place. Then I lift the side walls and use the bar latches to secure them into place. The side walls press a rubber gasket against the vertical aluminum bar that you see in the last pic. Along the top of each wall is a foam gasket that also presses against the inside of the roof. That's it. Takes about 2 minutes to set up. I still haven't figured out a way to then lock the roof to the walls. Probably will just use something as simple as a screen door latch just to keep the roof from being easily lifted off by wind or whatever. Oh yeah, not installed yet will be a piece of flat aluminum bar that goes on the side and along the bottom of each wall that will make the bottom of the walls weather tight.

Image
Lookin' up in da skize with ize on da prize
http://home.earthlink.net/~g.teague/
User avatar
GeorgeT
The 300 Club
 
Posts: 319
Joined: Wed Oct 20, 2004 1:21 pm
Location: Austin and Gomorrah
Top


Return to Teardrop Construction Tips & Techniques

Who is online

Users browsing this forum: No registered users and 5 guests