Page 1 of 1
Front Curve studs/framing

Posted:
Tue Jul 29, 2008 9:20 pmby S. Heisley
First off, forgive me if this is a stupid question.
I am building what I might call a "Boxtop Boxter half-standy". (It's sort of along the lines of Andrew's "Compact 3" but smaller, single axle, and with a curved front.) The curve in the front comes out just 6" further than the deck at the curve's deepest point. I've seen that most people frame their front curves with a series of pieces of wood glued/screwed together. Since I am using 1x2's to frame my trailer, I am wondering if there is some reason why I couldn't purchase 1x6" boards to use as studs, draw the curve's shape on them, and cut away the excess. Would this be stronger or weaker than the way most people do it? Is this a good or bad idea?
Thank you, in advance, for your replies,
Sharon
Posted:
Tue Jul 29, 2008 10:22 pmby tinksdad
No such thing as a stupid question.
My concern would be how the grain of the board crosses the remaining stock after you cut the curves. Also a 1x6 is only 5 1/2" wide. Will your 6" curve fit within that?
Posted:
Tue Jul 29, 2008 11:01 pmby S. Heisley
Hi, Tinksdad!
Yes, those are exactly my concerns....As far as size goes, I thought about that after I posted and wondered if anybody would notice. You did! I imagine I could get wider boards but the question of the grain is my concern also. I guess it might be better to use 3 or even 4 smaller pieces, glued and screwed to make the curve. I'm just looking for an easier way....
Thanks for your quick reply!
Sharon
Posted:
Wed Jul 30, 2008 7:54 amby Miriam C.
Sharon once you get the skins on the grain shouldn't be an issue. You can even use plywood. I used 1x2's that I ripped to be exact and kerfed them. The are solid and probably over done.

Posted:
Wed Jul 30, 2008 10:01 pmby S. Heisley
Thanks, Miriam. Plywood is more than one piece of wood and the grains on the sandwiched piece are going in the opposite direction from the outside pieces, so that makes sense. Maybe I'll try that.
...Sharon
Posted:
Wed Jul 30, 2008 11:50 pmby Esteban
Sharon,
It's not clear if you're asking about the inner wall frame of a sandwich wall or about outer trim boards. My answer is more about the first.
Joining 1"x6"s like you're thinking of then cutting away the excess should work well for the front curve.
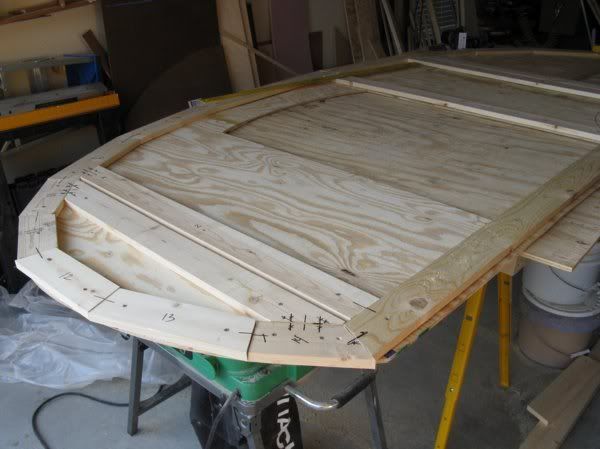
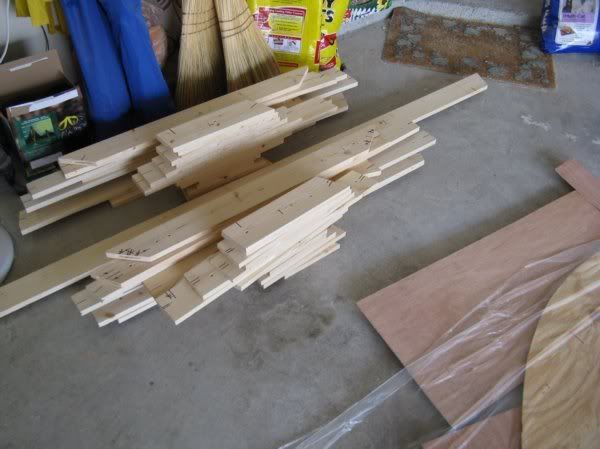
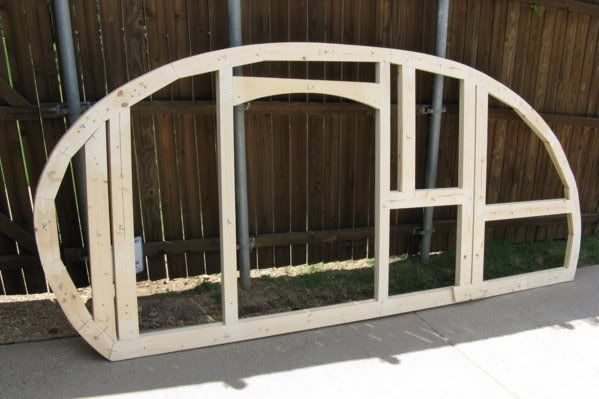
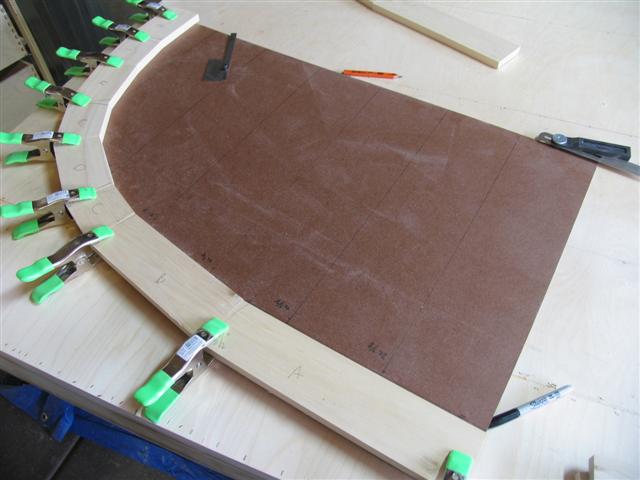
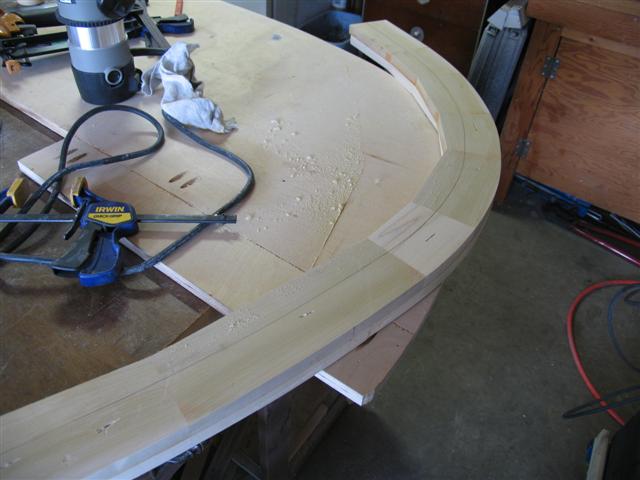
To make up the curved sections of my inner wall frames I used 1" material ( 1"x4", 1"x6", etc.) that was cut, end to end, to follow the curve of the front, roof, and hatch. They were joined together with an inexpensive Harbor Freight biscuit joiner and glue. Then cut to shape, plus a bit extra, with a jig saw and sanded (taking off the extra little bit) to a nice smooth profile.

edited to add a photo of my wall frame(s) nearing completion (from my friend Ron Dickey's album)
HTH and best of luck on your trailer.

Posted:
Thu Jul 31, 2008 12:27 amby S. Heisley
Yes, Steve, You are correct in your assumption. I was asking about the inner wall frame of a sandwich wall.
Thanks for your reply. As this curve business is new territory for me, I expect to consider all these answers and pick the one that I think will be easiest and work best for me with my limited tools and experience.
Thanks again,
Sharon
Posted:
Thu Jul 31, 2008 8:39 amby planovet
Esteban wrote:To make up the curved sections of my inner wall frames I used 1" material ( 1"x4", 1"x6", etc.) that was cut, end to end, to follow the curve of the front, roof, and hatch. They were joined together with an inexpensive Harbor Freight biscuit joiner and glue. Then cut to shape, plus a bit extra, with a jig saw and sanded (taking off the extra little bit) to a nice smooth profile.
That's how I did mine although I trimmed mine to shape with a router. Using a biscuit joiner and glue made it much easier and stronger.
Lining up pieces:
Pieces cut and waiting to be glued:
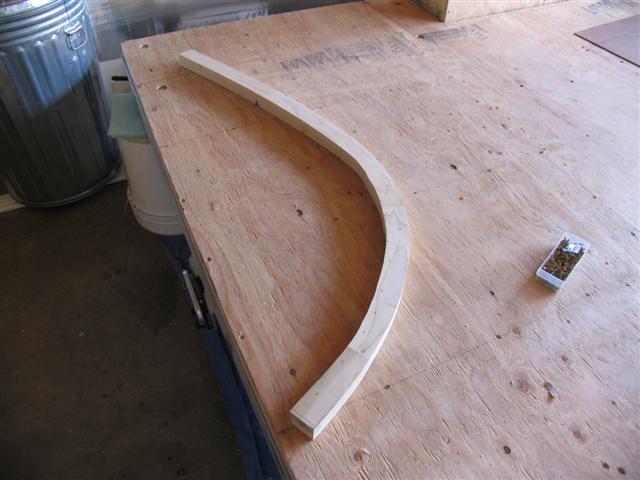
Frame trimmed to shape:
Posted:
Thu Jul 31, 2008 9:11 pmby bdosborn
planovet wrote:That's how I did mine although I trimmed mine to shape with a router. Using a biscuit joiner and glue made it much easier and stronger.
Me too. I cut out a pattern on a piece of hardboard to serve as a guide when I cut the 1x4s:
I glued the pieces all together and routed the outside. I transferred the hardboard pattern to a piece of plywood to serve as a guide to route around instead of using the flimsy hardboard.
Then I trimmed the inside with a jigsaw to follow the outside curve but you could probably skip this step. My framing is 1.5" thick so I cut two curves and stacked them to get the thickness I needed.
Bruce
Posted:
Thu Jul 31, 2008 9:42 pmby Toytaco2
As others have done, I also used various widths of 1" (actually .75 inch) to frame my walls. I then used a jig saw to cut the actual profile on joined stock.
Posted:
Thu Jul 31, 2008 11:17 pmby S. Heisley
wax paper, drywall screws, clamps, clamps, & more clamps
Posted:
Fri Aug 01, 2008 4:02 amby Esteban
Sharon,
It's fun to see the pictures and ideas we've each shared with you. Paying it forward.
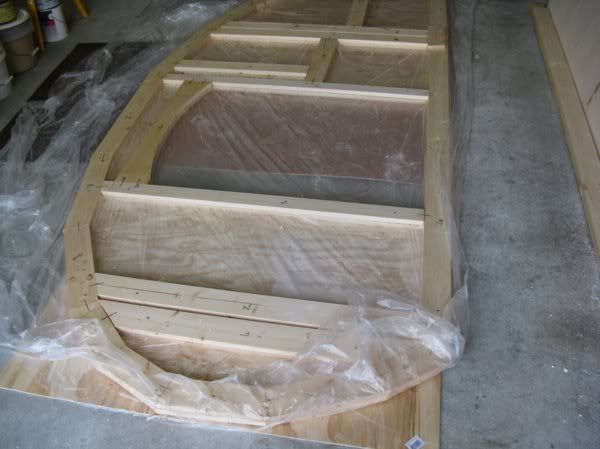
One other "tool" we haven't yet mentioned is wax paper. Place it under the segments of the frame as you do your glue up. That way you won't inadvertently glue your frame to your work table or pattern.
Drywall screws also came in handy as "clamps." I made up a full size template for my profile from two layers of 1/4" luan (to get a 4.5' x 11' sheet for my template). When doing my glue up I screwed the biscuit joined segments to the template, on top of my work table, till the glue set up.
In some ares I used Kreg screws to attack frame segments too. I didn't use them anywhere I planned to cut or shape the frame with a router - I used that too, as well a a power planner. Lots of cheap clamps too. Spring clamps, bar clamps, and pipe clamps all come in handy.
Some more low cost tools for planning, and building a frame I found very useful are blue painters tape and a Sharpie pen.
Used the blue tape on my mock up profile pattern to lay out the floor, bed, cabinets, and partitions for a good visualization.
The Sharpie pen is good for many things. Writing notes on your pattern or parts, putting match up lines across parts you'll biscuit join so they line up, numbering segments of wall parts, or just to counter act CRS (can't remember s**t).
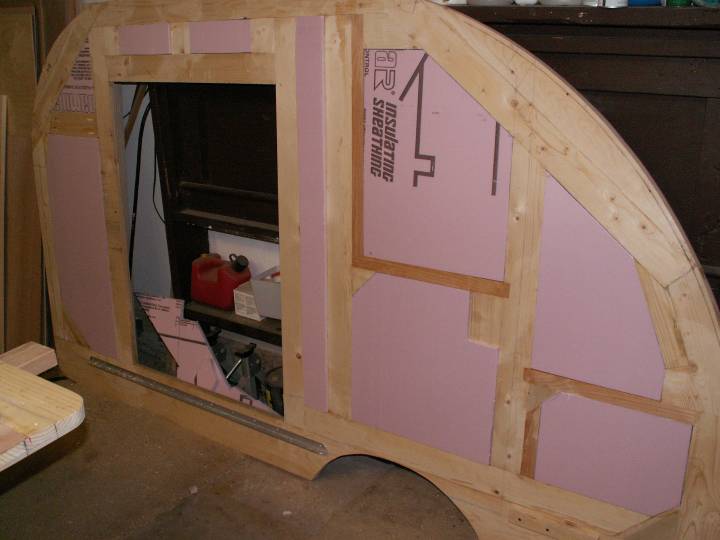
Because I'll be painting the outside walls of my teardrop I used the Sharpie to draw around the finished wall frame, every inner piece too, on the outside surface of my walls so when it's closed up with the inner plywood I'd know where the, now hidden, inner framing is. Kind of like a skeleton of a teardrop.
Re: wax paper, drywall screws, clamps, clamps, & more cl
Posted:
Fri Aug 01, 2008 8:38 amby planovet
Esteban wrote:It's fun to see the pictures and ideas we've each shared with you. Paying it forward.
One other "tool" we haven't yet mentioned is wax paper. Place it under the segments of the frame as you do your glue up. That way you won't inadvertently glue your frame to your work table or pattern.
So true. I learned a lot by seeing other people's pictures that I want to share mine also. Although I'm not as proficient and knowledgeable as some on this board, I am learning. You CAN teach an old dog new tricks!

I used a thin plastic drop cloth instead of wax paper. That way one sheet would fit under the entire frame. I used one sheet, then glued up my first frame, then another sheet on top and glued up my second frame then screwed it all together while it dried. Kinda like a plastic frame sandwich. The plastic sheets kept everything from sticking together. You can get a .7ml drop cloth in 9x12 for a little over a dollar at the big box stores. Cheaper and easier than wax paper. You can reuse it later for painting or whatever!