Page 1 of 1

Removing Titebond III

PostPosted: Fri Aug 22, 2008 10:56 am
by coreyjhen
I found a serious flaw in my construction and now need to go back and fix it. Does anyone have a safe, easy way to split apart a Titebond III joint without destroying all the underlying surface? I have searched the archives and not found anything... but it could easily be that I haven't searched on the right keywords.

Re: Removing Titebond III

PostPosted: Fri Aug 22, 2008 11:26 am
by halfdome, Danny
coreyjhen wrote:I found a serious flaw in my construction and now need to go back and fix it. Does anyone have a safe, easy way to split apart a Titebond III joint without destroying all the underlying surface? I have searched the archives and not found anything... but it could easily be that I haven't searched on the right keywords.

Try squirting a fine stream of lacquer thinner in the joint. It will soften Titebond II and may work on the Tightbond III. Good Luck :) Danny

PostPosted: Fri Aug 22, 2008 2:49 pm
by Steve_Cox
Depending on the type of joinery, I have used a sawzsall with a fine blade to separate glued parts.

PostPosted: Fri Aug 22, 2008 4:24 pm
by aggie79
Could you say what you are trying to correct? My thought is that it may be possible to remove just a portion of the skin to get to the structure for the repair.

PostPosted: Fri Aug 22, 2008 6:34 pm
by planovet
Steve_Cox wrote:Depending on the type of joinery, I have used a sawzsall with a fine blade to separate glued parts.


That was going to be my answer. Like Steve said, it depends on what kind of joint it is.

PostPosted: Sat Aug 23, 2008 8:45 am
by coreyjhen
aggie79 wrote:Could you say what you are trying to correct? My thought is that it may be possible to remove just a portion of the skin to get to the structure for the repair.


It's the outside walls - they're off by over a quarter of an inch, so nothing will line up. They're glued and screwed to the floor.

PostPosted: Sat Aug 23, 2008 9:13 am
by planovet
coreyjhen wrote:It's the outside walls - they're off by over a quarter of an inch, so nothing will line up. They're glued and screwed to the floor.


Well, if you haven't already covered the screws with epoxy or filler, I'd back out the screws and use a reciprocating saw (Sawzall) to cut the joint like Steve said. Use a fine blade and take your time and you should be able to re-glue it back down once you get it aligned properly. Good luck!

PostPosted: Sat Aug 23, 2008 11:36 am
by Ken A Hood
What you need is a Fein Multimaster .... I'm watching their infomercial right now.

PostPosted: Sat Aug 23, 2008 12:38 pm
by Larwyn
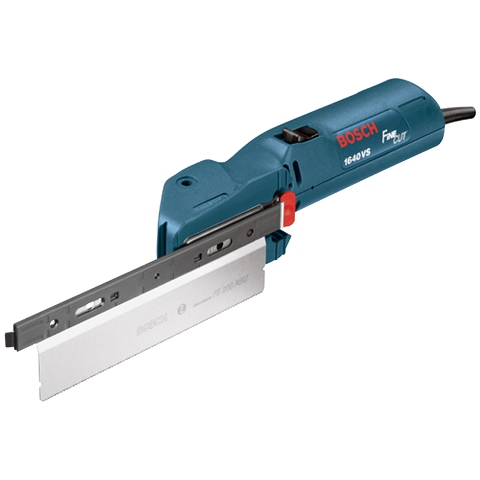
If you can remove the screws, I would consider using the Bosch Fine Cut saw. It is intended to cut door trim flush with new flooring. It has a very thin blade with the teeth slightly offset so you can lay the blade directly on the floor without damage to the floor, while cutting the trim. The blade can be reversed for right to left or left to right cuts. It does a great job. I actually used mine to trim the hatch width on my TD instead of a router with a flush trim bit. I just laid the blade flat against the outside wall of the TD and trimmed the overhang off of the hatch.

If the screws could be removed blades would last longer as they are not cheap ($15.00). You could lay the saw flat on the floor on the inside of the tear and use the floor to guide the blade for clean flush cut with a very thin kerf. You might have to wedge the kerf occasionally to keep the weight of the wall form bogging down the small 3.5 amp motor but it actually cuts very well. There is little or no vibration so it is easy to control and the thin blade results in very little sawdust.

You can find the Bosch Fine Cut saw at Lowes for around $100. with a blade or two.

Image

PostPosted: Sat Aug 23, 2008 12:54 pm
by halfdome, Danny
It appears some Titebond glues can be weakened by heat & steam.
Do you know of anyone who has one of those hand held steam cleaners? :) Danny