Table Saw Tips for Newbies

Anything to do with mechanical, construction etc

Table Saw Tips for Newbies

Postby David Grason » Sat Mar 26, 2005 9:22 am

I really enjoyed the thread talking about miter saws. Thanx Seattle G60 for asking those questions.

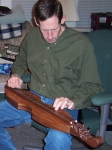
Anyway, I got to thinking about just what saw would be the best to start with if someone was brand new to this and had no idea where to even start. But on the same hand, that person wanted to go ahead and pursue the goal of building his/her own teardrop or any other wood working project for that matter. It's no secret that there are a lot of tools that have dedicated tasks that they do but if you're brand new and on a limited budget, and who isn't these days, and are wondering what your first big tool purchase should be, then please allow me to make this humble recommendation. Now this is my opinion only, but I think it's a good one. I highly suggest that your first big peice of shop equipment should be a table saw. It is IMHO, the most versatile of all saws and a wise investment in anyone's book. I'm going to use my own table saw as an example. Here it is:

Image

You'll notice that there is a drill laying on the floor. The crank handle broke on my saw years ago and rather than hunting for a new one, I now use the drill to quickly and effortlessly raise and lower the blade. I keep the adjustment threads lubed with WD-40 and fine adjustments can be done by hand on the drill's chuck. Here's what I mean:

Image

That makes life with an old raggedy table saw a lot easier.

I bought this table saw used for $40 in 1978. I built the guide fence myself circa 1980 after I'd been to a trade show and had seen some of the then new easily adjustable fences on the European market that were making their way to this side of the pond. These were the first guide fences that we'd seen using a lever and cam system to lock in your settings. Nowadays, lots of new table saws have this style of guide fence so you don't have to build one yourself. But at that time, those things were $3000 and LORDY I didn't have that kind of money. So I built this one. The red handle is just a peice of rod that I welded to some big fat round rod. I then drilled a hole off center to get a cam action. It's worked great for all these years. Granted, it's not as smooth as a fancy store bought one, but I'm just as proud of it. I did recently repaint it.

Image
I am NOT a complete idiot! Some of the pieces are missing.
User avatar
David Grason
Teardrop Master
 
Posts: 290
Joined: Tue Nov 16, 2004 8:50 am
Location: Nashville, Tn.

Postby David Grason » Sat Mar 26, 2005 9:36 am

In the next pic, you can see that I wittled a peice of hardwood so that I could clamp it to the guide fence. If I'm ripping plywood, I like to remove this and use the entire length of the fence. But this thing is really handy when I've got rip a peice of hardwood and it's got an ever so slight twist or warp to it. This little peice of wood drastically reduces binding.

Image

I use a Freud Thinkerf blade that I got at Home Depot. Here is a rule of thumb about blades.

Image

A sharp blade will always cut where YOU want it to, while a dull blade will cut where IT wants to.

So keep your blades sharp and when they get a little buildup around the teeth, you can use kerosene to clean them. But when they get dull, either send them out to get sharpened or buy new.

Anytime I get any rust on top of my tablesaw, I use a wirebrush to clean it off and then put on a coat of Minwax Paste wax. That keeps it from rusting again and it sure makes the wood slide through easily.

You can see in the photo the miter guage. My old one got lost and I just bought this one at Sears. It's good for cross cutting small peices of stock. However, for cross cutting big stock that would be too clumsy for this little miter guage, I use a shooting board that I made out of an extra peice of plywood and some scraps of hardwood. Here are 2 photos that show that underneath and then with the shooting board in position to make cross cuts.

Image

Image

Of course, I have to get the teardrop out of the way when I make crosscuts. :roll:

Remember, if you decide to build a shooting board for yourself, do NOT cut all the way through it. I plan on building a little hook that will catch on the end of the table so it will act as a brake and keep me from cutting all the way through.
I am NOT a complete idiot! Some of the pieces are missing.
User avatar
David Grason
Teardrop Master
 
Posts: 290
Joined: Tue Nov 16, 2004 8:50 am
Location: Nashville, Tn.

Postby David Grason » Sat Mar 26, 2005 9:43 am

You can build shooting boards for a variety of applications. You can build some just to cut miters or to fingerjoint drawer backs .... the possibilities are endless. Right now, I don't have a good miter saw. It got stolen a while back when I lived in a neighborhood with a bunch of friggin crack heads. Now I live in a nice area and my shop gets locked up tight every night. But my shooting board will serve me well until I can get the money together for a new miter saw or radial arm saw.

Anyway, table saws have been around for many years. They can be picked up for reasonable prices at yard sales, pawn shops, in the local traders papers and such. Or you can buy a fancy new one. You really can't go wrong with one of these babies and there are so MANY things you can do with them.
I am NOT a complete idiot! Some of the pieces are missing.
User avatar
David Grason
Teardrop Master
 
Posts: 290
Joined: Tue Nov 16, 2004 8:50 am
Location: Nashville, Tn.
Top

Postby ALAN GEDDES » Sat Mar 26, 2005 10:06 am

Table saw is the most important tool in my inventory. But for those tool challenged people out there you can build a tear with a good scroll saw, a drill, a palm sander and a skil saw and you could do without the last two if you had to.
Alan
User avatar
ALAN GEDDES
1000 Club
1000 Club
 
Posts: 1637
Images: 34
Joined: Fri Apr 16, 2004 8:48 am
Location: NC, Fayetteville
Top

Postby TomS » Sat Mar 26, 2005 11:54 am

David,

That's really great info. Thanks for sharing.

Mike, can we make this thread sticky? I think it's very usefull, especially for folks like me with limited woodworking experience.
Tom Swenson
[email protected]
User avatar
TomS
1000 Club
1000 Club
 
Posts: 1367
Joined: Thu Nov 18, 2004 2:06 pm
Location: Fitchburg, MA
Top

Postby toypusher » Sat Mar 26, 2005 12:30 pm

David,

Here's something for you to try with the 'sacrificial' wood on your fence. Instead of the cutouts and clamps, just drill a couple of holes through the fence and then use screws to fasten the wood to the fence. It will keep the clamps out of the way and works really great when you want to make a rabbet cut using your dada blade. Just use the full dado width and then bring the blade up under the sacrificial wood attached to your fence, leaving only the width you need exposed. This really helps eliminate chip-out also. Use a short sacrificial piece of wood that stops just short of the blade when you want to make cuts using the fence and the miter gauge in conjuction with each other. (Sorry I don't have any pics right now, but hope this all makes sense)

Kerry
User avatar
toypusher
Site Admin
 
Posts: 43040
Images: 324
Joined: Fri Jan 28, 2005 12:21 pm
Location: York, PA Area
Top

Postby Denny Unfried » Sat Mar 26, 2005 1:25 pm

Dados could be made with a router but plywood thickness is seldom to size so I prefer to make mine on the table saw with a stacked dado where I have more control of the width. Problem being I work by myself and wrestling a 4 by 8 sheet of ply is not only dangerous but doesn't work. Solution - was to build several of the stands below which I made about 20 years ago and are adjustable up to 39". The roller is a piece of PVC pipe and the ends are just wood that was cut down in the lathe. 8' dados where the floor fits into the sides can be made with no problem.

Image

Another handy tool is this bench which I made from construction lumber, plywood and a couple pieces of hardware. Since my people were master cabinet makers in Germany I'm still using hand tools over 100 years old like the hand made rosewood planes, scratchers et cetera.

Image

Denny
aka - "Uncle Denny"
<img src="http://www.uncledennyscorner.com/teardrop/photos/Linux.gif">
User avatar
Denny Unfried
sprint car builder/racer & all that jazz
 
Posts: 411
Joined: Mon Jun 21, 2004 8:54 am
Location: So Bay, CA
Top

Postby toypusher » Sat Mar 26, 2005 1:30 pm

Denny,

Yes the roller stand is invaluable to a one-man shop. You can get them most everywhere these days and pretty cheap too!!
:applause:

Kerry
User avatar
toypusher
Site Admin
 
Posts: 43040
Images: 324
Joined: Fri Jan 28, 2005 12:21 pm
Location: York, PA Area
Top

Postby asianflava » Sat Mar 26, 2005 1:31 pm

That looks like the same saw my dad has. Does it have the motor hanging off the back with a belt drive? He bought it used from the newspaper in the early 80's. The switch on it died when I started using it and finally the motor died. It is still sitting in the garage.

I would bring it here and fix it but I don't have the room for it. I'm considering getting a contractor saw instead. I'm currently borrowing a buddy's and after using it, I know what it's faults are. The newer version of his saw has fixed them.
User avatar
asianflava
8000 Club
8000 Club
 
Posts: 8412
Images: 45
Joined: Mon Aug 02, 2004 5:11 am
Location: CO, Longmont
Top

Postby Denny Unfried » Sat Mar 26, 2005 2:41 pm

Hey asianflava,

The old craftsman is probably twice the saw that a contractor saw is. I've used them with the aluminum tables and they are far from flat and hard to do any close work with. Also with the contractor saw the blade mounts directly onto the motor restricting how high the blade can raise. Might be worth a second thought - motors are cheap.

Penny's worth from ol' Denny
aka - "Uncle Denny"
<img src="http://www.uncledennyscorner.com/teardrop/photos/Linux.gif">
User avatar
Denny Unfried
sprint car builder/racer & all that jazz
 
Posts: 411
Joined: Mon Jun 21, 2004 8:54 am
Location: So Bay, CA
Top

Postby SteveH » Sat Mar 26, 2005 3:16 pm

I think my Craftsman saw is just like David's. Bought it in 1976, only mine doesn't have the drill attachment! :lol:
SteveH
Calling an illegal alien an "undocumented immigrant"is like calling a drug dealer an "unlicensed pharmacist ".
User avatar
SteveH
2000 Club
2000 Club
 
Posts: 2101
Images: 42
Joined: Mon Nov 01, 2004 8:28 am
Location: Bexar Co, TX
Top

Postby asianflava » Sat Mar 26, 2005 3:40 pm

Denny Unfried wrote:Hey asianflava,

Might be worth a second thought - motors are cheap.

Penny's worth from ol' Denny


But adding square footage isn't. :cry:
User avatar
asianflava
8000 Club
8000 Club
 
Posts: 8412
Images: 45
Joined: Mon Aug 02, 2004 5:11 am
Location: CO, Longmont
Top

Postby Geron » Sat Mar 26, 2005 4:39 pm

That Craftsman looks very much like the one I bought my Dad when we started builing his retirement house in 1980. My Son got that saw when my Dad died in 1996. I already had two.
If it's not broken, you're not trying hard enough.
User avatar
Geron
1000 Club
1000 Club
 
Posts: 1522
Images: 173
Joined: Tue Jan 18, 2005 6:23 am
Location: Georgia, Cherrylog
Top

Postby Syekick » Sat Mar 26, 2005 8:13 pm

This thread has been very helpful. I've owned a table saw for years and often wished I had a larger table attached with a straight edge. Plus the other tips are great. I imagine what little woodworking I've done over the years has been made more difficult because I don't know all the little tricks, jigs, and such to make it easy.

Thanks!
<b>Fudd's First Law of Opposition: </b>
If you push something hard enough, it will fall over.
User avatar
Syekick
Teardrop Builder
 
Posts: 29
Joined: Sat Mar 19, 2005 6:43 am
Location: Knoxville, TN
Top

Postby David Grason » Sat Mar 26, 2005 8:18 pm

asianflava wrote:That looks like the same saw my dad has. Does it have the motor hanging off the back with a belt drive? He bought it used from the newspaper in the early 80's. The switch on it died when I started using it and finally the motor died. It is still sitting in the garage.


Yes, the motor IS hanging off the back and YES the switch died years ago. If you'll look closely at the pics, you'll see where I wired in a regular light switch and while I was at it, I added a 110v outlet.

Toypusher, I'll do that thing with the screws to eliminate the clamps. That's a good idea.

Denny, I gotta have one or 2 of those stands. I like those. And I don't like the store bought ones. It's gotten to the point that when I have a choice of building or buying, I build. It's a matter of self respect.
I am NOT a complete idiot! Some of the pieces are missing.
User avatar
David Grason
Teardrop Master
 
Posts: 290
Joined: Tue Nov 16, 2004 8:50 am
Location: Nashville, Tn.
Top

Next

Return to Teardrop Construction Tips & Techniques

Who is online

Users browsing this forum: No registered users and 2 guests