question about generic benroy plans

Anything to do with mechanical, construction etc

question about generic benroy plans

Postby joe43952 » Wed Feb 18, 2009 7:13 am

Hi guys
Im getting ready to cut my sides. I have everything sorta figured out except for the hatch seal grove. I understand how the seal works on the sides. What I cant figure out is how do you seal the bottom edge of the hatch. If the hatch compresses the seal on the side, from what I can see on the plan the bottom of the hatch will fit tight with the frame with no room for a seal.

I dont know if i'm missing something. The hatch sides require a 3/8" grove to allow for a seal. The plans as I read them will not alow any clearance on the bottom of the hatch for one.

HELP
Joe
Lifes an adventure, not a guided tour
build pictures http://www.mikenchell.com/forums/album_ ... SC&start=0
User avatar
joe43952
Donating Member
 
Posts: 37
Images: 69
Joined: Mon Oct 13, 2008 9:04 pm
Location: Wintersville Ohio

Postby satch » Wed Feb 18, 2009 9:21 am

I built mine like the plans, than built the hatch frame with out the skins and fitted it with a 1/2" gap at the bottom for some door shoes...
Image
Image
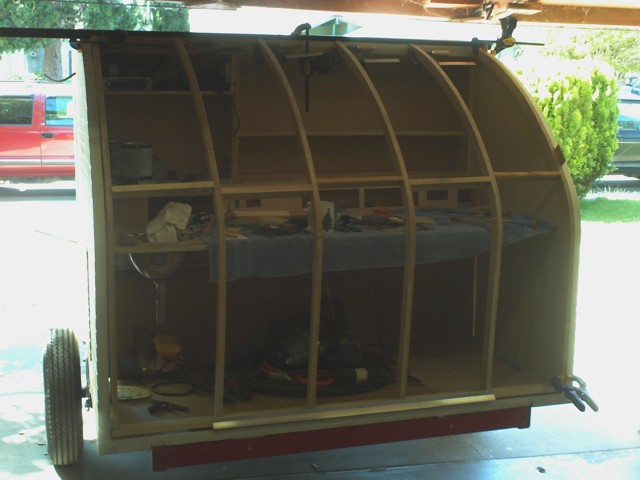
After making the hatch frame, you can adjust to what ever seal you want to use. Sorry I don't have a close up pic.
If it itches. scratch it
Rick
User avatar
satch
Donating Member
 
Posts: 1198
Images: 63
Joined: Thu Feb 07, 2008 9:46 pm
Location: the arm pit of Cali
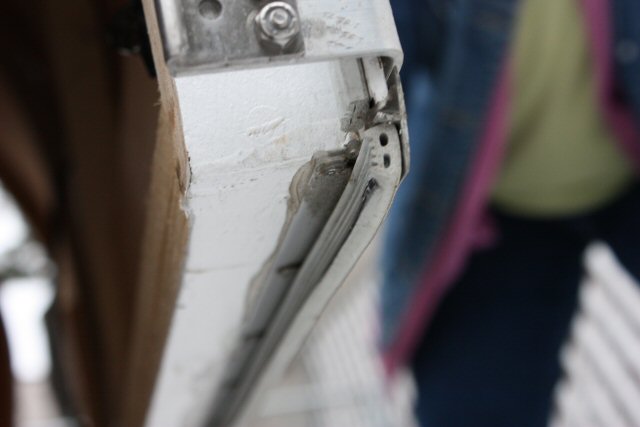
Postby Mauleskinner » Wed Feb 18, 2009 6:15 pm

Here's what I plan to do...Obviously (hopefully ;)) it's a side view:

Image

The black is the floor, the green is the hatch. The red is a probably 1/2" or 3/4" tall by 3/4" or 1" wide piece running from one side wall to the other, with the blue being a rubber seal.

Hope that makes sense (and if somebody knows it won't work, please tell me now! :? )

David
User avatar
Mauleskinner
The 300 Club
 
Posts: 350
Joined: Tue Aug 21, 2007 8:57 pm
Location: Southern MN
Top

Thanks

Postby joe43952 » Wed Feb 18, 2009 8:15 pm

Thanks guys you have shed some light on the subject.

Joe
Lifes an adventure, not a guided tour
build pictures http://www.mikenchell.com/forums/album_ ... SC&start=0
User avatar
joe43952
Donating Member
 
Posts: 37
Images: 69
Joined: Mon Oct 13, 2008 9:04 pm
Location: Wintersville Ohio
Top

Postby mikeschn » Thu Feb 19, 2009 5:05 am

When you put your t-molding on the hatch, there's a gap between the t-molding and the sub-floor. That's where the weatherstripping goes.

I'll see if I can get out this weekend and take a picture.

Mike...
The quality is remembered long after the price is forgotten, so build your teardrop with the best materials...
User avatar
mikeschn
Site Admin
 
Posts: 19202
Images: 475
Joined: Tue Apr 13, 2004 11:01 am
Location: MI
Top

Thanks Mike

Postby joe43952 » Thu Feb 19, 2009 7:11 am

Thanks Mike I would like to see how you did it.

Joe
Lifes an adventure, not a guided tour
build pictures http://www.mikenchell.com/forums/album_ ... SC&start=0
User avatar
joe43952
Donating Member
 
Posts: 37
Images: 69
Joined: Mon Oct 13, 2008 9:04 pm
Location: Wintersville Ohio
Top

Postby mikeschn » Sat Feb 21, 2009 1:44 pm

Okay, here is a picture of how I did it.

Image

There are 3 seals... 1 curved seal on each side that fits into the notch that you cut into the sidewalls. And one seal on the bottom that rests against the back edge of the subfloor. When you install the t-molding on the bottom of the hatch, it creates a gap between the t-molding and the edge of the subfloor. You'll have to measure that gap, and buy a seal to fit in that gap.

Mike...
The quality is remembered long after the price is forgotten, so build your teardrop with the best materials...
User avatar
mikeschn
Site Admin
 
Posts: 19202
Images: 475
Joined: Tue Apr 13, 2004 11:01 am
Location: MI
Top

Thanks Mike

Postby joe43952 » Sat Feb 21, 2009 9:56 pm

Thanks Mike I think I got it now :thumbsup:
Lifes an adventure, not a guided tour
build pictures http://www.mikenchell.com/forums/album_ ... SC&start=0
User avatar
joe43952
Donating Member
 
Posts: 37
Images: 69
Joined: Mon Oct 13, 2008 9:04 pm
Location: Wintersville Ohio
Top

Postby Mary K » Sat Feb 21, 2009 10:17 pm

I put a piece of weather stripping across the bottom inside (duh)edge of the hatch where it meets the edge of the floor. :thumbsup:

:thinking: 
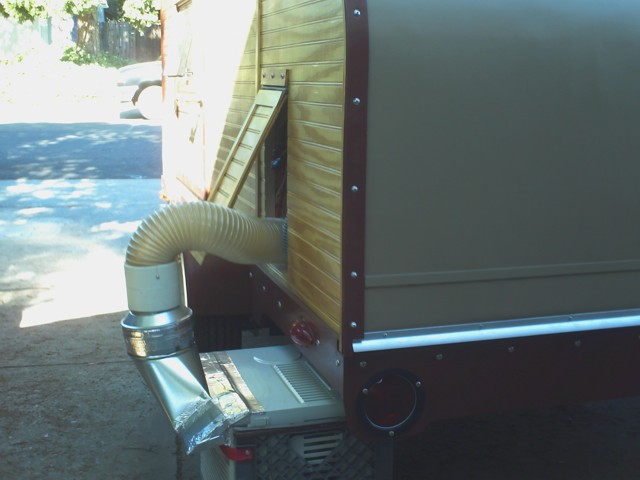
hum... I think I put one on the edge of the floor too for a double seal.
Mary K

I don't know half of you half as well as I should like; and I like less than half of you half as well as you deserve. Bilbo Baggins
User avatar
Mary K
6000 Club
6000 Club
 
Posts: 6425
Images: 44
Joined: Wed Aug 02, 2006 3:07 pm
Location: Florida, Pensacola
Top

Postby bobhenry » Sun Feb 22, 2009 6:37 am

While mine is not a Benroy and I built totally seat of the pants here is what I did.

As you can see the hatch does not "set" on the floor of the galley it extends 4 inches beyond closing on the rear most perimeter board of the torsion box floor. I did add a floppy type garage door bottom gasket to the face of the perimeter board. This would been unnecessary except for protection from driven water intrusion when driving in the rain.

Image

The bottom board IS a 2x4 but in the up right and locked position when making the galley lid into a roof over your head it acts as a header and I felt it should be a rather substantial member

Image
Growing older but not up !
User avatar
bobhenry
Ten Grand Club
Ten Grand Club
 
Posts: 10368
Images: 2623
Joined: Fri Feb 09, 2007 7:49 am
Location: INDIANA, LINDEN
Top


Return to Teardrop Construction Tips & Techniques

Who is online

Users browsing this forum: No registered users and 9 guests