Page 1 of 1

skin

PostPosted: Sun Mar 01, 2009 1:48 pm
by scotcon
I know this has been addressed many times but what about flashing for outer skin?

PostPosted: Tue Mar 03, 2009 12:52 pm
by john
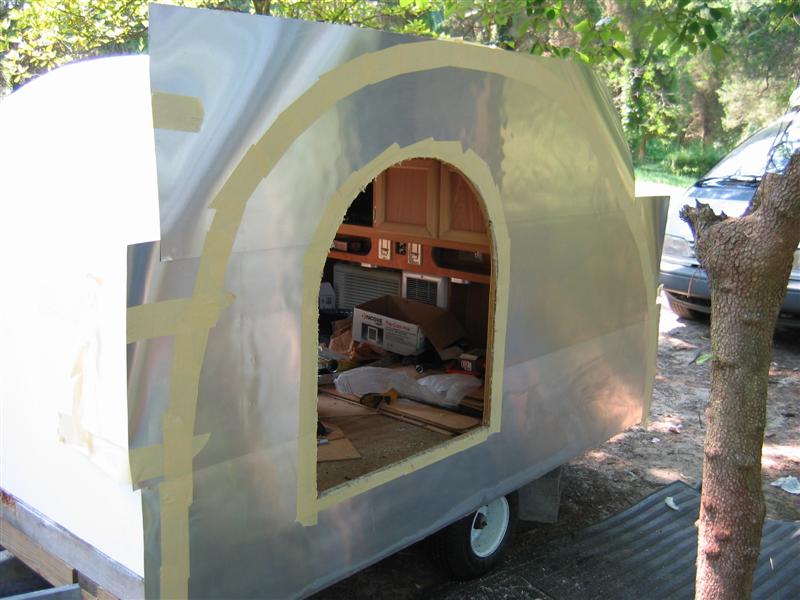
I used flashing on the sides of my tear. It works in keeping the tear dry. I lapped it horizontally two times on each side. Two 2" laps.

Flashing is very thin so a backer is needed for support. I glued the flashing on using Henrys outdoor carpet glue. I had mixed results with this. One side remains attached to the backer while on the other side one run of flashing has come loose. The areas that have come loose are places where I had to pull the aluminum off and then press back on to get pieces of trash out from under the skin. (i was working under a tree). So what little failure there has been has been a result of my working conditions. Th method seems solid.

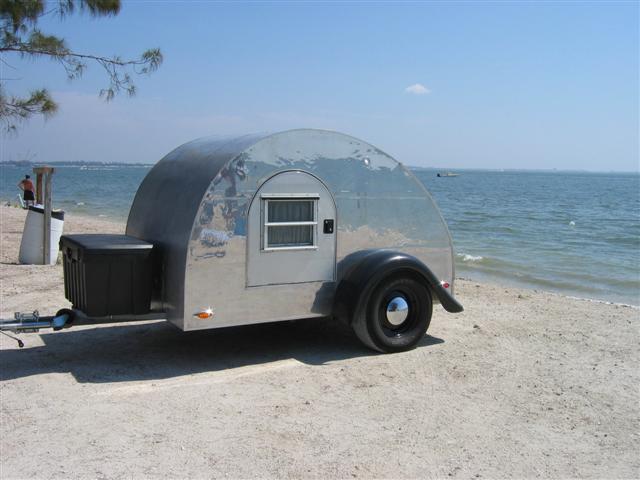
Total cost was around $50 for the sides. The roof was done with some thicker flashing that I stumbled onto in a hardware store for $8.

End result: It was cheap, light, keeps me dry, looks OK and will last a very long time with very little maintenance. I would not use it again, though. Dings too easy and the end look "hammered glass appearance" was not quite what I was after.

Image

Image

PostPosted: Tue Mar 03, 2009 2:17 pm
by Rarin2go
We used flashing for the roof, and it is holding up good. The sides, however are ply core as we wanted the "woodie look".

How Did you Lap It

PostPosted: Tue Mar 03, 2009 2:49 pm
by NebraskaTeachr
When you put the flashing on the roof, what kinds of lap seam did you use? I am thinking about using flashing for my roof as well.

Thanks for the input

Tim

PostPosted: Tue Mar 03, 2009 2:57 pm
by Rarin2go
Hi Tim,
I used 1.5 inch lattice to cover the seams. After finishing the wood I used clear silicone to seal the edges at the flashing. You can see the roof in our album.

PostPosted: Tue Mar 03, 2009 3:50 pm
by john
I used windshield glue on my roof laps. The lap there was 5 or 6 inches.

It works but the aluminum I had, had been rolled too tight or something. when unrolled it not only wanted to roll up along the length but it also wanted to curl. That's right...a compound curve. That made it difficult to put on the roof.

I attached the aluminum at the rear with the hatch hinge and wrapped it around the front lower corner at the other end. There were no other screws outside of the edge trim. I did the edges along roof first and the center roll last so as to cover the other aluminum.

PostPosted: Tue Mar 03, 2009 6:43 pm
by TheOtherSean
Thanks for posting about your experience with the aluminum flashing. I saw some at Home Depot the other day and was considering using it; hearing that you've had some success is very encouraging.

PostPosted: Tue Mar 03, 2009 8:10 pm
by scotcon
thanks for all the help. im now having to rebuild the sides. thought i was being smart and useing 1/4 inch ply but it warped to bad . so lesson 1 learned..................... scott

PostPosted: Tue Mar 03, 2009 11:22 pm
by Miriam C.
scotcon wrote:thanks for all the help. im now having to rebuild the sides. thought i was being smart and useing 1/4 inch ply but it warped to bad . so lesson 1 learned..................... scott


Scott, if you use 1/4" ply you need some framing to keep it from warping. I used 3/8" Baltic Birch but framed more than necessary.

PostPosted: Tue Mar 03, 2009 11:36 pm
by NightCap
Super Idea. What do you have to do tot the surface to keep it shiny for ever? Will it oxidize?

PostPosted: Wed Mar 04, 2009 12:40 am
by john
I only polished it because once unrolled I found something had been spilled on the rolled up aluminum and damaged the finish. I thought no big deal. :roll: I was wrong on that.

The polishing took 20 to 40 hours all together. Months in reality. I had to polish off the etching.

The polish is not permanent and has already dulled. I figure a second polishing to return the mirror finish would only take 4 or 5 hours, though.