Page 1 of 1
Putting on the epoxy

Posted:
Sun Sep 13, 2009 1:21 pmby BK One
I hope I can ask this without pictures. If I confuse everyone I'll come back later with a drawing.
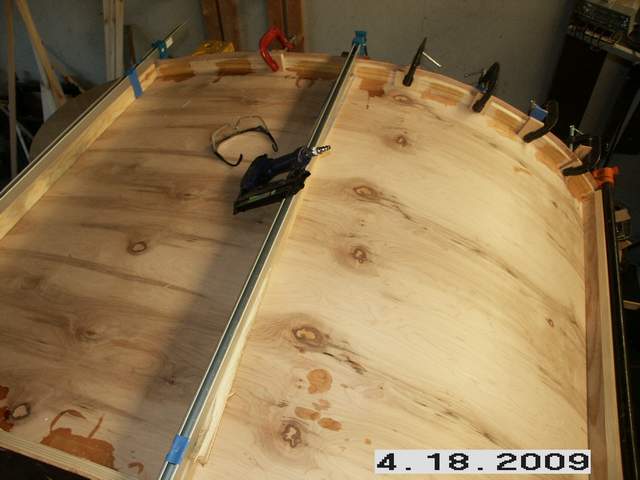
My sides are 1/4" skins on 1x framing with 1/4" or 1/8" interior skins. The exterior will have 1x trim around the perimeter as many woodies do. I want to build the entire wall on the bench (including the trim), apply several coats of CPES, and at least one coat of spar urethane before I set the walls up. However, it would be easier to screw in the end of the spars thru the exterior skin, cover those screw heads up with the exterior trim, and then apply the CPES.
So what does everyone think? Is it that much harder applying the CPES on a vertical surface? If so, how would you attach the spars? Go thru the trim and plug them? Screw in from the interior side with a Kreg jig? (I don't like that one much.)
Posted:
Sun Sep 13, 2009 1:30 pmby Greg M
I'd suggest that you apply the cpes to everything first, screw the spars to the sides, attach the trim, and then varnish. that way everything is encapsulated in cpes.
-Greg
Posted:
Sun Sep 13, 2009 1:40 pmby BK One
I think you're right. My only problem is I was going to glue and screw the trim. I cant glue to the CPES, right?
Maybe I should just screw in the trim from the inside, varnish it all and call it quits.
Thanks for the quick reply. I'm close to the computer while the Colts are on TV!
Posted:
Sun Sep 13, 2009 1:53 pmby greekspeedoman
Why not try attaching your spars with pocket holes? Then you have no holes on the outside ever. I did it this way and it looks great.
Kreg Tool is the most popular:
http://www.kregtool.com/index.php
Posted:
Sun Sep 13, 2009 2:17 pmby BK One
Mark, I was hoping someone would respond that's done this. My hangup is that the Kreg joint "looks" weak, even for a face frame. I know it's stronger than it looks. I tried breaking some practice pieces when I first got the Kreg. But my spars are 1 1/2". The strength of the Kreg joint is higher when the screws have a little more space between them.
Still, it's probably more than we need for our roof spars. I tend to overdo alot a things. How long have you had yours together? Any problems? I might do a 5' long mock-up of a roof spar and jump on it and see how it does!
Posted:
Sun Sep 13, 2009 2:35 pmby Rock
I've never used CPES so I can't comment specifically.
But if you use a conventional epoxy like West System or System 3 it is both sealant and adhesive. So I applied a saturation coat of epoxy to the walls in the shop. After the walls were up I used Miller dowels to secure the spars (as well as fiberglass tape and epoxy before the outer skin went on.) I then applied fiber glass and epoxy to the tear exterior.
The great thing about this system is that up until the point you varnish, all you have to do is scuff sand the epoxy and glue anything you want to the outside with more epoxy. I'm going to attach wooden blocks for the tail lights and porch light this way. (Even after the varnish is on, all you have to do is sand down to epoxy. But then you would have to locally re-varnish.

Eric
Posted:
Sun Sep 13, 2009 3:01 pmby Steve_Cox

on the epoxy as a sealant and adhesive. The most important place you need to seal plywood is the end grain. That is almost always where problems occur, even under trim. CPES will leave a very thin coat of epoxy on the surface. One or two coats will make it water resistant, 3 will make it waterproof. I have used both epoxy and CPES. For what it's worth, CPES was developed to restore rotten wood (not plywood). The epoxy will do a better job encapsulating plywood. I have used epoxy as an adhesive and used the pocket hole screws to hold the joint together until the epoxy sets up. My favorite filler for epoxy adhesive is wood dust from my sander. Boat builders call it "wood flour".
Posted:
Sun Sep 13, 2009 5:26 pmby sjacobso76
In response to the pocket holes, I think they would work really well (I plan on using them for my spars when I get to that point). You're getting essentially the same holding power that you would get if you screwed into the end of the spar. The only reason I could see for doing otherwise would be if you were just using 3/5 ply for the sides, as the solid wood spars would hold the end of the screw better. But since you have solid wood framing in your walls, I would say go with the pocket holes.
Posted:
Sun Sep 13, 2009 8:11 pmby S. Heisley
BK One wrote:
My sides are 1/4" skins on 1x framing with 1/4" or 1/8" interior skins. The exterior will have 1x trim around the perimeter as many woodies do. I want to build the entire wall on the bench (including the trim), apply several coats of CPES, and at least one coat of spar urethane before I set the walls up. However, it would be easier to screw in the end of the spars thru the exterior skin, cover those screw heads up with the exterior trim, and then apply the CPES.
So what does everyone think? Is it that much harder applying the CPES on a vertical surface? If so, how would you attach the spars? Go thru the trim and plug them? Screw in from the interior side with a Kreg jig? (I don't like that one much.)
BK:
Since you said you plan to put on more than one coat of CPES, my personal preference would be to put one coat of CPES on before you put the walls up; work with the walls, drilling and screwing them however you want; then, put another layer or two of CPES on after the walls are up and completed. For any plywood that needs to be applied to a curve (like the roof), I would wait and apply the first coat of CPES after installation because I would think that you might loose some flexibility with the CPES on it.
It's good to have a layer of CPES on the wood as soon as possible because it gives it additional strength and protection while you're building. However, there is something to be said for sealing the wood after you've finished drilling and screwing because you have the opportunity to seal the wood cuts and holes you've made with the CPES.
Applying CPES horizontally is easier because the stuff is runny. If you’re applying it vertically, don’t fill the brush too full. Also, the brush is ruined once you've used it for a CPES application. I use inexpensive brushes that I can discard afterwards. As far as glue goes, I have used PL polyurethane construction adhesive with CPES coated wood without any problems. It seems to be holding okay.
Probably one of the best sources of information is from The Rot Doctor. (
http://www.rotdoctor.com/) When you get to this website, you will see a notation at the top of the screen, stating that you can contact them by email. Click on the purple/burgundy word ‘email’ and you can ask the Rot Doc. They are pretty good about answering within about 24 hours. Another source for information is the developer. (
http://www.smithandcompany.org/CPES/index.html)
…hope this helps!
Posted:
Mon Sep 14, 2009 9:31 amby greekspeedoman
I've had mine together for about a year and a half. I do off road driving so It has experienced quite a bit of vibration & bumps. No problems so far. I just put a bit of glue on the end of each spar and in each pocket hole (to keep the screws from backing out) and drove them in. It was fast & strong. Good enough for off road.
Cheers,
mark
Re: Putting on the epoxy
Posted:
Mon Sep 14, 2009 9:44 amby planovet
BK One wrote:So what does everyone think? Is it that much harder applying the CPES on a vertical surface? If so, how would you attach the spars? Go thru the trim and plug them? Screw in from the interior side with a Kreg jig? (I don't like that one much.)
As far as the CPES, applying it to a vertical surface is not a problem. It soaks in pretty quickly so the is little to no drips. I'd apply at least one coat before you do anything and another after you have done everything.
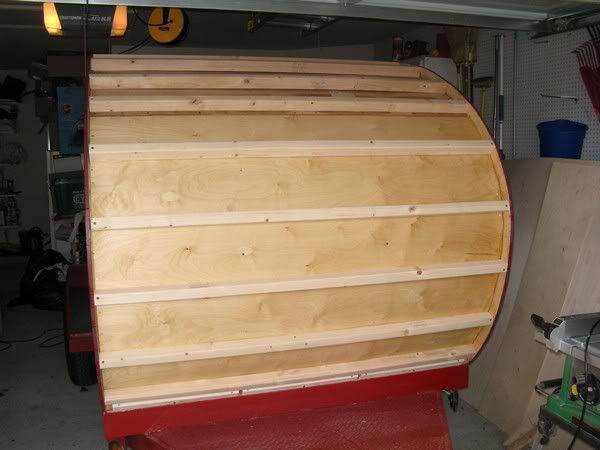
As far as the spars, since you are doing a sandwich wall why don't you screw the spars into the framing and not the walls. If the walls are attached well to the framing, it should work fine. That is what I did on mine. I was able to finish the walls on the bench and not put any additional holes in them after I got them vertical.
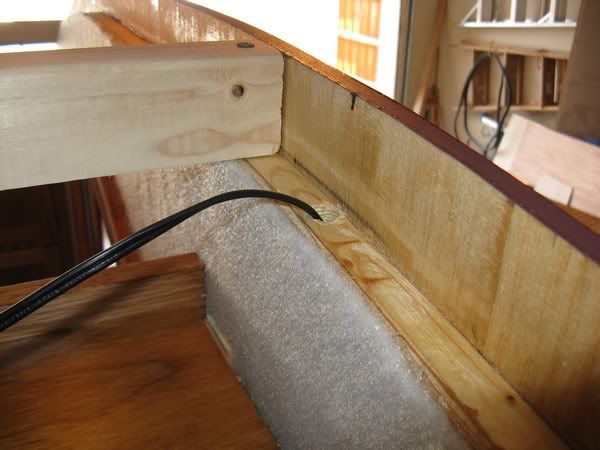
Side is up and shows lip where spar will sit;
One spar attached. It was screwed into the framing and not the wall. I used 2x4 for the spars that were ripped down to fit:
Posted:
Mon Sep 14, 2009 12:59 pmby BK One
Mark, that's exactly how I initially intended to attach my spars. I was going to put the headliner on top of the wall framing per Steve Frederick, and then attach the spars. But I changed the shape of my door and made it a little bigger so now it would have been conflicting with my wall framing.
(OK, here's where I was going to post the profile pic and realized it's not in my album.)
I'll post these missing pictures tonight. I think I'll go the pocket screw route so there won't be any more holes in my exterior. Thanks to all for your help.
Brian
Posted:
Mon Sep 14, 2009 2:08 pmby planovet
BK One wrote:I was going to put the headliner on top of the wall framing per Steve Frederick...
That is what I did. The picture in the post above is a temp spar holding the walls plumb until I could get the ceiling in. It just showed the spar placement better than the pictures with the ceiling already in place.
Posted:
Mon Sep 14, 2009 2:38 pmby davidrn
Its only been a short time since I completed my Woody Tear, but I think it is pretty tightly built. I did the same as you are planning, on the flat frame floor. I laminated my exterior walls out of 2 layers of 1/8" ply and then used 3/4" Baltic Birch as framing, except at the door, there I used solid maple. Used 1/8" Luan inside. I completed the walls, applied 3 coats of CPES and then used Polyurethane glue and plenty of clamps to glue the walls down to the floor and a 1x1 strip of maple. The ceiling of luan went on next. I glued the spars in one at a time, to the wall framing, not the 1/4" wall lip at top, and to the Luan ceiling. After each spar was glued and screwed, and clamped with a 6' pipe clamp, I cut a 12" piece of insulation, glued that in place, and then postioned and glued the next spar. The benefit to taking your time is I didn't have to try and measure the spar distance exactly to cut the insulation board. It was a simple system. Hope that last tip might help.
Posted:
Tue Sep 15, 2009 6:01 pmby Aaron Coffee
Kind of sounds liek the debate I 've been having. Had originally planned on epoxy, varnish then assembly, but think I have now decided on epoxy(done), assembly, then epoxy trim on and touchup screw holes, then varnish using an as yet unpurchased HVLP gun. The HVLP kind of scares me but this build has kind of turned into trying new things.