Page 1 of 1

Hatch Framing Conundrum

PostPosted: Wed Oct 28, 2009 11:53 am
by aggie79
I have completed my galley hatch framing, but am second guessing my design, and would appreciate comments before I skin the framing.

As it is now, the hatching framing has four continuous ribs - two on the sides and two interior. The depth of the ribs is 1 1/2". The outer ribs are made from two thicknesses of 3/4" plywood. The interior ribs are single thickness 3/4" plywood. The header spar for the galley hinge is made from two 1x2 poplar boards. The other spars are single 1x2 poplar boards, and are spaced at approximately 12" on center. The spars are pocket-screwed and glued to the ribs, and I've added gussets to many of the spar/rib butt joints.

Image

Image

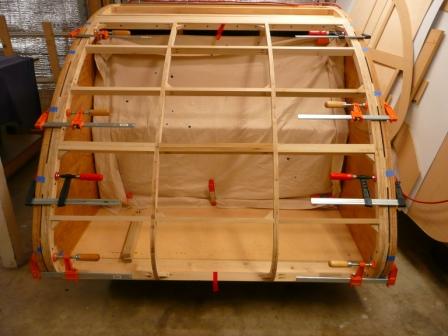
Off the teardrop, the assembly is quite stout and does not flex or rack much. I plan to skin both sides of the hatch with 1/8" baltic birch plywood (with aluminum exterior sheeting.) That said, I've had some concerns that the framing won't be strong enough for the tight curve of the profile at the back of the teardrop.

My questions, to the long-winded set-up, are:

1. Do you think the 1 1/2" depth of the framing is sufficient?
2. Is there a modification I should make to the framing to increase its strength?
3. Or should I start over on the hatch framing?"

Thanks, Tom

PostPosted: Wed Oct 28, 2009 1:01 pm
by halfdome, Danny
Tom
From what I see you've done a fine job :thumbsup: .
It will stiffen up quite nicely with the two 1/8" Baltic Birch Skins.
I'd place some flat pieces of 1/2" or 3/4" plywood to catch a blind screw for your license plate bracket and lights if they go in the hatch.
Make sure you map out where everything is for future reference. :D Danny

PostPosted: Wed Oct 28, 2009 1:01 pm
by Classic Finn
Hi Tom

Youve done a very nice job on your hatch. :applause: :applause: :applause:

In my opinion your hatch thickness of 1.5 inches is plenty. I over built on the thickness myself which is at 50mm which over 2 inches. Im going to build my next one thinner. With the screws and glue it will work well.

Are you going to skin the inside or are you going to leave it open?
The skin for the outerside will strengthen it more as well.

The only place where I would add some bracing with ply is the area where your tail lights go but thats not even necessary. What type of lighting are you going to install?

Other than that. I really like your build. :applause: :applause: :thumbsup:

Classic Finn

PostPosted: Wed Oct 28, 2009 1:03 pm
by Classic Finn
halfdome, Danny wrote:Tom
From what I see you've done a fine job :thumbsup: .
It will stiffen up quite nicely with the two 1/8" Baltic Birch Skins.
I'd place some flat pieces of 1/2" or 3/4" plywood to catch a blind screw for your license plate bracket and lights if they go in the hatch.
Make sure you map out where everything is for future reference. :D Danny


Hi Danny, I was typing to tom and whamo you replied before I got mine posted. But we both have about the same reply. :lol: :lol:

Tom your hatch looks Finntastic :applause: :applause:

Classic Finn ;)

PostPosted: Wed Oct 28, 2009 1:23 pm
by aggie79
Thanks Danny and Classic Finn,

Like most first-timers, I was dreading the hatch construction. The framing, however, seemed almost too easy. That's when I started second guessing my construction methods.

I do plan to add plywood blocking for the license plate bracket and tail lights, once I decide where they should go. Also, I need to decide whether or not I'm going to use some sort of latch on the hatch or draw-tight latches on the sidewalls. These are easy decisions compared with having to rebuild the hatch framing.

Tom

PostPosted: Wed Oct 28, 2009 1:42 pm
by Dean_A
Your construction is very similar to mine, but I used single thickness curved ribs on the outside, and 6 ribs total. I probably overbuilt mine, but your could say that about most things on my trailer. Mine also has birch on both sides and aluminum on the exterior, in addition to foam insulation in the interior.

I think your concern is spring-back on the hatch, making it not seal up tight? I don't think you'll have a problem from what I can see. Even if you get a bit of springback, you can always use draw latches to snug it down tight.

If you are REALLY concerned about spring-back, you could try:

1) Score the inside of the birch ply width-wise in the area of the tight curve so it curves easier.

2) Use specialty bendy ply.

3) Double up the ribs in the area of the tight curve.

4) Don't use birch under the aluminum; just float the aluminum over the ribs.

I can't endorse any of these ideas. Just brainstorming. And like I said, I don't really think you'll have a problem.

I ended up using construction adhesive to adhere my ply to the frame because it could fill gaps better that wood glue could, and my ribs were not exactly perfect.

Another thing to keep in mind is that is a lot easier to position your hatch supports before your hatch is skinned.

Image

PostPosted: Wed Oct 28, 2009 2:06 pm
by boomboomtulum
I like your design and building skills as well. The only thing I may have done different would be to install at least one more vertical spars if not two. The reason being the verticals give the support that fight against The dreaded Hatch Spring Back. I have found the extra horizontal spars are not really doing alot except where you may mount lights etc. as screw backing, perhhaps two rows of Horizontal spars. You will not have to worry about the hatch racking with the 1/8 plywood sheeting on both sides and the Alum. on the exterior. Now I have only built 2 of these and built the Hatch the same way on both because it worked for me.
Of course this is just an opinion.
Dave

PostPosted: Wed Oct 28, 2009 2:58 pm
by aggie79
Classic Finn wrote:What type of lighting are you going to install?
Classic Finn


This is what I'll be using:

Image

Gig'em, Tom :thumbsup:

PostPosted: Wed Oct 28, 2009 3:07 pm
by aggie79
Dean and Dave,

I agree with you - for peace of mind even if not necessary structurally - on build #2 I'm going to use more vertical ribs/spars.

On the front of my teardrop, there is a 6" radius roll pan. I skinned it with 1/8" baltic birch, and it was a little unwieldy. The radius at the hatch is much larger, so I will "pre-bend" the baltic birch to make things easier.

I do plan on using PL Premium to attach the skin.

Tom

PostPosted: Wed Oct 28, 2009 5:54 pm
by Classic Finn
Tom just to show you what mine looks like. Notice the little grooves for the cross pieces?

Might be overkill too but Oak on both top and bottom of the hatch. ;)

Image

Image