A Little More Progress

Anything to do with mechanical, construction etc

A Little More Progress

Postby GeneH » Sun Nov 29, 2009 8:56 pm

This was a good weekend, I was able to cut the perimeter framing wood for both side walls sandwiches that I am building per Steve Frederick's shop manual and the door frame and base for one. I will be using pocket screws instead of bisquits and clamps to build the framing. The drilling for them can be seen in the following photo.

Image


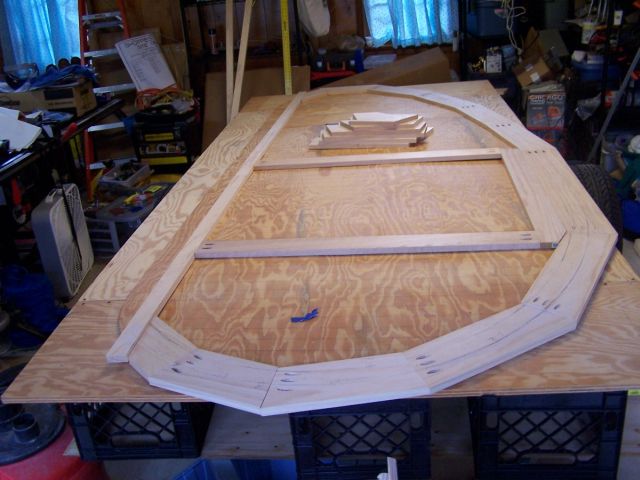
Next I will add the vertical frame parts to create the mounting pockets for the front and back bulkheads and then the wall backing to attach the sides of the shelves to the walls then apply the Titebond III and the screws.

The pile of wood is the second wall's perimeter pieces.

I've added a few more photos to my album.
User avatar
GeneH
Gold Donating Member
 
Posts: 60
Images: 34
Joined: Tue Oct 25, 2005 10:02 pm
Location: Irmo, SC

Postby aggie79 » Mon Nov 30, 2009 9:22 am

:applause: Very nice Gene! Your teardrop is really starting to take shape.

Pocket screws are one of those "how did we get along without it" tools.
Tom (& Linda)
For build info on our former Silver Beatle teardrop:
Build Thread

93503
User avatar
aggie79
Super Duper Lifetime Member
 
Posts: 5405
Images: 686
Joined: Tue Aug 07, 2007 5:42 pm
Location: Watauga, Texas

Postby Lawnjockey » Mon Nov 30, 2009 10:28 am

Nice!! That is very similar to what I am doing except I am using hardwood dowls for the joints. My choice of dowling was based on my belief that dowls are stronger than biscuits and I don't have the mental agility to keep the screws out of the cut areas. I had thought about finger joints which I believe would be best but I already have a dowling jig and I didn't want to spend the cash for the finger joint jig or router bit.

I notice two cut lines, are you cutting the inside too? I am planning on leaving the inside alone. That way I can glue it to the plywood before cutting and thus have it better supported during the cut.

Thanks for the very informative post.

Jocko
Lawnjockey
Teardrop Master
 
Posts: 166
Images: 43
Joined: Fri Nov 20, 2009 10:08 am
Location: front yard
Top

Postby GeneH » Mon Nov 30, 2009 8:50 pm

This is my first use of pocket screws but they do seem to be very useful.

The outer of the two lines drawn on my framing represents the cut line that the cabin ceiling will rest on as described in Steve's CD. It is 1-5/8" inside the roof line to allowing for 1/8" luan as the ceiling and 1-1/2" spars with foam insulation between them. The bottom line shows what I can remove with a router and still have a 2" wide perimeter frame if I figure it will save me enough weight to be worth the effort. I may just route away the excessive areas and leave the areas around the joints larger for the Titebond III to work with.

Puttin the lines in first allowed me to locate the pocket screws where they would not be hit during the cutting.
User avatar
GeneH
Gold Donating Member
 
Posts: 60
Images: 34
Joined: Tue Oct 25, 2005 10:02 pm
Location: Irmo, SC
Top

Postby Miriam C. » Mon Nov 30, 2009 10:20 pm

:thumbsup: 
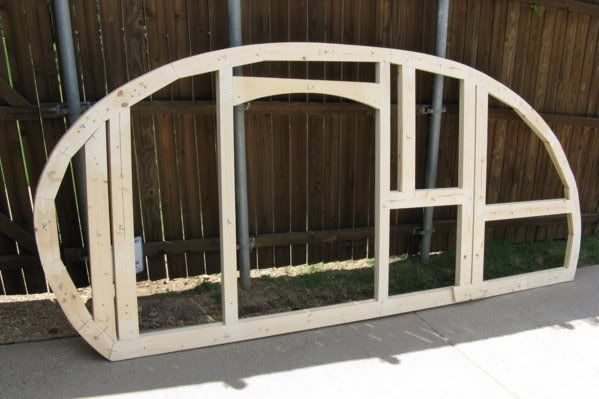
looks great. A suggestion. Glue the framing and remove the pocket screws before you do any routing. You can put them back in if you feel the need. :thumbsup:
“Forgiveness means giving up all hope for a better past.â€
User avatar
Miriam C.
our Aunti M
 
Posts: 19675
Images: 148
Joined: Wed Feb 15, 2006 3:14 pm
Location: Southwest MO
Top

Postby planovet » Tue Dec 01, 2009 10:20 am

Miriam C. wrote:Glue the framing and remove the pocket screws before you do any routing. You can put them back in if you feel the need.


I agree. I used biscuits although pocket screws probably would have been better. But with the biscuits I didn't have to worry about hitting a screw when I trimmed my frame. I used Steve Frederick's shop manual for portions of my build too and remember that you will have to cut the frame twice in the hatch area. And I would not bother cutting the bottom portion off. It will be more work than it's worth, you are not going to save that much weight.

Looking good, brings back memories of building my wall framing :thumbsup:

Image
ImageMark (& Cindi)
Visit our website: Little Swiss Teardrop

I was wondering why the water balloon was getting bigger... and then it hit me.

ImageImageImageImage
User avatar
planovet
The Cat Man
 
Posts: 5583
Images: 3
Joined: Tue Nov 27, 2007 4:48 pm
Location: Plano, Texas
Top

Postby Cliffmeister2000 » Tue Dec 01, 2009 12:20 pm

Miriam C. wrote::thumbsup: A suggestion. Glue the framing and remove the pocket screws before you do any routing. You can put them back in if you feel the need. :thumbsup:


Amen! I have personally seen how fast a pocket screw can go when propelled by a table saw blade. I hate to think about the speed it could attain when propelled by a much faster router bit! :oops:
God Bless

Cliff

♥God. ♥People.
1 John 4:9-11

My Teardrop build pictures
User avatar
Cliffmeister2000
Titanium Donating Member
 
Posts: 3622
Images: 157
Joined: Thu Jul 26, 2007 10:18 pm
Location: Phoenix, AZ
Top

Postby GeneH » Tue Dec 01, 2009 9:52 pm

Hmmm Flying Pocket Screws ... I'll bet that was a startling incident.

I am probably going to use a jig saw to cut the top section of the rame off rather than a router just because of my lack of experience with a router.

Even so ... temporarily removing the screws that are close to the line is probably a good idea.
User avatar
GeneH
Gold Donating Member
 
Posts: 60
Images: 34
Joined: Tue Oct 25, 2005 10:02 pm
Location: Irmo, SC
Top


Return to Teardrop Construction Tips & Techniques

Who is online

Users browsing this forum: No registered users and 8 guests