Page 1 of 3

Roof/Luan concerns(?)

PostPosted: Sat Apr 10, 2010 10:33 pm
by Alfred
Hey gang,

When I was putting the CPES on today I noticed two splits in the forward outer layer of the roof luan (I don't see the roof up close too often, 'cause I'm short).

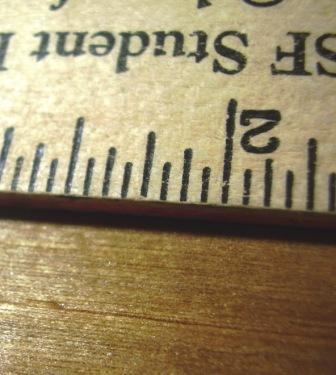
This first one looks to be a split in the very thin outer layer of the luan, but it is about 6 1/2" long, you can feel it with your finger. By touch, it feels ridge like. It is more noticeable in real life than it is in this picture:

Image

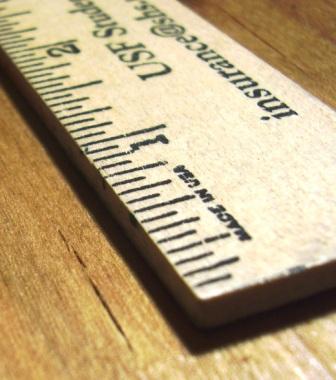
The second looks more like a crack in the wood, this one only 1" in length, just a few inches further down and parallel to the other, and I got a better picture of this one.

Image

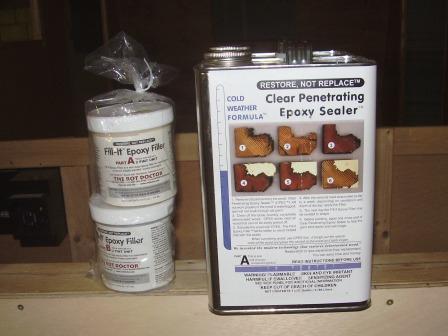
So how do I fix them? Do I just put epoxy filler in the grooves, then sand them? I liberally painted on CPES today, I know it is going to need more than this.

Image

AL in Asheville :thinking:

PostPosted: Sat Apr 10, 2010 10:43 pm
by Miriam C.
:D The entire roof of mine did that and I just epoxied it. Glued all the parts and pieces together so now it looks funky. Great faux finish. :lol: I am cool with it. You however might use the cpes on it and even get a small thing of marine epoxy at the hobby shop. Or you can cpes and bondo. 8)

EDIT for not paying attention. Put epoxy filler in it and sand.

PostPosted: Sat Apr 10, 2010 10:45 pm
by S. Heisley
Alfred:

That could be flaws in the original plywood or it might be a minor delamination starting. The CPES will help keep it from delaminating any more and the fillit will work to patch the cracks. The two together will ready it for the aliphatic paint. Between all three, you should be good to go. When you fill the crack and are ready to smooth it out, dip your smoothing spatula/tool in paint thinner first or put Saran Wrap-type plastic wrap over the patch and then smooth it while it is still moist. That way, you should get a smoother finish and shouldn't have to sand much, if at all.

Thanks

PostPosted: Sat Apr 10, 2010 10:47 pm
by Alfred
Thanks Sharon and Miriam! That eases my mind a bit.

AL :thumbsup:

PostPosted: Sat Apr 10, 2010 10:55 pm
by Gage
I can't answer but that is one reason I don't use luan. Sorry I can't help you with the fix but your plan (epoxy) sounds like a logical fix. :thumbsup:

P.S. Has it been sitting outside unprotected. :thinking:

PostPosted: Sat Apr 10, 2010 11:03 pm
by Alfred
Gage wrote:I can't answer but that is one reason I don't use luan. Sorry I can't help you with the fix but your plan (epoxy) sounds like a logical fix. :thumbsup:

P.S. Has it been sitting outside unprotected. :thinking:


Hey Gage,

Thanks for the feedback.

Interestingly, it has not been outside, it has been garage kept. I just pull it outside sometimes to work on it in better light.

Al in Asheville :thinking:

PostPosted: Sat Apr 10, 2010 11:12 pm
by doug hodder
Al...how thick is the material and how do you plan on finishing it? If it's aluminum skinned you'll be fine, if not and it's going to be painted, you might want to do a coat of a regular epoxy on it with some thickening agent in it to fill any cracks. It builds much quicker than the CPES...but since you have that already...use it and make sure you fill any voids. If you don't stop any separation in the luan/veneer now...it'll show up later. Kinda one of those things...it never gets better. Other opinions may vary.

I don't use CPES so don't know if it can be thickened in any way to fill a void. Regular epoxy will give you a lot smoother surface to paint on quicker. Luan can be a real problem, I've had chunks explode into cracks when bending, I only use it for sub aluminum surfaces or patterns anymore.

Maybe get onto something else for a while and see what appears over time on the roof. May give you a better idea on what to expect and how to deal with it.

May not be what you wanted to hear...but just my thoughts. Doug

PostPosted: Sun Apr 11, 2010 6:52 am
by Rock
No close-ups handy, but my plywood had splits in the veneer often over 1/8" wide. So I first painted a thin layer of epoxy on the cracks to seal the wood. Then I mixed up epoxy and tinted it jet black, then used this to fully fill the cracks (plywood laying horizontal.) Then I levelled the epoxy with planes and scrapers, then finished the wood overall with epoxy.

Probably way overkill for what you have, but instead of trying to hide all the cracks I thought I would highlight them. Only a year down the road but the epoxy and fiberglass have prevented the veneer from moving further.

Eric

PostPosted: Sun Apr 11, 2010 8:13 am
by Arne
When I install 1/8th with a bend, I soak it with water on the surface that will be on the outside of the curve and wait a few minutes... dry ply will crack, especially if left out in the sun..

On my first build, I left a sheet out in the sun, not thinking about it, and it curled up big time in less than a hour when the top layer got really dry from the direct sun hitting it.... learned from that, I did.

All of the above solutions are good.... fill it, sand it, then cpes it... good to go for years.

PostPosted: Sun Apr 11, 2010 9:20 am
by S. Heisley
Looking at his pictures, Alfred is keeping his trailer in a garage that is located under the house, kind of like a basement. My guess is that there was enough moisture accumulated in the air of that basement-like area during this winter to cause the weak points in the plywood to loosen. :thinking: CPES and Fillit are brand names for the types of epoxies that he is using.

PostPosted: Sun Apr 11, 2010 10:25 am
by Alfred
S. Heisley wrote:Looking at his pictures, Alfred is keeping his trailer in a garage that is located under the house, kind of like a basement. My guess is that there was enough moisture accumulated in the air of that basement-like area during this winter to cause the weak points in the plywood to loosen. :thinking: CPES and Fillit are brand names for the types of epoxies that he is using.


Hi Sharon,

Those are my thoughts, too. The camper has been kept exclusively in the basement garage, I will bring it out now and then to work on it outside, but it has not been outside over the Winter at all. The garage can get a little damp sometimes, I keep a dehumidifier running most of the time, but I think there was probably still enough moisture down there.

AL in Asheville :thinking:

Coating in epoxy

PostPosted: Sun Apr 11, 2010 10:36 am
by Alfred
doug hodder wrote:Al...how thick is the material and how do you plan on finishing it? If it's going to be painted, you might want to do a coat of a regular epoxy on it with some thickening agent in it to fill any cracks. It builds much quicker than the CPES...Doug


Hey Doug,

Its thin luan, sandwich construction. I have the luan outside, then pink foam insulation then another sheet of luan inside. Plan has been to coat with CPES (Did most of that yesterday), then use Fill-It Epoxy Filler on the screw holes, seams, etc. Then paint the whole thing with the marine aliphatic paint, which I already have.

Miriam mentioned marine epoxy from the hobby shop (?) I have seen the small double-plunger type epoxy cement at hardware stores(?) That I could squirt into the seam/crack.

If I understand you are also recommending using a coating of thicker epoxy - What exactly would I be looking for and where would I find it?

Al in Asheville :roll:

PostPosted: Sun Apr 11, 2010 12:24 pm
by Micro469
Al, if you want a permanent fix... cover it with CPES, then a layer of fiberglass clothe and epoxy........That's what I'm having to do with my woody.... and I used Birch for the roof..... :?

PostPosted: Sun Apr 11, 2010 2:07 pm
by john
I have been battling this same problem on my camper. I used luan also.

My finish is different than yours. I covered my luan with epoxy and only fibered on the joints between sheets and corners. I painted it with silver automotive paint. The problems revealed themselves almost immediately while traveling out west in the dry air. I covered them for the duration of the trip with emergency use aluminum foil tape to keep the rain from damaging the wood further.

After getting home I decided against fixing them with the hope that time would bring out the rest of the problems.

For the most part, the cracking was few and far between. But, there was one sheet on the roof that ...well here is a pic.

Image

I began to fix the issues this spring. I found that under the cracking either a void, or a void that had been filled with a filler that was easily picked out. I filled the resulting holes with epoxy followed by bondo.


Image
Image


Image

I intend to recover the roof with true fiberglass and repainting after all the repairs are completed.

Luan is not the best choice, but it is cheap.

More

PostPosted: Sun Apr 11, 2010 6:09 pm
by Alfred
Hey gang,

Found 3 or 4 more of these cracks this afternoon, a few fair sized ones on the front face of the camper now. Here is a picture of part of one of them, several inches in length.

Image

It seems like they are appearing, or getting worse, after I applied the CPES yesterday(?)

AL in Asheville :thinking: