How long does it take PL Premium to cure?

Posted:
Mon May 03, 2010 9:25 pmby dh
I have the wall frames and skins ready to laminate, would have done it this weekend, but the weather didn't cooperate. But, I did a sample lamination with some scraps, and, well... How long does this stuff have to cure before the weights can come off???
I took a scrap of 3/4" ply, and a scrap of 1/8" Baltic Birch, both about 8" square. I put the PL on the 3/4" and trowled it with a V-notched trowell, laid the 1/8" BB on top, and put a 12" square pave stone on top of it. I let it sit for 13 hours, took the weight off, and to my surprise, they where rather easy to seperate.
How long should I let the walls sit with the weights on them???
Re: How long does it take PL Premium to cure?
Posted:
Mon May 03, 2010 10:19 pmby afreegreek
dh wrote:I have the wall frames and skins ready to laminate, would have done it this weekend, but the weather didn't cooperate. But, I did a sample lamination with some scraps, and, well... How long does this stuff have to cure before the weights can come off???
I took a scrap of 3/4" ply, and a scrap of 1/8" Baltic Birch, both about 8" square. I put the PL on the 3/4" and trowled it with a V-notched trowell, laid the 1/8" BB on top, and put a 12" square pave stone on top of it. I let it sit for 13 hours, took the weight off, and to my surprise, they where rather easy to seperate.
How long should I let the walls sit with the weights on them???
there is no accurate answer. it depends on the temperature and the moisture content of the wood. the latter being the less significant of the two but it's still a factor. it also depends on what you mean by cure. it can take from 12 hours @ 90 degrees to a few days near freezing temps if there will be no stress on the bond once the clamps/weights etc are removed. more if there will be stress. like if it was hung on the ceiling for example, or bent over the roof.. best thing is to do your layup and a sample or two at the same time and use the bond strength of the sample as your indicator..
Posted:
Mon May 03, 2010 10:23 pmby afreegreek
BTW, for all the 'you haven't built a TD' chirpers out there... I use the stuff every day... so save it


Posted:
Mon May 03, 2010 10:23 pmby dh
I didn't think about setting up a few sample boards at the same time.
Good idea

Posted:
Mon May 03, 2010 10:30 pmby afreegreek
dh wrote:I didn't think about setting up a few sample boards at the same time.
Good idea
thanks Bud, but it's not my idea.. it's industry practice for a lot of adhesives.. just passing the lesson on.

Posted:
Mon May 03, 2010 10:44 pmby afreegreek
dh wrote:I didn't think about setting up a few sample boards at the same time.
Good idea
posted some pics on my album for you.. assembled and applied with PL..

Posted:
Mon May 03, 2010 10:51 pmby Miriam C.
If you read the package it will tell you. If I remember it correctly you can take the clamps off after a short time but not put pressure on it for 24 hours.
With PL you also don't want to clamp it too tightly. It is intended to swell..........
Posted:
Mon May 03, 2010 11:21 pmby dh
Miriam C. wrote::o If you read the package it will tell you. If I remember it correctly you can take the clamps off after a short time but not put pressure on it for 24 hours.
With PL you also don't want to clamp it too tightly. It is intended to swell..........
I read the tube, it just said to use mechanical fasteners to hold surfaces together while it cured.
Will 12" square pave stones be too much pressure? I figure around 15 lbs, 144 square inches, .104 PSI clamp force.
Posted:
Tue May 04, 2010 12:16 amby afreegreek
dh wrote:Miriam C. wrote::o If you read the package it will tell you. If I remember it correctly you can take the clamps off after a short time but not put pressure on it for 24 hours.
With PL you also don't want to clamp it too tightly. It is intended to swell..........
I read the tube, it just said to use mechanical fasteners to hold surfaces together while it cured.
Will 12" square pave stones be too much pressure? I figure around 15 lbs, 144 square inches, .104 PSI clamp force.
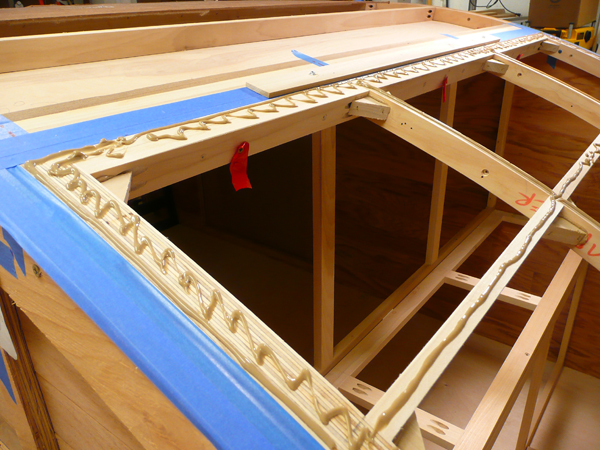
1- if you look at the pics on my album you'll see I assembled those window trim frames with masking tape.. the cord is just to hold the thing together so I could pick it up and move it without breaking or stretching the tape. I had 13 window frames to glue up but if I only had one to do and didn't have to move it off the bench, the tape alone would, does, and has worked fine all by itself. all you need is to hold the parts in place. pressure is not required..
2- running a screw or shooting an air driven nail through the ply applies a hell of a lot more pressure than putting a paver on it.. there's no problem with your method at all.
Posted:
Tue May 04, 2010 4:18 amby Lou Park
afreegreek wrote:
1- if you look at the pics on my album you'll see I assembled those window trim frames with masking tape..
Very nice. I knew I like you from your other post. I looked at your pics and wanted to ask you, which jig saw do you like better?
Lou
Posted:
Tue May 04, 2010 7:58 amby aggie79
I used screws as temporary "clamps" until the PL Premium cured. My plywood and lumber were quite dry so I usually left the screws in place until the following weekend.