Page 1 of 3
Door trim & weather stripping????

Posted:
Wed Jun 08, 2005 11:04 amby The R/C Man
Well since the windows for the doors are on the way I need to start figuring out how to seal the door when it is closed.... Are there special moldings I can use? Can T-aluminum be mounted to the outside edge of the door with a rubber seal on the inside? Pictures and links would be great help.... Thanks!

Posted:
Wed Jun 08, 2005 5:53 pmby WarPony
Hey Greg, I am going through that phase of my trailer now. I used 1/4" thick plywood and made a lip that is about 1" smaller than the door so I can put a seal on that lip and the door will seal against that. I want a clean look to the door but I might use some aluminum angle around the edge, I'm not sure yet.
Posted:
Wed Jun 08, 2005 6:00 pmby Woody
The lip idea works great, I did it on mine. I was worried in the beginning about all the stories I heard from others of water being forced in while driving and camping in bad weather. Has not leaked yet after almost 7000 miles. Of course now that I said that, it will. Seals great and the weather seal is mounted on the face of the lip, which contacts the aluminum trim on the backside of the door when closed.
Posted:
Wed Jun 08, 2005 6:19 pmby The R/C Man
Thanks guys!
I would also like a clean appearance. So maybe recessing the lip that the door seal is attached to might be the way to go. (Routers are a great tool!)
Since my door is the left over from making the door opening (which I assume is the norm) it is a very tight fit (a jigsaw blade width). It is also not perfectly straight. How much space can be left and still get a good seal? Maybe 1/4"? The reason I ask is that I would like to router the door sides flush with the door framing.... Any thoughts?
Do you guys have some pics of the door and seals? I am one of those guys that can build from pictures and don't read the instructions....

Posted:
Wed Jun 08, 2005 6:41 pmby WarPony
Greg, I just put some pics in my album of my
Sooner Schooner door opening.
Posted:
Wed Jun 08, 2005 7:00 pmby The R/C Man
Thanks for the pic!!! Is the lip about an inch wide? Are you are also planning to install an aluminum lip on the door as well?
Posted:
Wed Jun 08, 2005 7:09 pmby WarPony
The lip is about 1" wide. I made it bigger to give me some "fudge" room. I plan on using a 3/4" wide door seal so I can trim off any excess later. The jury is still out on whether or not I'm going to trim out the door and the opening in aluminum yet. Depends on my "craftsmanship". Got some badass storms coming my way right now so I may not have to worry about it.
Posted:
Wed Jun 08, 2005 9:27 pmby exminnesotaboy
WarPony wrote: Got some badass storms coming my way right now so I may not have to worry about it.
We are getting your leftovers right now. Geeeeee, rain isn't supposed to go sideways now, it is?

Posted:
Wed Jun 08, 2005 11:20 pmby Nitetimes
exminnesotaboy wrote:WarPony wrote: Got some badass storms coming my way right now so I may not have to worry about it.
We are getting your leftovers right now. Geeeeee, rain isn't supposed to go sideways now, it is?
I'm not sure where you're at but it certainly does in N.M. aroung the WHITE Sands area. We used to be able to spread our arms out with a poncho an and lay back on it. Was great for short breaks. Problem was that sometimes it stopped suddenly, OUCH!
Posted:
Thu Jun 09, 2005 8:00 amby IraRat
Guys, I'm confused--and that aint good when it comes to doing my doors, which will be coming up shortly. Even the photos didn't help me much.
Greg, when you do yours, could you please take A LOT of photos of this assembly?
Let's see if I have this straight:
I take 3/4 ply (I guess any 3/4 material would be okay), and what I'm doing is creating kind of like an additional framing around the door, installed on the inside of the opening. Pony extended it about an inch into the door opening, but I can probably go a little less.
So now when the door closes, it's going to close flush onto this piece, correct? If I'm right so far, what additional sealing (rubber?) do you use? In that picture, I can't figure out what that stuff is that looks like tape applied to the edge of this additional lip.
Greg, not that this is biblical advice or anything, but the Cubby plans tell you to make the door 1/4" narrower than the opening--all around. I guess this makes sense, because we're talking 1/4" to account for your hinges, and another 1/4" so the thing can actually close.
(Remember those compasses in school that we used to poke kids in the a**es with? That's how we get the true 1/4 all around.)
Anyone--please correct me NOW if I'm wrong here, and stop me before I cut again.[/img]
Posted:
Thu Jun 09, 2005 8:51 amby toypusher
Ira,
Remember that the 1/4" smaller is measured AFTER you have the opening trimmed out completely! Otherwise the trim will take away from the 1/4" and them things might be a little tight!
Kerry
Posted:
Thu Jun 09, 2005 9:22 amby IraRat
toypusher wrote:Ira,
Remember that the 1/4" smaller is measured AFTER you have the opening trimmed out completely! Otherwise the trim will take away from the 1/4" and them things might be a little tight!
Kerry
Thanks, Kerry--and therein lies (lays?) my confusion:
I have no idea what this trim is supposed to look like or how it's installed. In the Cubby plans, it's kind of hard to see exactly what's going on--especially in the black and white printed version of the plans. Plus, those plans don't call for a lip like that anyway.
MAKE SURE YOUR CAMERA IS FULLY CHARGED, GREG! I NEED VISUAL AIDS ON THIS!
Posted:
Thu Jun 09, 2005 9:55 amby madjack
...Ira, when the time comes I will be using 2 pieces of angle on the door jamb, a 1x.25 first, placed to the inside to form the inner lip and a .75x.25 on the outside, this will actually result in a "Z", a piece of trim seal on the inside lip will complete the seal against the door. The door itself will be wrapped with .75x.25 channel, this will result in a flush fit on the door-to -outside wall
madjack

Posted:
Thu Jun 09, 2005 10:15 amby IraRat
madjack wrote:...Ira, when the time comes I will be using 2 pieces of angle on the door jamb, a 1x.25 first, placed to the inside to form the inner lip and a .75x.25 on the outside, this will actually result in a "Z", a piece of trim seal on the inside lip will complete the seal against the door. The door itself will be wrapped with .75x.25 channel, this will result in a flush fit on the door-to -outside wall
madjack
Whilst thou be taking photos of this fair process, Sir Jack? In other words, you're not using a wood lip.
There are sone things I just can't visualize without seeing. It's a right brain/left brain thing.
Posted:
Thu Jun 09, 2005 10:21 amby toypusher
IraRat wrote:toypusher wrote:Ira,
Remember that the 1/4" smaller is measured AFTER you have the opening trimmed out completely! Otherwise the trim will take away from the 1/4" and them things might be a little tight!
Kerry
Thanks, Kerry--and therein lies (lays?) my confusion:
I have no idea what this trim is supposed to look like or how it's installed. In the Cubby plans, it's kind of hard to see exactly what's going on--especially in the black and white printed version of the plans. Plus, those plans don't call for a lip like that anyway.
MAKE SURE YOUR CAMERA IS FULLY CHARGED, GREG! I NEED VISUAL AIDS ON THIS!
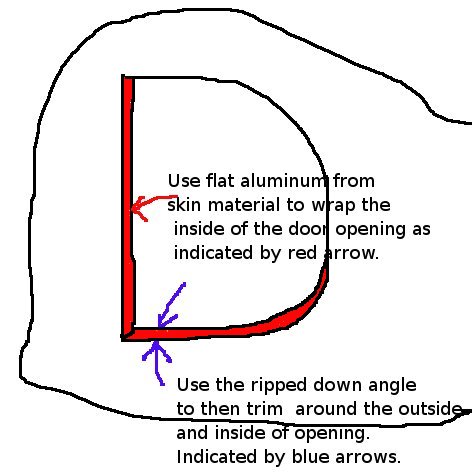
Ira,
On page 38 (in my copy of the plans anyway) there is a picture of the door trim with an explanation of how it is done. What it does not seem to indicate is that you put a piece of aluminum flat on the inside of the opening all the way around and then use 1/2" x 1/2" angle with one side ripped down to 1/4" (the narrow side to the outside and to the inside, depending on which side of the door you are doing) to trim the opening and the outside or inside skins.
Maybe this sketch will help: