Page 1 of 1

New build question

PostPosted: Mon Jun 14, 2010 10:48 am
by Woodbutcher
Image

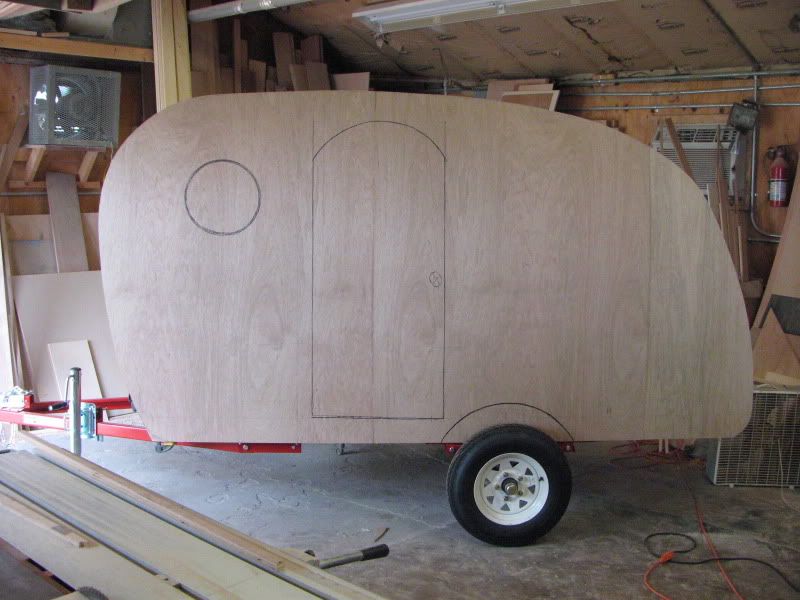
Here is the profile of my new build. I am using a Harbour Freight 4x8 trailer and will be building over the wheels. The hope is to make it 60" wide inside. I am using 2 folding seat mechanisms from a conversion van to allow sitting inside with a drop well for feet. But that makes the OD measurements larger then 60". I know I can find 60" wide aluminum, but will I have trouble getting 72 or so. What are others doing that build over 60"? Or for ease of finding wood (1/8" baltic birch) and aluminum should I keep it under 60" OD width? Any help would be appreciated.

PostPosted: Mon Jun 14, 2010 11:20 am
by len19070
This is how I got 64" wide.

An over the wheel build with no wheel wells inside.

Image

Image

Image

http://s26.photobucket.com/albums/c106/ ... ?start=all

I used an EPDM rubber roof, it comes as wide as you want it.

Happy Trails

Len

Re: New build question

PostPosted: Mon Jun 14, 2010 11:28 am
by danlott
Woodbutcher wrote:Image


I like the profile. Post lots of pictures of your build.

Dan

PostPosted: Mon Jun 14, 2010 12:53 pm
by Woodbutcher
Len, I love your trailer. Very well made and thought out. The EDPM rubber roofing will not help me . I will still need the width for the hatch and the front of the trailer. I was planning on using the standard aluminum sheeting for the whole unit. There is no natural break that I could stop at if I use the rubber on top. I also did not see any levelors on your unit. Do you use them or is it stable enough with just the tongue jack.

Here is what I plan on doing inside. Because the seat units are on legs and only 45" wide they will fit between the wheel wells, so I can build flat to the floor. As it is the whole unit will be about 78"tall . Do you have anything to help you step in?

Image

The 2 seat unit pull toward the center and make a 78" long bed.

Dan....I promise to post lots of Pics. You may get tired of seeing them!

PostPosted: Mon Jun 14, 2010 1:46 pm
by len19070
Yeah, with a White trailer its easy.

Wide aluminum isn't hard to find on line.

RV surplus & salvage http://www.rvsurplus.net/catalog/displa ... uct_id=419 has it and being in Chicago your really not that far way. Shipping.

Locally its a different story.

There are a lot of other businesses that may be local that have sheet aluminum but don't necessarily think of it for RV use.

I have found Sign Company's to be helpful.

Ya really gotta Poke around.

Happy Trails

Len

PostPosted: Mon Jun 14, 2010 2:10 pm
by madjack
2 options...1) buy Xx12' sheets and cut in half, trim to size needed and install, you will end up with a seam...overlap 2"s over a spar and use SS screws every couple of inches or so with a good urethane type sealant...OR...2)find an 18wheeler trailer repair shop, they should have or access to 102-3"wide AL on a roll for roof repair....................
madjack 8)

PostPosted: Mon Jun 14, 2010 7:11 pm
by Woodbutcher
Len , Thanks for the link. I will check out RVsurplus.


Madjack....I had not thought about a seam. Given the size of the trailer I would need 2 seams to go from the front to the hatch. Would it work to put a seam front to back where I can buy 36" wide aluminum?

PostPosted: Tue Jun 15, 2010 9:39 am
by Nobody
I built my TD just as madjack described. I too used 2 seams (side to side) on the top/front. One seam is on the curve at front & the other is just in front of the fantastic vent on top. I made sure to overlap the seams 2" directly on top of a spar, used lotsa top grade (read expensive, this was before I found about sika-flex :R ) sealer/adhesive, pre-drilled & placed stainless screws every 2" thru both layers of aluminum into the spar (after driving each screw, back it out, add a squirt of sealant & re-torque). After nearly 4yrs & 10K plus miles thru every kind of weather (including some hail) we've never had even a drop of water penetrate the joints/seams. Actually I have 3 seams but the one at bottom front where the diamond tread joins the mill finish skin is a 3" overlap with extra sealer & screws into butyl (between the skin & spar). Again, no leaks.

If I were doing it again I'd probably spring for the cost of the 102" width trailer body aluminum, just 'cause devising 'hold-downs' for the pieces, & driving that many screws was a royal PITA :roll:

Image
Image

PostPosted: Tue Jun 15, 2010 1:22 pm
by aggie79
The type of aluminum finish I'm using was only available in 48" widths and my teardrop is 60" wide. So, I'm building mine like Harvey and Madjack said. The sealant/adhesive I'm using is 3M 4200. At $17 per tube it is expensive, but it is rated for marine, below waterline, use.

I have a seam in front and one at the fan like Harvey. Here is the one in the front. (The screws will be replaced with stainless steel screws, and the blue protective film is still on the aluminum but not at the overlap joint.)

Image

When putting in the permanent SS screws, I put some of the 3M 4200 in a syringe and squirted it into the screw hole. In this picture, I'm getting ready to install the teardrop side of the hurricane hinge.

Image

Not shown, but after I filled the screw holes, I placed a large bead of the same sealant along the length of the aluminum before installing the hinge. Here is the finished hinge installation.

Image

It is a lot of extra work like Harvey said so if you can avoid it by finding a wide enough sheet that is the route I would go.

PostPosted: Tue Jun 15, 2010 9:13 pm
by Woodbutcher
Great tips, thanks a lot for the info. I will look hard for some wider the 60' aluminum first. But I know what to do now if I can't find any.