Page 1 of 3

How many ribs in a hatch?

PostPosted: Fri Dec 03, 2010 1:23 pm
by mcspin50
Hi everyone,
Since winter has arrived in Minnesota and I can no longer work on the Lily Pad outside or in the garage, I'm going to start working in the furnace room. I figured I could construct the hatch while I wait for warmer weather.
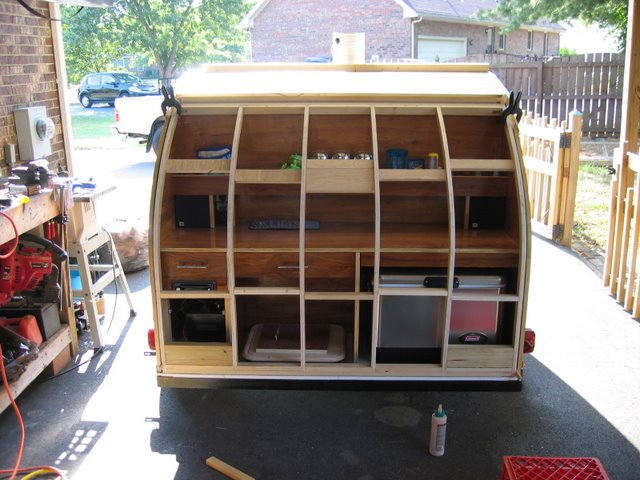
I've noticed two methods of building the framework. Here's one with six vertical ribs and short horizontal braces in between the ribs:
Image

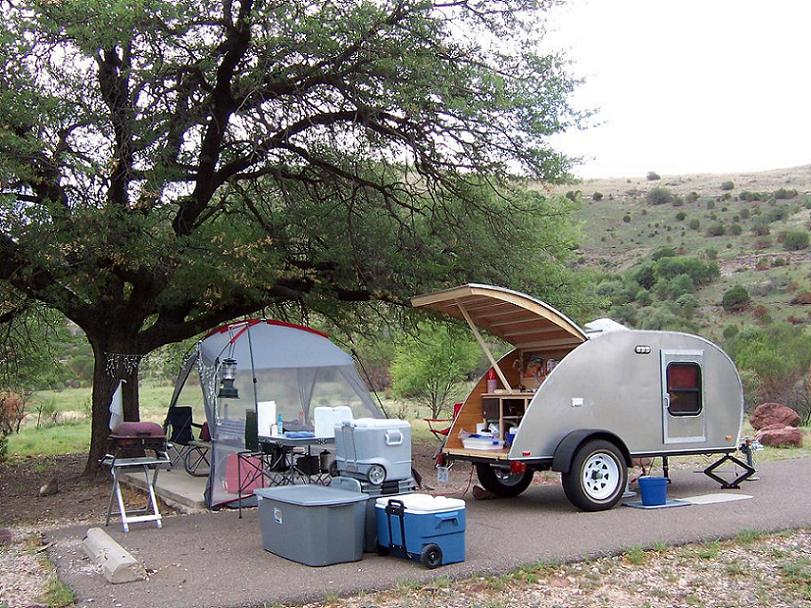
Here's one that has two outside ribs and full width horizontal crosspieces:
Image

This looks like a 4-wide, but I have seen pics of 5-wide hatches built this way.

Keeping in mind my skill with the jigsaw :O, I would MUCH rather cut only TWO curved pieces than SIX. Don't want to burn out the good ol' Craftsman belt sander my husband used in the good ol' days :peace: to make redwood signs. It saved me on the profile and door cuts.

Should I use 3/4" plywood or 1/2" plywood for the ribs? I had a heckuva time cutting the Benroy profile out of 3/4" plywood. I'm assuming it's easier to cut 1/2", so if I cut 4 - 1/2" ribs and glue two together for the outside ribs, then did straight cross braces, would that give me a strong enough hatch? I'll be skinning both sides with 1/8" bending plywood.

Any and all advice gratefully received.

PostPosted: Fri Dec 03, 2010 1:33 pm
by bobhenry
I cut 4 verticals out of 11 7/8 rim board. Think of it as a 1 1/4 thick piece of osb . The vertical runs make it a bit easier to add blocking for tail lights and license plate mounts etc.

Image

Here are just the center two in place. I was toying with a self leveling shelf system in this pic.

~~~~~~~~~~~~~~~~~~~~~~~~~~~~~~~~~~~~~~~~~~~

Image

This is the blocking for the license plate holder and light. It is 3/4 hard rubber sheeting. The same stuff as is on the galley floor.
~~~~~~~~~~~~~~~~~~~~~~~~~~~~~~~~~~~~~~~~

Image

Measures 5 ' 3 " inside to inside.

~~~~~~~~~~~~~~~~~~~~~~~~~~~~~~~~~~~~~~~~~~~~~~~

Image

Just 6 pieces of wood and a lexan skin !

SPRING BACK ??? I don't think so :thumbsup:

PostPosted: Fri Dec 03, 2010 1:36 pm
by absolutsnwbrdr
Mine is similar to the second picture you posted... used 2 curved pieces cut from 3/4" plywood, but only a few pine 1x3's going across.

I did have a tiny bit of "spring-back" immediately after I skinned it with the plywood, but it relaxed after a few days. My next build will probably have another curved rib in middle of the hatch to help prevent any spring-back.

Image

And also, if you look at my hatch, the two straight boards in the middle that are standing on edge provide much more strength than the 2 laying flat. I had to use an additional board standing on edge at the top of the hatch to prevent it from bending out. (hope that makes sense)

PostPosted: Fri Dec 03, 2010 1:42 pm
by absolutsnwbrdr
I can guarantee that my hatch has more flex than the first picture that you posted, but it didn't take as much time or wood to construct. If I were forced (i.e. an accident) to rebuild my hatch, I'd spend a little more time and do it similar to the first picture. I was in somewhat of a hurry to get things done the first time.

But let it be known that I am definitely happy with my hatch as it is! :D

PostPosted: Fri Dec 03, 2010 2:04 pm
by mcspin50
bobhenry wrote:I cut 4 verticals out of 11 7/8 rim board. Think of it as a 1 1/4 thick piece of osb . The vertical runs make it a bit easier to add blocking for tail lights and license plate mounts etc.

Image

SPRING BACK ??? I don't think so :thumbsup:


Wow!!! :shock: Them's some beefy hatch ribs! I think you have access to more power tools than I own. But I think I'm beginning to understand what everyone means when they talk about "spring-back".

Zach, thanks so much for explaining it so well. So, those two sheets of 1/8" bending ply that I would cover the hatch with, although easy to bend, do want to return to a flat state and with less vertical ribs there's less opposing force...hence spring-back. So leaving the underside of the second hatch pictured uncovered means that second sheet of bending ply isn't trying to flatten out...less spring-back.

OK, so maybe I'll just cut FOUR ribs out of 3/4" plywood. :thumbsup: How's that sound?

PostPosted: Fri Dec 03, 2010 2:08 pm
by absolutsnwbrdr
Sounds like you got it! Keep us posted!

PostPosted: Fri Dec 03, 2010 2:13 pm
by mcspin50
bobhenry wrote:I cut 4 verticals out of 11 7/8 rim board. Think of it as a 1 1/4 thick piece of osb . The vertical runs make it a bit easier to add blocking for tail lights and license plate mounts etc.


bobhenry, in Minnesota the state issues a permanent sticker on small trailers, even teardrops, so no need for a license plate holder. My 5x8 NT trailer has the lights mounted on the side, so I only need that hatch to cover the galley...no other purpose. That's why the second method looked so appealing to me. 8)

PostPosted: Fri Dec 03, 2010 2:13 pm
by bobhenry
quote

Wow!!! Them's some beefy hatch ribs! I think you have access to more power tools than I own.


The cuts were made with my little handy dandy ryobi jig saw. Wern't nothin' special. I did clamp them together and sanded them a bit with some 60 grit on a belt sander to knock of the obvious humps and bumps off after cutting them out.

P.S. buy a 6 pack of good agressive wood jig saw blades. It took about 90 minutes to cut these four. [ allowing for beer breaks ]


On a totally different note...... If your tail lights are low do your self a favor and add a 3 light , light bar to the hatch higher up and a 3rd stop light would be a good thing also. You need to be seen. Mine looks like a christmas tree at night and I like it that way. Some fool on your butt in traffic will never see those low tail lights.

Just the dumb ramblings of an electrical nut. :?

PostPosted: Fri Dec 03, 2010 2:38 pm
by aggie79
Lil,

I used a total of six ribs made from 3/4" ply. The ribs are 1 1/2" deep. The outer two are doubled up.

Image

The hatch was assembled in place. I used 1/4" mdf spacers at the sides (for clearance), at the top (for the hurricane hinge), and at the bottom (for weatherstripping).

In the "what would I do differently department", I would:

1. For the outer ribs, I would increase the depth of the outside of the doubled up ribs. At the top and at the bottom, the dimension would be 1 1/2" but would flare out the depth to about 2 1/2" at mid-span. Although I haven't had spring-back issues they way I did it, increasing the depth of the outer rib would help stiffen the hatch. I'd leave the inner of the doubled ribs at 1 1/2" depth to provide a nailer for the inside surface material.

2. Consider the Steve Frederick method of hatch construction. A good example of this is the way Mark (Planovet) did his hatch (http://littleswissteardrop.com/thegalleyhatch.html). I think this method provides a potentially better way to seal against moisture and it incorporates the wider outside ribs in #1 above.

3. Install the inner skin of the hatch first. This will allow you to place blocking for all of your interior hardware - light, speakers, wiring, hatch latch, etc. - and install the hardware easier. The only exception to this is if you are going to have trailer lighting, lift handle, etc. on the outside of the hatch.

I found that the hatch was not the horror part of the build as some have experienced. With your woodworking skills it should be a breeze for you.

Take care, Tom

PostPosted: Fri Dec 03, 2010 2:40 pm
by DogStar
mcspin50 wrote:OK, so maybe I'll just cut FOUR ribs out of 3/4" plywood. :thumbsup: How's that sound?


Sounds like a great, even perfect compromise.

It will work just fine for ya!

Eric

PostPosted: Fri Dec 03, 2010 3:52 pm
by planovet
aggie79 wrote:2. Consider the Steve Frederick method of hatch construction. A good example of this is the way Mark (Planovet) did his hatch (http://littleswissteardrop.com/thegalleyhatch.html). I think this method provides a potentially better way to seal against moisture and it incorporates the wider outside ribs in #1 above.


Thanks Tom.

Steve's way was pretty easy although it looks complicated. Your outside pieces have to be beefy enough to keep the hatch from wanting to un-curve (is that a word? LOL) on you.

PostPosted: Fri Dec 03, 2010 4:03 pm
by mcspin50
bobhenry wrote:The cuts were made with my little handy dandy ryobi jig saw. Wern't nothin' special. I did clamp them together and sanded them a bit with some 60 grit on a belt sander to knock of the obvious humps and bumps off after cutting them out.

P.S. buy a 6 pack of good agressive wood jig saw blades. It took about 90 minutes to cut these four. [ allowing for beer breaks ]


Yeah, I think I just need to get over my FOJ (Fear of Jigsaw) Syndrome. I ordered a rebuilt Bosch 1587 off of Amazon. The Skil one I have just didn't seem to be very stable and wandered all over. Maybe I just need to slow down since you said it took you 90 minutes to cut the four ribs. Personally, I'd usually have wine breaks, but this time of year some egg nog with a little of this...
Image
would be nice...but only after I was done cuttin' and swearin' and sandin'. :lol:

bobhenry wrote:On a totally different note...... If your tail lights are low do your self a favor and add a 3 light , light bar to the hatch higher up and a 3rd stop light would be a good thing also. You need to be seen. Mine looks like a christmas tree at night and I like it that way. Some fool on your butt in traffic will never see those low tail lights.

Just the dumb ramblings of an electrical nut.
:?


Oh no, bobhenry, now you've discovered my FOW Syndrome...(Fear of Wiring). I was hoping to avoid messing with the trailer wiring and just tackle the teardrop wiring, but the 3rd brake light is something I need to seriously take a look at doing. Will go over to the Electrical Secrets forum and ask about it...when I get to it. Thanks for all your help and advice.

PostPosted: Fri Dec 03, 2010 4:34 pm
by mcspin50
aggie79 wrote:
In the "what would I do differently department", I would:

1. For the outer ribs, I would increase the depth of the outside of the doubled up ribs. At the top and at the bottom, the dimension would be 1 1/2" but would flare out the depth to about 2 1/2" at mid-span. Although I haven't had spring-back issues they way I did it, increasing the depth of the outer rib would help stiffen the hatch. I'd leave the inner of the doubled ribs at 1 1/2" depth to provide a nailer for the inside surface material.

2. Consider the Steve Frederick method of hatch construction. A good example of this is the way Mark (Planovet) did his hatch (http://littleswissteardrop.com/thegalleyhatch.html). I think this method provides a potentially better way to seal against moisture and it incorporates the wider outside ribs in #1 above.


The outside wider rib makes good sense re: hatch stiffness. Will have to be sure to adjust the depth of the counter so it doesn't interfere with the wider rib.

And Mark, I looked at your process of creating your hatch. :bowdown:
I'm going to have to look it over a number of times to take it all in. You did an amazing job!

OK, it looks like I'm back to 6 hatch ribs :cry: - 4 of them 1.5" deep and 2 of them 1.5" to 2.5" to 1.5" deep. And here I thought I could get off easy. :lol: But I'll have a good, strong hatch. :thumbsup:

PostPosted: Fri Dec 03, 2010 4:39 pm
by Steve_Cox
Lil,

Ya got good taste in rum.... 8)


Image

PostPosted: Fri Dec 03, 2010 4:47 pm
by planovet
Steve_Cox wrote:Lil,

Ya got good taste in rum.... 8)


I concur! :thumbsup: