Page 1 of 1
Interior wall sandwich question

Posted:
Wed Apr 06, 2011 11:20 pmby Burro
I am wondering how others have cut out the interior wall ply. I have my 3/4 ply screwed to the frame and a few roof spars in place. I am putting insulation against the 3/4 ply and attaching luan plywood to the insulation. I have 2 questions. Can I just glue the ply to the foam insulation? More importantly how did others figure out how to cut out the shape of the interior wall ply wood, to take into account the roof spars? Just wondering how others have done it.
Posted:
Thu Apr 07, 2011 6:50 amby Loader
I cut both interior and exterior walls at the same time (carefully stack them so they are at the proper orientation for installation), that way they are the same shape, and door openings line up perfectly.
After I mounted my exterior walls and temp install a couple spars, I trim the interior wall as required. In some cases, big cuts (to go around bulkheads) are required. For the spar placement, I just trim the notches out for them. After th enotches are cut for the couple of spars I installed, the remaining spars are installed over the interior skin, - no nothces needed.
Not sure if it is the best way or the right way, but it is my way! Opinions may vary.
Perhaps in your case, since the outer wall is cut and the inner wall is not, you can clamp the inner wall to the outside of the outer wall (mind the orientation) then trace and cut.
Good luck in your build.
walls
Posted:
Thu Apr 07, 2011 9:34 pmby 3822sean
hello i use poster board 22x28 taped together real good and make a full size pattern works good just start in one corner and start taping them together does not matter how much you over lap kinda like doing a tile job,, hope i explained that right good luck

Posted:
Fri Apr 08, 2011 7:33 amby GPW
If you glue up your complete wall panels (inside and out ) Prior to assembly , and cut the slots for the cross spars ... Then assembly is easier and less time consuming than cutting interior patterns (ask me how I know

)
Gluing plywood to foam works ... might take a while to dry unless you use Gorilla Glue , or a foam safe contact cement ...
Posted:
Fri Apr 08, 2011 3:49 pmby asianflava
I used 5x5 shets of baltic birch. I cut my interior walls on 2 sides of the sheet keeping the factory edge on the sidewalls. That way I knew all the walls were the same width with parallel sides. If the cut wasn't square to the guide edge, it was obvious.
What I didn't realize was that the 5x5 sheet wasn't exactly 5ft. Mine were 1/8 wider. It didn't really make a difference until I ordered my hatch hinge.
Posted:
Sat Apr 09, 2011 8:27 amby OuttaHand
You can check my online build log here:
http://webpages.charter.net/outtahand/littletow/index.htm
I did not try to cut the spars into the interior wall. I used a Kreg Jig to make pocket holes in the sprs and then glued/screwed them directly to the side walls.
After the spars were up in place, I had spars on the top side with some support pieces that I had cut and glued/screwed to the side walls with about 3/8" between the two.
Then I used a large roll of paper to make a template of the interior wall plywood. I taped it up inside to get it just right, then taped it to the sheet of plywood to mark the wood.
I slid the now-cut side wall plywood in between the roof spars and glued/screwed it into place.
Once the side wall plywood was in place, I slid the ceiling pieces in between the roof spars and the side wall ply. Once they were in the right place, they were glued/screwed up to the spars.
I had a small gap between the sidewall and the ceiling ply but that was easily hidden by some quarter-round trim.
All of this is photographed and explained on my site. Take a look at the link above.
Posted:
Tue Jun 07, 2011 11:26 amby rowerwet
I built the walls inside out, the first wall up was the inside wall with the framing, the spars were glued in afterwards, I trust the PL premium over screws for strength. If I had thought ahead I would have made a frame on the inside of the inner wall at the joint to the roof and notched it for the spars, I had to make this after the roof was on which wasn't as easy. the only screws left in my TD after the glue dried are the ones tieing the walls to the deck
Posted:
Tue Jun 07, 2011 2:50 pmby planovet
I made my exterior sides, then the interior framework and then glued the interior sides to the framework. I used a router to clean up the edges.
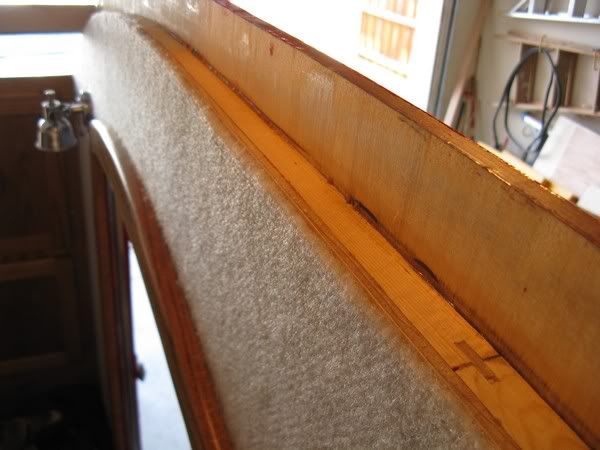
I made a "ledge" to put my spars on so I did not have to worry about cutting slots.
Posted:
Tue Jun 07, 2011 6:21 pmby dh
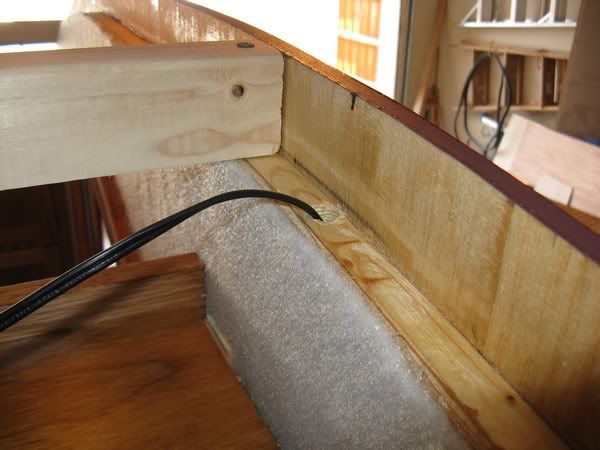
I cut my frame out of 4x10x3/4" CDX (5'x9' TD) then glued 2 sheets of 5x5 Baltic Birtch for the outside skin, trimmed with router, flipped over, glued in insulation, ran wires in the wall, glued on two more sheet of Baltic Birtch, and trimmed with router.
Posted:
Fri Jun 10, 2011 10:58 amby TwilightLane
What GPW said: I built & assembled my walls: exterior, then insulation, then interior 5mm ply in one complete sandwich. Only then did I attach to the trailer. I think you might be making your assembly more difficult than it need be to do it all in-place on the trailer.
Also, like planovet, I made a ledge at the top of the wall. I used that ledge to drape the internal ceiling ply. Only then did I add the spars - they were one of the last things I added. I had some shelving and cabinetry to help hold walls vertical.
Check out my build thread for details. Page 11 and page 14 or so. Good luck!!
Posted:
Fri Jun 10, 2011 12:00 pmby planovet
TwilightLane wrote:Also, like planovet, I made a ledge at the top of the wall. I used that ledge to drape the internal ceiling ply. Only then did I add the spars - they were one of the last things I added.
Same here. The spar in the picture was just a temporary one. Resting the ceiling ply on the ledge and then putting in the spars was very easy.