Page 1 of 2

TearDrop Repair - and what not to do...

PostPosted: Sun Jun 19, 2011 4:28 pm
by crazycyclist
I built my teardrop using a framing method so that I could put 3/4" insulation in the walls. The mistake that I made was to use pine for the frame. Once you drop pine down to 3/4 inch widths it tends to warp. This caused my sides to not be straight. Then when I pulled them in to attach them to the wall separating the galley from the cabin over time I developed hairline cracks in the sides. As soon as we discovered the problem we sealed the cracks but by then it was too late and the plywood under the epoxy had already de-laminated.

So for the advice:

If you are building a teardrop and want a frame for insulation use a wood that won't warp for your frame - or maybe even 3/4" birch plywood. OR don't worry about the insulation and just use the 3/4" plywood that Halfdome Danny has perfected.

Also, epoxy and topside marine paint is A LOT of work. Aluminum is MUCH easier.

OK, Now for the question.

I've opened up the affected area and removed the plywood that has come apart and I've sanded down the side of the TD. The plan is to cover the side with aluminum. I'm actually looking for a anodized or painted aluminum sheet sheet so I can still have color. I really like the blue... but that's another topic.

The question is, what is the best way to patch the problem area? I'm considering two options. 1) Completely cutting out the problem wood back to the next studs (marked by the arrow lines in the picture below) and putting in a new piece of plywood or 2) using bondo to cover the area before applying the aluminum sheet over top. The bondo concerns me for two reasons that I can think of - first it's a biger area and will be a bit deep as well as there is not much for it to fix to as you can see there are some places I'm all the way down to the insulation and secondly, I don't want to introduce moisture, although the bondo will set.

Maybe there are other ideas as well. Thanks.
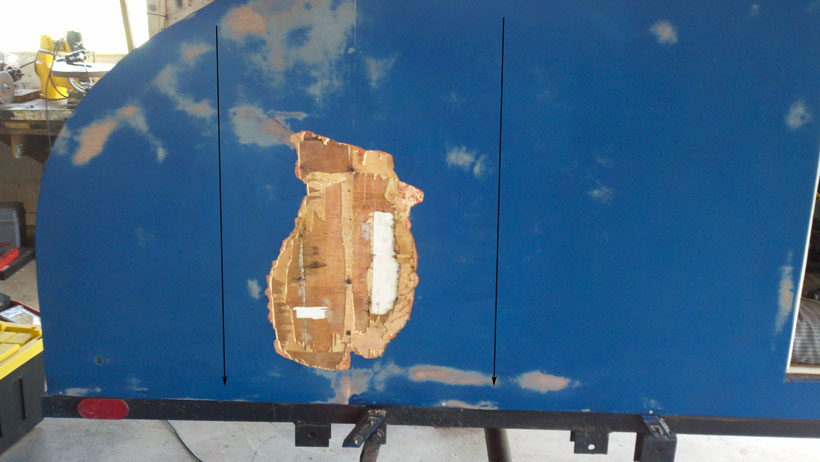
Image

PostPosted: Sun Jun 19, 2011 4:40 pm
by glenpinpat
I would cut it out and then add some cross members for added strength. easiest and quickest way. Bondo might not be solid enough and your aluminum might bend into hole.

PostPosted: Sun Jun 19, 2011 4:43 pm
by glenpinpat
i used aluminum that was colored both sides(white), it was the same price for colored 1 side or both. If you really like color you could have it vinyl over it once you cut out the door holes but before trim.

Re: TearDrop Repair - and what not to do...

PostPosted: Sun Jun 19, 2011 5:19 pm
by Larry C
crazycyclist wrote:I built my teardrop using a framing method so that I could put 3/4" insulation in the walls. The mistake that I made was to use pine for the frame. Once you drop pine down to 3/4 inch widths it tends to warp. This caused my sides to not be straight. Then when I pulled them in to attach them to the wall separating the galley from the cabin over time I developed hairline cracks in the sides. As soon as we discovered the problem we sealed the cracks but by then it was too late and the plywood under the epoxy had already de-laminated.

So for the advice:

If you are building a teardrop and want a frame for insulation use a wood that won't warp for your frame - or maybe even 3/4" birch plywood. OR don't worry about the insulation and just use the 3/4" plywood that Halfdome Danny has perfected.

Also, epoxy and topside marine paint is A LOT of work. Aluminum is MUCH easier.

OK, Now for the question.

I've opened up the affected area and removed the plywood that has come apart and I've sanded down the side of the TD. The plan is to cover the side with aluminum. I'm actually looking for a anodized or painted aluminum sheet sheet so I can still have color. I really like the blue... but that's another topic.

The question is, what is the best way to patch the problem area? I'm considering two options. 1) Completely cutting out the problem wood back to the next studs (marked by the arrow lines in the picture below) and putting in a new piece of plywood or 2) using bondo to cover the area before applying the aluminum sheet over top. The bondo concerns me for two reasons that I can think of - first it's a biger area and will be a bit deep as well as there is not much for it to fix to as you can see there are some places I'm all the way down to the insulation and secondly, I don't want to introduce moisture, although the bondo will set.

Maybe there are other ideas as well. Thanks.

Image


Thanks for sharing your problem so the rest of the community can benefit.

I guess I don't understand why the plywood lamination failed. Did water enter the edges? How did you initially seal the plywood, was it just paint? What did you use for plywood, Big Box crap or good quality exterior ply?

As far as the repair, I would make a frame of 1x2's and screw it to the outside of the damaged area, and use this as a router template to cut out the bad spot to the depth needed without cutting into the inner skin. Epoxy in a replacement piece, and proceed with your aluminum skinning.

Larry C

repairs

PostPosted: Sun Jun 19, 2011 5:30 pm
by tonyg
I can't believe that the ply wood would de-laminate like that. Can't you get exterior grade plywood with C-D grade face plies? I would start again using a decent 3/4" ply and make cutouts for the insulation. Then you could paint the ply with a bitumen paint (cheap) and cover with aluminum. The interior can also be lined with a face ply used in RV's.
good luck

PostPosted: Sun Jun 19, 2011 5:43 pm
by Mikka
3/4 pine would not have enough twistind strenght to delaminate plywood. actually, pine is one of the most stable wood. That is why you see so much furniture made of pine. Balsam/spruce a different story for stability, but still hard for me to believe that it would force delamination of ply,. :?

PostPosted: Sun Jun 19, 2011 5:46 pm
by crazycyclist
The warping didn't for the delamination. The warping against the pressure of the pulling against the warp caused cracks that then allowed moisture to get in which caused the delamination.

I didn't use exterior grade which was probably another mistake, but even with exterior grade I would have had problems - they would have just taken longer to show up.

Re: TearDrop Repair - and what not to do...

PostPosted: Sun Jun 19, 2011 5:51 pm
by crazycyclist
Larry C wrote: I guess I don't understand why the plywood lamination failed. Did water enter the edges? How did you initially seal the plywood, was it just paint?
Larry C


4 layers of epoxy. 2 layers of primer. 3 layers for paint. Lots of sanding. :?

PostPosted: Sun Jun 19, 2011 7:01 pm
by ssrjim
My sheets came prepainted and I think blues was one of the colors. I got it from a sign shop.

PostPosted: Sun Jun 19, 2011 7:06 pm
by ssrjim

Re: TearDrop Repair - and what not to do...

PostPosted: Sun Jun 19, 2011 7:56 pm
by KenC
crazycyclist wrote:
Larry C wrote: I guess I don't understand why the plywood lamination failed. Did water enter the edges? How did you initially seal the plywood, was it just paint?
Larry C


4 layers of epoxy. 2 layers of primer. 3 layers for paint. Lots of sanding. :?


Wow, thats a bummer all the work and then that happens, now I'm paranoid. My build is using exactly the same process, except I used exterior grade ply. I better keep a close eye on my walls for failure, I knew I should of skinned it with aluminum.

How long has is been since your build was complete and when did you first notice it, do you keep the TD in a garage, or covered or is it exposed to the elements ???

PostPosted: Sun Jun 19, 2011 8:21 pm
by PhotoGuy
I don't have any advice, But thanks for the tip on the pine studs. That is what I was going to use. what should I use instead of pine.

PostPosted: Sun Jun 19, 2011 8:33 pm
by crazycyclist
I would skip the studs and just use 3/4" plywood with plenty of insulation in the roof. Check out Halfdome Danny's work:

http://tnttt.com/album_ ... er_id=1429

PostPosted: Sun Jun 19, 2011 9:14 pm
by PhotoGuy
crazycyclist wrote:I would skip the studs and just use 3/4" plywood with plenty of insulation in the roof. Check out Halfdome Danny's work:

http://tnttt.com/album_ ... er_id=1429


I plan on doing a lot of early spring and late fall camping / out working in the woods. And I can expect to have snow on the ground any morning. With just having 3/4 walls, would that be warm enough?

PostPosted: Sun Jun 19, 2011 9:46 pm
by Deryk the Pirate
Wow, all this happened in 2 years? I cant believe it twisted enough to put cracks through the finish. What thickness plywood did you use?