Router masters???

Anything to do with mechanical, construction etc

Router masters???

Postby Guy » Wed Aug 03, 2005 10:36 am

A question for all you router men and women.

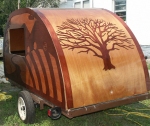
What type of bushings are available for pattern bits? As you can tell from my question I am seeking to determine which pattern will be best for duplication of all the elements of my avatar. The outside is three radii from the golden section of the largest which is 97".

What are the sizes of the available bushings? Any recommended places to buy from?
Regards,

Guy
Keep on living, laughing, learning and loving.
Image
User avatar
Guy
1000 Club
1000 Club
 
Posts: 1521
Images: 44
Joined: Thu Nov 25, 2004 5:53 pm

Postby Guest » Wed Aug 03, 2005 10:58 am

Guy,
I haven't bought my pattern bits yet, but I've been looking at them and I'm leaning towards going with a top bearing and upwards spiral bit.
I've got a full size template that I'll be stacking on top of the substrate to be cut.
The "Router Master" out at Almquist Lumber advised me of staying away from the straight-on cut pattern bits, says they get quite grabby...
(I'm still workig on the Brinks armoured frame...)

BTW-There's some interest about doing Redwoods Revisted '05 like in September. The full moon is on Sunday the 18th. :o
Think you might be up for that? (I've got a couple of "soft-siders")
Guest
 

Postby Steve Frederick » Wed Aug 03, 2005 11:04 am

I have a kit from MLCS
As you know, I use a router for everything. These are nice quality, and come in a nice case.
Image
For pattern cutting you could also use a flush-bearing spiral cutter from the same folks.
I just use the 1/4" spiral bit with a 3/8" bushing, just make the pattern 1/8" smaller than the final piece.
Blessings, Steve
Adirondacks, Upstate New York
Building Journals
The Shop Manual's 8-years old!! Thank's everyone!
New! 'Rondack Lodge Plans!Order Here!
Image
User avatar
Steve Frederick
Custom Teardrop Builder
 
Posts: 1984
Images: 29
Joined: Thu Apr 15, 2004 5:02 pm
Location: Upstate New York, Adirondacks (Great Sacandaga Lake)
Top

Postby randy chesnutt » Wed Aug 03, 2005 11:39 am

what would be very helpful would be a router table. they are easy to build. it makes routing alot easier, especially if you use jigs. steve has the right tools to do the job. have fun and enjoy all you can do with a router
User avatar
randy chesnutt
Teardrop Master
 
Posts: 144
Images: 65
Joined: Mon Jun 27, 2005 9:52 pm
Location: Humble,tx
Top

Postby Guest » Wed Aug 03, 2005 12:15 pm

Steve,
That bushing set looks like a good way to go on the door cutouts.
Didn't I read somewhere that you used a roto-zip for the doors?
Guest
 
Top

A router table used as a joiner

Postby Guy » Wed Aug 03, 2005 2:53 pm

Dear router masters,

While looking around to learn more I came upon this webpage.

It is using a router table as a joiner.

http://www.woodshopdemos.com/rtrplnr.htm
Regards,

Guy
Keep on living, laughing, learning and loving.
Image
User avatar
Guy
1000 Club
1000 Club
 
Posts: 1521
Images: 44
Joined: Thu Nov 25, 2004 5:53 pm
Top

Postby Denny Unfried » Wed Aug 03, 2005 6:40 pm

I use the same bushing set that Steve Frederick shows in his post. Harbor Freight has a brass set with a good price. I chose not to use the bit with the top bearing because you have to take the full depth cut in one pass. Instead used the bushings against the 1/4" template and made three passes through the 3/4" birch. Easier on the router, cutter and my nerves. :D

Denny
aka - "Uncle Denny"
<img src="http://www.uncledennyscorner.com/teardrop/photos/Linux.gif">
User avatar
Denny Unfried
sprint car builder/racer & all that jazz
 
Posts: 411
Joined: Mon Jun 21, 2004 8:54 am
Location: So Bay, CA
Top

Postby Steve Frederick » Wed Aug 03, 2005 7:59 pm

Dean in Eureka, CA wrote:Steve,
That bushing set looks like a good way to go on the door cutouts.
Didn't I read somewhere that you used a roto-zip for the doors?


Dean,
I cut the doors out with my cordless circ-saw, round corners with the jigsaw. I used the rotozip bit in a special chuck, to cut the frames to size and make the ledge for the headliner/roof. I used the bushing/pattern method.
Blessings, Steve
Adirondacks, Upstate New York
Building Journals
The Shop Manual's 8-years old!! Thank's everyone!
New! 'Rondack Lodge Plans!Order Here!
Image
User avatar
Steve Frederick
Custom Teardrop Builder
 
Posts: 1984
Images: 29
Joined: Thu Apr 15, 2004 5:02 pm
Location: Upstate New York, Adirondacks (Great Sacandaga Lake)
Top

Postby doug hodder » Wed Aug 03, 2005 9:06 pm

Guy if you are using the router to match the exterior profile, I would recommend cutting one side first with the scroll/jig saw, sand it to the lines you want, then drop it on top of the other sheet, clamp them together and rout for a dead on match...To me this just seems easier than making a template and then routing as making the template is going to be just as much work as doing the job in the first place....Besides, if you are trying to rout both pieces at the same time, it might be tough as typically you shouldn't try to rout any deeper than the width of the cutting bit...I do, but I have also broken bits...I routed mine out with a 1/2" pattern bit, 1/2" arbor and a bottom bearing, straight cut bit..1/2 inch shank lets you cut thicker material with less danger of breaking a bit shank...Spirals give a lot better surface and remove the material well, but in plywood this worked great...I would recommend upcut spirals on aluminum however...I also used a jig saw on the door cutouts...a router will leave at least a 1/4" kerf...don't know if you want that much on a woody, just depends on how you want to weather seal it...I only had the kerf width of a jig saw blade......Just my thoughts and process...Doug
doug hodder
*Snoop Dougie Doug
 
Posts: 12625
Images: 562
Joined: Tue Dec 14, 2004 11:20 pm
Top

thanks Doug

Postby Guy » Wed Aug 03, 2005 9:59 pm

Thank you Doug. You made me reflect on the process. Iwas still thinking I was making the templates for teardrops4vets, but since I am on the east coast that may not be the best way to go about it.

Maybe the jig saw first cut is the way to go. A radius jig would still work for a jig saw. (remember my entire tear is based on the golden section.) The entire outline is actually three radii and not an ellipse or other curve.

Also the door section on mine is a completely different structure from the rest of the tear. The sections to the left and right of the door are 5'x5'x1/2" baltic birch. The bottom and the verticals "woodie trim" are actually 1 1/2 inch stock Dadoed with the the baltic birch set into the dado. the curved trim is 1/2" plywood biscuit joined to the horizontal and vertical "trim".

Insulation is double foil bubble insulation covered with fabric, just like upholstered walls. Dave Nathanson and I had been looking into the foil insulation and we both are pretty sold on it. The real clincher came at the Mystic Gathering a few weeks ago. A Tearjerkers members, Too Tall Mike, had his tear insulated with just one bubble layer (he works for a company that makes the stuff). The interior temperature of his tear was the lowest by a wide margin IMHO. Furthermore, this type of structure is simpler to build and lighter and gives a great degree of sound insulation as an additional benefit.
Last edited by Guy on Wed Aug 03, 2005 10:35 pm, edited 1 time in total.
Regards,

Guy
Keep on living, laughing, learning and loving.
Image
User avatar
Guy
1000 Club
1000 Club
 
Posts: 1521
Images: 44
Joined: Thu Nov 25, 2004 5:53 pm
Top

Postby asianflava » Wed Aug 03, 2005 10:14 pm

I am by no means a router guru, this was the first project where I used a router to any extent. (all I used prior was a laminate trimmer) I cut as close to the line with a jigsaw then cut the profile to the pattern with a top bearing bit.

One thing I regret was using a relatively thin pattern 1/4in. If I had any upward movement, (it was thin so it would flex) the bit would come off the pattern.
User avatar
asianflava
8000 Club
8000 Club
 
Posts: 8412
Images: 45
Joined: Mon Aug 02, 2004 5:11 am
Location: CO, Longmont
Top

Postby doug hodder » Wed Aug 03, 2005 10:56 pm

Asianflavia...good point, if you are making a template of this size in something like masonite, make sure it is secured to the material with some screws and not just weights....obviously any upward movement allowing the router to slip above the template is going to be a problem as well as flex in the material...for me, I prefer cheap 1/4 inch ply as it is more rigid than masonite, and when it is all over, I can use it on other projects easier than the masonite material...Everyone is going to figure out the best way for them to achieve what they want...I just try to keep it simple and I was only doing a one shot trailer...the next one will have it's own profile, different than this one and I will probably do it the same way....and a PS for those learning to use a router....I own 4 and have a ton of bits and it is amazing what they can do...I really believe that they are one of the woodworkers most valuable tools....IMHO :roll: .Doug
doug hodder
*Snoop Dougie Doug
 
Posts: 12625
Images: 562
Joined: Tue Dec 14, 2004 11:20 pm
Top

Postby lmh222 » Thu Aug 04, 2005 12:59 pm

I actually bought a router just for this project - never touched one before. I didn't use a pattern - I just traced a pencil line and sort of improvised. This definitely would not work for perfectly straight lines but I'm pretty happy with the results on these "murals". Two of the hay bales broke off while I was cutting them so I'm planning to add a seperate spiral and just glue it in to the middle. I got the hang of it by the third bale(center to edge rather than edge to center). I just used a straight 1/8" for the whole thing. That is 1/8" Okoume plywood. It needs more poly - that was just the first coat on the new trim.

Image


Image

I have had a ton of fun with this project so far - I think that I'm in love with my router. It is actually kind of addictive. I have huge plans for the other side of the TD too - the door will be styled like an antique radio. (you know, with those curvy lines). I'm even thinking about gluing plywood to the new aluminum front door on my house and doing some kind of elaborate pattern there. Ahh, the possibilities are endless! I can't wait to learn more and try out new techniques.

Lindsey :)
The difference between being involved and being commited is like eggs and bacon - the chicken was involved but the pig was commited.

http://www.teardrop.myphotoalbum.com
User avatar
lmh222
Teardrop Advisor
 
Posts: 67
Images: 8
Joined: Wed Apr 06, 2005 1:25 pm
Location: Vermont
Top

Postby Guest » Thu Aug 04, 2005 1:07 pm

Lindsey,
Your hatch is stunning!!!
Looks like the router and you have many new creations ahead of you!!!
:thumbsup: :thumbsup: :thumbsup:
Guest
 
Top

Great work, Lindsay

Postby Guy » Thu Aug 04, 2005 3:14 pm

Beatuiful job Lindsey.

I have been planning an eagle on the front of my tear above the tongue box line. I have been very frightened even considering it but you have given a great deal of comfort to me knowing someone has actually executed such an idea. Thank you very much.
Regards,

Guy
Keep on living, laughing, learning and loving.
Image
User avatar
Guy
1000 Club
1000 Club
 
Posts: 1521
Images: 44
Joined: Thu Nov 25, 2004 5:53 pm
Top

Next

Return to Teardrop Construction Tips & Techniques

Who is online

Users browsing this forum: No registered users and 4 guests