Page 1 of 1

Attaching the alum siding at the edge of the notch

PostPosted: Fri Jul 08, 2011 9:57 pm
by Glenn Quarles
Friends, I understand using the edge trim that covers the joint between the sides and roof, but how do you attach the free floating alum siding along the notch for the hatch? I have been looking for pictures to answer my own question, but haven't found one yet.

Thanks!
Glenn

PostPosted: Fri Jul 08, 2011 10:18 pm
by aggie79
Glenn,

My sidewall aluminum is glued at the edge of the profile and at openings, and is captured by trim.

On the galley portion of the sidewalls, I used wall cap molding. It is mostly a flat with a short return "L". This is the same trim that is used around doors and door openings.

Image

Image

The pictures aren't that good but hopefully you can get an idea of what I did.

Take care,
Tom

PostPosted: Fri Jul 08, 2011 10:31 pm
by Glenn Quarles
Tom, thanks for getting back to me so quick. It is funny, I was just on
p 10 of your build looking for pictures like this! I really like the way you did everything!

Glenn

PostPosted: Sat Jul 09, 2011 7:44 am
by aggie79
Glenn, you're welcome.

I don't believe I have any original ideas in my teardrop construction. I've just borrowed methods from everyone before me.

Take care,
Tom

PostPosted: Sat Jul 09, 2011 12:15 pm
by Glenn Quarles
Tom (or others), can you show a picture of how you seal the hatch? Do you have any kind of trim on the hatch that overlaps the side when it is down? Does this trim you used to hold the siding on at the notch get in the way of the seal?

Glenn

PostPosted: Sun Jul 10, 2011 10:52 am
by aggie79
Glenn,

Regarding the hatch trim, I used the wide lip RV roof edge molding from Grant Whipp of Lil Bear Teardrops. I also used this trim along my roof and along the the bottom of the sidewalls.

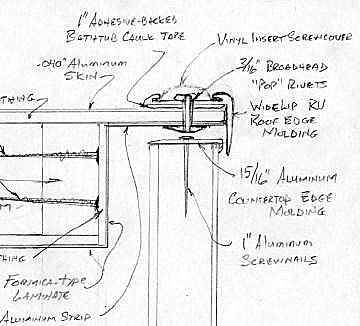
Here is a detail that Grant drew on how to install the trim.

Image

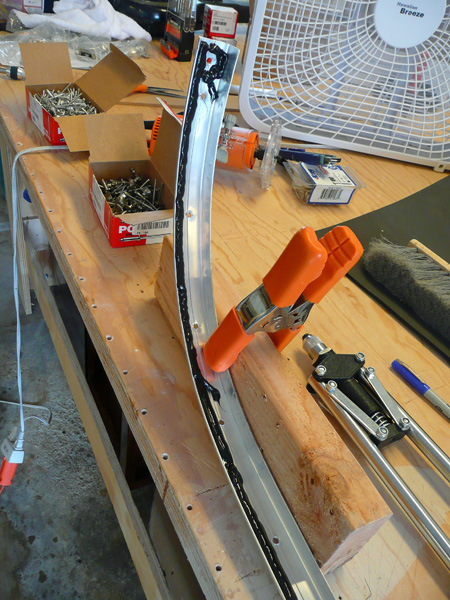
Depending upon the profile of your hatch, you will probably want to "pre-bend" the trim before installing it, especially if you use the wide lip profile. I formed the trim against a piece of scrap MDF cut to the profile of the hatch.

Once the trim is formed, hold or clamp it into place to drill holes for fasteners. I used wide head stainless steel rivets. Other use sex bolts and screws also known as barrel bolts and Chicago nuts. I added a strip of aluminum to the underside of the hatch. If you go this route, you'll need to pre-drill it too. (I glued the underside aluminum in place with 3M 4200 prior to drilling.)

There actually is a lip on both sides of the trim. (The bottom of the extrusion is not flat.) I hot-glued washers to some of the fastener holes are to keep the trim from "rolling" as I installed the rivets.

This is a picture of the hatch aluminum with holes drilled and washers glued in place just prior to installing the trim.

Image

I then added sealant to the trim. You can see that the trim was pre-bent before installing.

Image

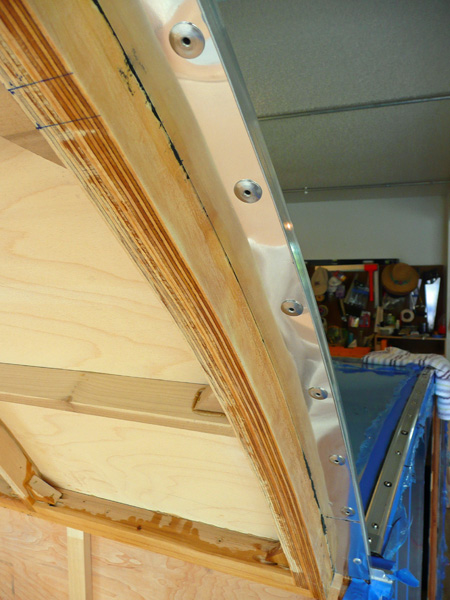
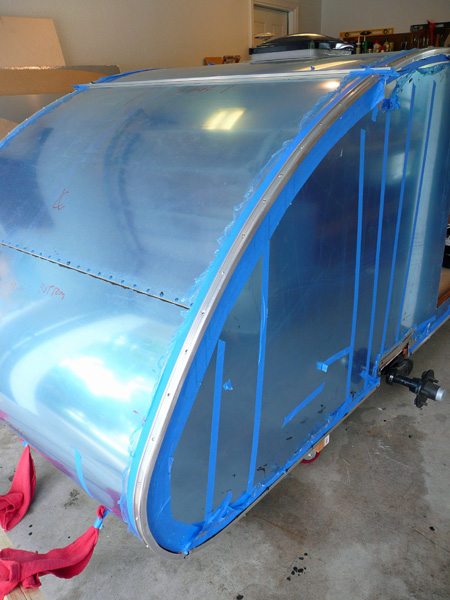
These are pictures of the trim installed. The first is the underside with exposed rivet heads. The second is with the trim installed and hatch closed.

Image

Image

The only thing I might add is that I could not find wide head rivets in aluminum so I purchased stainless steel. When I tested the SS rivets on scrap, I found out that a standard rivet tool, at least for me, did not have enought leverage. I had to purchase a long-handle rivet tool.

I hope this helps.

Take care,
Tom

PostPosted: Sun Jul 10, 2011 10:03 pm
by Glenn Quarles
Tom, that is awesome...exactly what I was looking for!!!

Thanks, you have have been a great help so far!

Glenn